Saturday, April 19, 2025
Home Blog Page 10

Size selective DNA precipitation-PDF

Curators

Kersten S. Rabe

Anyone should feel free to add themselves as a curator for this consensus protocol. You do not need to be a curator in order to contribute. The OpenWetWare community is currently discussing the idea of protocol curators. Please contribute.

Abstract

A very fast and easy method for the size-selective removal of smaller DNA from larger fragments. By adjusting the PEG concentration the range of precipitated DNA fragments can be adjusted.

Materials

Reagents

  • DNA to be separated (e.g. PCR reaction mixture)
  • 30% (w/v) PEG 8000/30 mM MgCl2 (concentration of PEG 8000 can be varied to shift the size of the percipitated DNA. The concentration used here will remove DNA fragments with less than 300bp)
  • TE Buffer, pH 8.0 (10 mM TRIS-HCl, 1 mM EDTA, pH 8.0)

Equipment

  • Centrifuge which can do up to 10.000 rcf (=g)
  • Appropriate tubes for the centrifuge
  • Pipettes
  • Vortexer

Procedure

  • Mix 50 μL of sample with 150 µL of TE
  • Add 100 µL of PEG/MgCl2
  • Vortex
  • Centrifuge 15 min at 10.000 rcf at roomtemperature
  • Carefully remove supernatant not to disturb the pellet, which will be invisible
  • Dissolve the pellet in a appropriate amount of buffer of choice

Critical steps

  • Before centrifugation mark the tubes in order to know where the pellet will be expected afterwards, as the pellet will be (nearly) invisible

Other PEG Concentrations and Approximate Size Exclusion

% PEG — Fragments Excluded

  • 10% — <300bp
  • 6% — <500bp
  • 5% — <700bp
  • 4% — <1kb

Notes:

    • Yield decreases considerably when <10% PEG is used
    • Always use 10mM final concentration of MgCl2

Troubleshooting

Notes

  • This protocol is being mentioned in the manual for the Gateway recombinational cloning system based on published methods.[1, 2, 3]
  • Adjusting the PEG concentration can shift the threshold of the size of the precipitated DNA. The higher the final PEG concentration, the smaller the fragments that will be removed (which will stay in the supernantant).
  • If the sample volume is different, simply adjust the other volumes accordingly to end up with the same ratio.

References

  1. http://www.invitrogen.co.jp/focus/181027.pdf
  2. Paithankar KR and Prasad KS. Precipitation of DNA by polyethylene glycol and ethanol. Nucleic Acids Res. 1991 Mar 25;19(6):1346. DOI:10.1093/nar/19.6.1346 | PubMed ID:2030954 | HubMed [Paithankar]
  3. Lis JT. Fractionation of DNA fragments by polyethylene glycol induced precipitation. Methods Enzymol. 1980;65(1):347-53. DOI:10.1016/s0076-6879(80)65044-7 | PubMed ID:6246357 | HubMed [Lis]

All Medline abstracts: PubMed | HubMed

Discussion

You can discuss this protocol.

Tag this page with categories to allow easier indexing and searching. See Categories for information on existing categories.

Amplified insert assembly-PDF

Overview

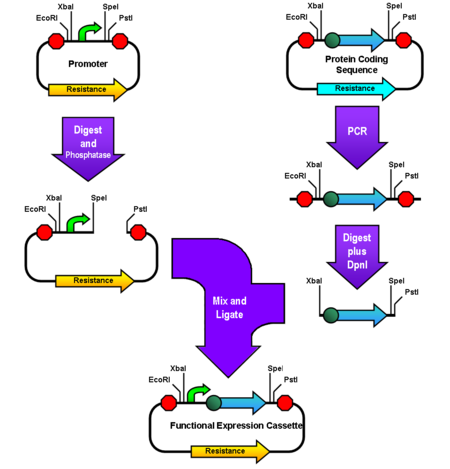
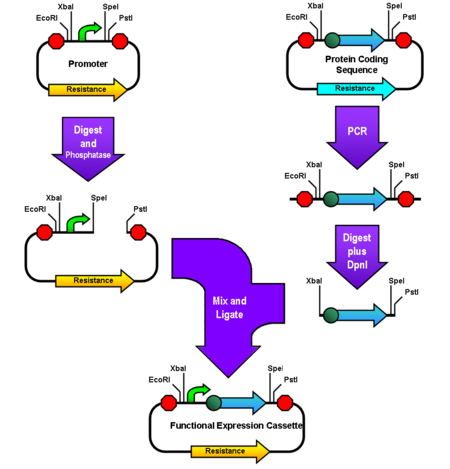
Amplified Insert Assembly is a method of “BioBricking™” two biological parts (i.e. pieces of DNA) together. For more information on BioBricking see this link. A You-Tube video summary of the Amplified Insert Assembly method provides a quick visual introduction.

This method combines the ease and flexibility of 3A assembly with the reliability of standard assembly. In comparison to 3A assembly, this method can take up to two hours longer; however, the additional time spent at the bench is minimal. Major benefits of this assembly method over other BioBrick™ assembly methods include:

  • No need for gel electrophoresis or gel extraction.
  • The ability to insert small (i.e. invisible on a gel) parts.
  • No need to use multiple antibiotic resistances.
  • No having to make construction vectors.
  • No need to order custom oligos for each assembly.
  • Really low background (99% of colonies are correct)
    • This means less sequencing
  • Easy transformation (use homemade competent cells)
  • Less culturing
    • This is because one plasmid prep can supply many PCR inserts. So minipreps of common parts (i.e. promoters and RBSs) can be used over and over again.

This protocol is typically used to do BioBrick™ assembly with restriction sites in the RFC 10 BioBrick Standard :

—–EcoRI–XbaI–Part–SpeI–PstI—–

But it can also be applied to any other format in which the two inner sites form an inactive “scar” and the two outer sites can be heat inactivated.

The two parts you want to assemble will be labeled “insert” and “vector” and will be initially contained on separate plasmids. The eventual goal of assembly is to get these parts on the same plasmid next to one another.

This is a consensus protocol. For more information see the pages below

Materials

General

  • Pipettors
  • Microcentrifuge
  • Water baths
  • Thermocycler
  • Electroporator
  • Selective media plates

Enzymes

  • EcoRI Restriction Endonuclease
  • XbaI Restriction Endonuclease
  • SpeI Restriction Endonuclease
  • PstI Restriction Endonuclease
  • DpnI Restriction Endonuclease
  • Vent DNA Polymerase (or another equivalent high fidelity polymerase)
  • Antarctic Phosphatase
  • T4 Ligase

Procedure

1. Miniprep both “insert” and “vector” from their respective cultures using a kit or this protocol (30 mins).
2. PCR the “insert” plasmid.

  • Use a high-fidelity polymerase (e.g. pfu Turbo or Vent).
  • Use the same primers you use for Colony PCR.
    • These should flank your restriction sites by 100-150bp thus allowing even very small parts (e.g. RBS) to be purified using a column.
    • They should probably have a Tm of 55-60°C.
    • For most BioBrick applications these can be primers VF2 and VR.
  • Only run 25-30 cycles as this will help ensure high fidelity.
  • This will take 1-2 hrs, but start the vector digest right away while the PCR is cycling.

3. Digest the “vector” with the appropriate restriction endonucleases for 2 hours.(do this while while PCR is running)
4. Purify the PCR product using a kit or this protocol.
5. Digest the purified insert for 1 hour with enzymes complementary to your vector digest.

  • Include DpnI along with the other restriction endonucleases.

6. Add 6μL Antarctic Phosophatase Buffer and 1μL Antarctic Phosphatase to the “vector” digest and incubate until the “insert” digest is done.
7. Kill all reactions by incubating for 20 mins at 80°C.
8. Ligate at a molar ratio of 4:1 (insert:vector).
9. Transform your cells.
10. Plate the transformed cells on plates with the same antibiotic as the “vector” resistance.
11. Celebrate.

  • If you already have PCR insert ready to go (i.e. you ran the PCR the night before from old miniprep) then it only takes about 4 hours.

Notes

  • The DpnI eliminates any background from the insert PCR.
  • The phosphatase eliminates any background vector.
  • The “vector” will be digested for a total of thee hours (including nearly one hour with Antarctic Phosphatase)
  • The “insert” will only be digested for one hour. This is okay as there is a lot of it.
  • Detractors of this method may say that it’s risky to PCR the inserts because of mutations. We say:
  1. This hasn’t been a problem for us.
  2. This is why we use a high-fidelity polymerase
  3. We’re sequencing the constructs anyway so we’d spot any mutations.

References

PNK Treatment of DNA Ends-PDF

Introduction

This protocol is used to add a phosphate group to the 5′ end of a single or double stranded DNA molecule. Most primers, for example, are ordered without this being added as it requires an extra synthesis step and hence greater cost. However subsequent ligation steps are more efficient if these phosphate groups are added.

  • T4 Polynucleotide Kinase is an enzyme that can perform this on blunt or overhanging DNA ends. T4 polynucleotide kinase phosphorylates single-stranded DNA most efficiently, followed by overhanging ends, and then by blunt-ended double-stranded DNA.
  • The above website outlines a protocol for use that is modified and summarized below.
  • If you plan on PNK treating complementary oligos it is best to do so prior to annealing the oligos since phosphorylation of single-stranded DNA is more efficient (see above) and also because the heat inactivation step may be close to the melting temperature of the annealed oligos.
  • T4 PNK can also be used to phosphorylate RNA, and is commonly used for radiolabeling RNA. Ensure that the enzyme you are using for labeling RNA is RNase-free (this is the case for most commercial enzymes).

Reaction Mix (10μl)

  • 1 μL PNK stock (10,000 U/ml)
  • 1 μL T4 Ligase Buffer
  • 8 μL Substrate

Reaction Conditions

  1. 37°C for 30mins
  2. 65°C for 20mins
  3. Store at 4°C

Notes

  • The T4 Ligase Buffer provides the required ATP and substitutes for the PNK Buffer and ATP in the NEB protocol. It is actually possible to perform the PNK step and a ligation step simultaneously although I have not done this.
  • Performing this protocol on an insert along with a phosphatase step on the vector can greatly improve the efficiency of a ligation by reducing the likelihood of a vector religating at the same time as making the ligation of vector and insert more likely.


Polyacrylamide gel electrophoresis-PDF

Overview

This procedure is useful for the separation of small pieces of DNA, small quantities of DNA, or applications where higher resolution than can be achieved with agarose gel electrophoresis is needed. Because it is very difficult to remove DNA from polyacrylamide gel, it is advised that this protocol should only be used for diagnostic purposes and not for size separation of useful fragments.

Materials

Reagents

  • 29:1 Acrylamide Solution
  • 10X TBE buffer
  • Ammonium Persulfate
  • TEMED
  • DNA solution
  • SYBR green
  • Bromophenol Blue

Equipment

  • Vertical electrophoresis chamber
  • Glass plates w/ spacers (which fit the chamber)
  • Casting holder
  • Pipettors

Procedure

1. Place Glass plates in casting apparatus
2. Add together the following to make 5ml of gel (0.75mm spacers)

  • 500µl 10X TBE solution
  • 35µl Ammonium Persulfate (10%w/v)
  • X mL 29:1 acrylamide solution (See the table under “notes” to determine the desired acrylamide concentration)
  • Y mL water (To make 5 mL)
  • 2µl TEMED

3. Pipet the acrylamide solution between the casting plates using a 5ml pipetor.
4. Insert comb into the top of the gel and allow it to cure vertically for approximately 30 minutes.
5. Combine the following for all DNA samples including the ladder:

  • 10μL DNA solution
  • 1μL SYBR green (100X Dilution in DMSO)
  • 1μL Bromophenol Blue

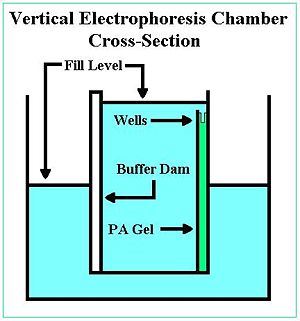
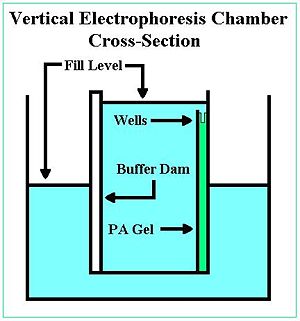
6. Insert the gel into the electrophoresis chamber allong with the buffer dam.

  • Make sure both the gel and the buffer dam seal.
  • The wells on the gel should face the inside.

7. Add 1X TBE to the space between the gel and tue buffer dam until the TBE fills the wells in the gel.

  • No TBE should leak into the space outside of this chamber.

8. Add 1X TBE to the outer chamber to the specified fill level.
9. Add DNA mix to wells.
10. Apply 80 volts and run for approximately 60 minutes.

Notes

  • It is important to get the fill level right in the electrophoresis apparatus (please see the figure to the right).
  • For thicker gels (bigger wells) more gel will need to be made. The amount of gel necessary can be calculated volumetrically.
  • The voltage applied to the gel will vary according the the tube of gel you cast. The specified voltage is 1-8 volts/cm. Centimeters in this case specifies the length of the gel from top to bottom (i.e the direction the DNA will travel).
  • To determine the final acrylamide concentration for your application use the following table. For example: if I had a 40% acrylamide stock solution and I wanted 5mL of gel with a final concentration of 12% acrylamide, then I would add 5ml*(12%/40%)=1.5mL of acrylamide solution to make my gel.

Choosing an Acrylamide Concentration

Acrylamide Concentration(%) Optimal DNA Resolution (bp)
3.5 1000-2000
5.0 80-500
8.0 60-400
12.0 40-200
15.0 25-150
20.0 6-100

References

  • Sambrook J, Russell DW, Cold Spring Harbor L: Molecular cloning : a laboratory manual / Joseph Sambrook, David W. Russell. Cold Spring Harbor, N.Y. :: Cold Spring Harbor Laboratory; 2001.

Discussion

You can discuss this protocol.

Making and Using Frozen Yeast Competant Cells-PDF

Overview所有文章

The following is a protocol to freeze down and use any of our S. cerevisae strains for standard LiOAc transformation at a later date. This is especially useful when you often need to perform many transformations using a single background strain. Adapted from the protocol by Geitz et. al 2007, Nature Protocols.

Materials

  • 50 mL Conical Tubes
  • Frozen Competant Cell Solution (recipe to follow)
  • Liquid YPD media (From media facility, or recipe in Amberg et. al’s Methods in Yeast Genetics)
  • 100 well styrofoam freezer racks (that will fit standard 1.5 mL ‘microfuge’ tubes
  • A 250 mL sterile culture flask for each strain
  • A 2 L sterile flask for each strain

Stock Solutions

Frozen Competant Cell (FCC) Solution

Solution is 5% (v/v) glycerol and 10% (v/v) DMSO. Be sure to filter-sterilize.

Cell Preparation

  1. Innoculate an overnight culture of your strain into 25 mL of YPD and grow at 30°C and 200 RPM overnight or for 12-16 hours.
    1. Pre-warm 500 mL YPD in the 2 L flask at 30°C for later use.
  2. Take this culture and find the OD600 to determine cell count (OD 0.1 ≈ 1 x 10^6 cells/mL.) An OD close to 1 is desired.
  3. With this culture, innoculate the pre-warmed flask of YPD with the entire 25mL and shake at 30°C for about 4 hours
    1. NOTE that adding cells according to their titers as described in Geitz et. al will not be possible since the cell densities achieved were not even close to what was described (try using 2X YPD if this is the route you need to go in.)
  4. Harvest the cells by centrifugation at 3,000xg for 5 minutes using 50 mL conical tubes (since this is what we happen to have in spades.) I split 250 mL of the culture among 5 tubes, spin them down, discard the supernatant, and add the remaining culture to the same tubes and repeat.
  5. Wash the cells in 0.5 volumes (25 mL in each of these tubes) of sterile water. Resuspend in 0.01 volumes (500μL each) sterile water and transfer to microfuge tubes. Pellet cells at 3,000xg for 5 minutes.
  6. Resuspend in 500μL FCC solution and aliquot 50μL each into microfuge tubes.
  7. Place these tubes into the styrofoam racks and store at -80°C. Since the racks are to promote slow freezing, after the tubes are brought to -80°C you may transfer them to whatever your container of choice is in the -80.

Using These Cells for Transformation

Take out a tube for each set of transformations and warm between your hands for 15 to 30 seconds. Pellet the cells at 3,000xg for 2 minutes and discard the supernatant. Take these cells and add them to your transformation master mix. You may need to use more than one tube of cells if your yield was low.

References

Gietz, R.D. and R.H. Schiestl. (2002) Frozen competent yeast cells that can be transformed with high efficiency using the LiAc/SS carrier DNA/PEG method. Nature Prot. Vol. 2 No. 1.

Fixation of Yeast-PDF

Overview

This is the protocol used by P. Xu for fixing yeast cells for GFP fluorescence.

Materials

  • Yeast cells
  • Formaldehyde 37% (Sigma-Aldrich, #252549)
  • Phosphate buffered saline

Protocol

  • Prepare eppendorf tubes with 50μL of 37% formaldehyde, one per sample.
  • Add 450μL of culture to 50μL of formaldehyde in an eppendorf tube and mix by inversion. (The goal is to have a final concentration of formaldehyde around 3.7%. So you can adjust the cell and formaldehyde volumes accordingly, as long as you end up with 3.7% formaldehyde).
  • Incubate the tube at room temperature for 15-20 minutes.
  • Spin down at 8000rpm for 1 minute.
  • Wash cells with ice cold 1X PBS 3 times, spin at 8000rpm for 1 minute each time (can be longer if you need).
  • Resuspend cell pellet in 100ul of 1X PBS.
  • Store samples at 4°C until you are ready to image.

Phosphatase treatment of linearized vector-PDF

To minimize self-ligated vector in your transformation, treat your linearized vector with a phosphatase to remove the 5′ phosphates necessary for ligation. This should improve the percentage of colonies with inserts.

Materials

  • Linear DNA from restriction digest (heat-inactivation of restriction enzymes is necessary but DNA purification is not).
  • Antarctic Phosphatase
  • 10X Antarctic Phosphatase buffer

Procedure

  1. Add Antarctic Phosphatase buffer to a final concentration of 1X to linearized vector sample.
  2. Add 1μL Antarctic Phosphatase (probably should make final glycerol concentration less that 5%?)
  3. Incubate 60 mins at 37°C.
    This should be sufficient to remove 5′ phosphates even from 5′ recessed ends like those produced by Pst I.
  4. Heat-inactivate for 5 mins at 65°C.
  5. Proceed directly to ligation step.

Notes

NEB’s Antarctic Phosphatase

Fixation of Yeast (Bisaria Protocol)-PDF

Overview

This is the protocol used by Anjali Bisaria for rapidly fixing yeast cells from chemostat cultures to image for both bud index and fluorescence. We found that this protocol preserves both GFP and mCherry fluorescence.

Materials

  • Yeast cells
  • Formaldehyde 37% (Sigma-Aldrich, #252549)
  • 0.1M | Potassium Phosphate Buffer pH 7.5

Protocol

  • Prepare eppendorf tubes with 50μL of 37% formaldehyde, one per sample.
  • Add 450μL of culture to 50μL of formaldehyde in an Eppendorf tube and mix by inversion. (The goal is to have a final concentration of formaldehyde around 3.7%. So you can adjust the cell and formaldehyde volumes accordingly, as long as you end up with 3.7% formaldehyde).
  • Incubate the tube at room temperature for 15-20 minutes.
  • Spin gently for 5 minutes at 8000rpm in the small Eppendorf centrifuge.
  • Resuspend cells in 75-100μL of 0.1M potassium phosphate
  • Store samples at 4°C until you are ready to image.

References

Anjali Bisaria, Senior Thesis, 2012

Plasmid Loss Assay-PDF

Overview

This method is appropriate for purposefully losing an undesired plasmid from your strain of interest or for measuring the approximate rate of plasmid loss in non-selective media. Adapted from Lundblad and Zhou, 2001.

Materials

  • Non-selective liquid media (I typically use YPD if I’m dropping a single plasmid, but if you want to drop one plasmid while maintaining others, make sure the media allows for selection of the ones you want to maintain)
  • Non-selective solid media (Same consideration as above.)
  • Selective solid media (Media that should select for the plasmid you’re trying to lose.)

Protocol

  1. Grow an overnight culture of a single colony of the plasmid containing strain in non-selective liquid media.
  2. The next day, grow a subculture of this overnight in the same non-selective media to mid-log phase.
  3. Measure OD600 of this culture. Aliquot a small portion and dilute it to OD600 = 0.2.
  4. Take this culture and perform dilutions so that you have 1:1000, 1:10,000, and 1:100,000 dilutions.
    • You’ll need 200μL of these dilutions for each plate you plan on plating. You’re aiming for ~100 colonies per plate. I like to plate three plates for each dilution.
    • If you don’t want to do so much plating, just try the 1:10,000 dilution and adjust if necessary.
  5. Plate 200μL of the dilutions on non-selective plates. Grow at 30°C for 1-2 days. (I like to wait 2 days so I can have a clear indication of the colony concentration. You may have to add another day if using synthetic media.)
  6. Replica these plates onto the selective media plates. Grow all of these at 30°C for 1-2 days, again depending on media composition.
  7. Take each plate and compare. Look for colonies that grew on non-selective media but did not on selective. You can take pictures and use software, such as ImageJ, to compare plates and count colonies if necessary

Purification of DNA-PDF

Alcohol precipitation

  1. DNA Precipitation
  2. Ethanol precipitation of nucleic acids
  3. Ethanol precipitation of small DNA fragments
  4. Isopropanol Precipitation for PCR Purification
    • use to concentrate DNA from PCR when you have verified that only a single PCR product exists. When performed properly this procedure exceeds the recovery of QIAquick PCR purification columns

2-propanol (isopropanol) precipitation yields less DNA than EtOH precipitation. (In my hands 60% less on average! Jasu) 2-propanol at RT reduces the risk of co-precipitation of salts (which can interfere with downstream experiments). 2-propanol is preferred for large volumes of DNA since less alcohol is required, plus it’s faster since it doesn’t require a cooling step. Glassy pellets from 2-propanol precipitation are harder to see than fluffy, salt-containing pellets from ethanol precipitation. 2-propanol pellets are also more loosely attached after centrifugation. Take care when decanting.

Size-dependent precipitation by PEG8000/MgCl2

  1. Protocol Size-selective DNA precipitation by PEG/MgCl2

A very easy and fast way to remove e.g. primers for downstream applications

Filtration/affinity columns

  1. Centrifugal filtration/Nucleic acids
    • for small DNA fragments (~50-200 bp in length)
    • removes proteins, nucleotides and salts
  2. Miniprep
    • for purifying plasmid DNA from E. coli cells
  3. QIAquick PCR purification
    • for typical DNA fragments (> 200 bp in length)

Products from the restriction need to a number of reagents removed from the previous restriction. These include salts (from buffers) and restriction enzymes. DNA can be removed and washed from solution by using column purification kits. Here is a rough description of how the kit works.

Step 1: Enhance DNA negative charge. DNA is negatively charged because of the phosphate backbone, so this step enhances the negative charge. In the Qiagen kit, the PB solution contains guanine chloride, a protein detergent and denaturant. The solution is also slightly acidic due to the low pH

Step 2: Stick the negative DNA to the positively charged resin. Load your negatively charged DNA product into the tube and centrifuge it (usually around 14,000 rpm for 1 min).

Step 3: Wash DNA to remove small pieces of DNA. This is achieved using Ethanol and Tris buffer and is labelled as the “PE” buffer in the Qiagen kit. This solution solubilizes smaller pieces of DNA so that they can be eluted from the column. Generally you add a large amount of this stuff and spin the column (~750mL of PE buffer, spin for 1 min).

Step 4: Remove excess EtOH. After dumping out the EtOH from the previous step, another spin is good to remove all the EtOH from the column and DNA so that it doesn’t get into the final eluted product. Spin for about 12 minutes at 14,000 rpm).

Step 5: Elution. Elution buffer is Tris buffer with some EDTA at a pH of 8-8.5. EDTA binds to divalent cations, particularly magnesium (Mg2+). Tris has labile protons with a pKa of 8.30 (at 20 °C; this declines approximately 0.03 units per degree Celsius rise in temperature). Tris is often used when working with nucleic acids. Tris is an effective buffer for slightly basic solutions, which keeps DNA deprotonated and soluble in water. These ions are necessary co-factors for many enzymes; Magnesium is a co-factor for many DNA-modifying enzymes. Tris is toxic to mammalian cells, and reacts strongly with pH electrodes. It is a primary amine, and can thus react with aldehydes.

DNA is now stabilized and ready for long-term storage at -20C.