Saturday, April 19, 2025
Home Blog Page 11

Ethanol precipitation of small DNA fragments-PDF

Overview

This protocol is for a simple ethanol precipitation of small fragments. This protocol was used to (partially) purify a DNA fragment containing a ribosome binding site (~40 bp) during 3A assembly. The fragment was generated via restriction digest and it was used in a ligation reaction. Note that this protocol simply concentrates your sample and removes enough salts/enzymes for ligation to be successful. All DNA fragments from your digest will still be present in your pellet. These residual DNA fragments do not matter for 3A assembly which selects against incorrect ligation products.

Materials

  • Absolute Ethanol (100% = 200 proof)
  • 95% ethanol
  • Tabletop centrifuge
  • -80°C freezer

Procedure

  1. Add 2 volumes ice cold absolute ethanol to sample.
    Generally the sample is in a 1.5 mL eppendorf tube. I recommend storing the absolute ethanol at -20°C.
  2. Incubate 1 hr at -80°C.
    The long incubation time is critical for small fragments.
  3. Centrifuge for 30 minutes at 0°C at maximum speed (generally >10000 g at least).
  4. Remove supernatant.
  5. Wash with 750-1000 μL room-temperature 95% ethanol.
    Another critical step for small fragments under 200 base pairs. Generally washing involves adding the ethanol and inverting several times.
  6. Centrifuge for 10 minutes at 4°C at maximum speed (generally >10000 g at least).
  7. Let air dry on benchtop.
    I generally let the pellet air dry completely such that it becomes white so that all residual ethanol is eliminated.
  8. Resuspend in an appropriate volume of H2O.
    Many protocols recommend resuspending in 10 mM Tris-HCl or TE. The advantage of TE is that EDTA chelates magnesium ions which makes it more difficult for residual DNases to degrade the DNA. I generally prefer H2O and don’t seem to experience problems of this sort. If you plan to ultimately use electroporation to transform your DNA then resuspending in H2O has the advantage of keeping the salt content of your ligation reaction down.

Keiki Gels-PDF

Gel electrophoresis is used to separate DNA or RNA molecules by size. For this experiment, the gel is inside a plastic drinking straw.

Since this is a DIYbio experiment, I emphasize that all of the materials came from regular shops, including Radioshack and an Asian grocery store in Sacramento, CA. This experiment is designed to create a faster and smaller alternative to traditional gel electrophoresis.

At this point, these instructions are for imaging food coloring – take these instructions and figure out how to do DNA, RNA, proteins, and genome fingerprinting. Staining DNA requires more than food coloring, you’ll probably need a blue transilluminator, but that can be as simple as putting together a few LEDs. Would be cool to see this used with real DNA.

Better ideas? Edit this page or email: tito at titojankowski.com

Final result – 3 straws

General Procedure

  1. Cast a gel in a straw
  2. Load sample
  3. Place straw in gel box with running buffer
  4. Run the gel

Casting Gels

Making Gel:

  1. Measure 1/2 cup of water into a microwaveable glass cup
  2. Add 1 tbsp of agar powder into the cup. Stir.
  3. Microwave for 1 minute. Caution: The water may be extremely hot. If the water still has visible agar powder floating in it, swirl and microwave for 15 second intervals until the powder is totally dissolved.

How to get the gel into the straws:

  1. Cut clear drinking straws to 3 inch sections – each section will hold one sample
  2. Lay the straws at the bottom of a small bowl.
  3. When the cup of agar is cool enough to pick up, pour the gel into the small bowl.
  4. Put a heavy piece of plastic across the top of the straws so that they don’t float to the top of the gel. At this point, check that the straws look like they are full of gel and don’t have any air bubbles.
  5. Wait for the gel to harden, pull your straws out of the gel.

Buffer

  1. Measure 1 cup of warm water into a glass cup
  2. Add a pinch of salt
  3. Stir and microwave the water until the salt dissolves

Loading your sample

  1. At this point, your straws are filled with gel.
  2. I used a small knife to poke a hole in the straw about 1/2″ from one end of the straw. This created a little pocket in the gel, which is where I added a drop of food coloring. (I used 4 straws, 1 for each of the dyes Green, Red, Blue, Yellow)
  3. Place the straws in parallel at the bottom of your gel electrophoresis box (or a tupperware container or bowl should be fine). The dye ends should all be facing one direction.
  4. Put a heavy piece of plastic across the the top of the straws so they won’t float when you add buffer

Connect your power supply

Keiki gels in gel box

#Connect 4 9v batteries in series. I used 4 because that’s how many came in the pack from RadioShack ($10)

  1. Connect an alligator wire to the positive terminal, and another alligator wire to the negative terminal.
  2. Place the alligator wire connected to the positive (+) terminal in the buffer on the side of the straws with NO dye
  3. Place the negative (-) terminal at the end with the dye

Run the gel

  1. Add your buffer. It should cover the straws completely, as well as the alligator clips.
  2. The negative (-) alligator clip immersed in buffer will begin to have bubbles form on its surface.
  3. Wait about an hour, depending on how strong your power supply is. You can watch your food coloring separate into its raw colors during this time.
  4. Take your straws out of the gel chamber – all the colors should be separated
  • Blue: becomes blue + red
  • Green: becomes blue + yellow
  • Yellow: yellow, but disappears quickly
  • Red: red

DNA ligation-PDF

Contents

  • 1 Curators
  • 2 Abstract
  • 3 Materials
    • 3.1 Reagents
    • 3.2 Equipment
  • 4 Procedure
    • 4.1 10μL Ligation Mix
    • 4.2 Calculating Insert Amount
    • 4.3 Method
  • 5 Critical steps
  • 6 Troubleshooting
    • 6.1 Factors affecting efficiency
  • 7 Notes
  • 8 Acknowledgments
  • 9 References
  • 10 Specific protocols
  • 11 Discussion

Curators

James Hadfield, CRUK Cambridge Research Institute, Robinson Way, Cambridge CB2 0RE.

Anyone should feel free to add themselves as a curator for this consensus protocol. You do not need to be a curator in order to contribute. This is a new initiative on OWW, please provide your thoughts on the idea of consensus protocol curators here.

Abstract

This is a consensus protocol. See the bottom of this article for specific protocols.

DNA ligation is the process of joining together two DNA molecule ends (either from the same or different molecules). Specifically, it involves creating a phosphodiester bond bond between the 3′ hydroxyl of one nucleotide and the 5′ phosphate of another. This reaction is usually catalyzed by a DNA ligase enzyme. This enzyme will ligate DNA fragments having blunt or overhanging, complementary, ‘sticky’ ends. Typically, it is easier to ligate molecules with complementary sticky ends than blunt ends. T4 DNA ligase is the most commonly used DNA ligase for molecular biology techniques and can ligate ‘sticky’ or blunt ends.

The two components of the DNA in the ligation reaction should be equimolar and around 100μg/ml. Most commonly, one wants to ligate an insert DNA molecule into a plasmid, ready for bacterial transformation. Typically, DNA and plasmid vector are individually cut to yield complementary ends, then both are added to a ligation reaction to be circularised by DNA ligase. If the plasmid backbone to insert DNA ratio is too high then excess ’empty’ mono and polymeric plasmids will be generated. If the ratio is too low then the result may be an excess of linear and circular homo- and heteropolymers.

Materials

Reagents

  • T4 DNA ligase
  • 10x T4 DNA Ligase Buffer
  • Deionized, sterile H2O
  • Purified, linearized vector (likely in H2O or EB)
  • Purified, linearized insert (likely in H2O or EB)

Equipment

Vortex

Procedure

10μL Ligation Mix

Larger ligation mixes are also commonly used

  • 1.0 μL 10X T4 ligase buffer
  • 6:1 molar ratio of insert to vector (~10ng vector)
  • Add (8.5 – vector and insert volume)μl ddH2O
  • 0.5 μL T4 Ligase

Calculating Insert Amount

[math]\displaystyle{ {\rm Insert\ Mass\ in\ ng} = 6\times\left[\frac{{\rm Insert\ Length\ in\ bp}}{{\rm Vector\ Length\ in\ bp}}\right]\times{\rm Vector\ Mass\ in\ ng} }[/math]

The insert to vector molar ratio can have a significant effect on the outcome of a ligation and subsequent transformation step. Molar ratios can vary from a 1:1 insert to vector molar ratio to 10:1. It may be necessary to try several ratios in parallel for best results.

Method

  1. Add appropriate amount of deionized H2O to sterile 0.6 mL tube
  2. Add 1 μL ligation buffer to the tube.
    Vortex buffer before pipetting to ensure that it is well-mixed.
    Remember that the buffer contains ATP so repeated freeze, thaw cycles can degrade the ATP thereby decreasing the efficiency of ligation.
  3. Add appropriate amount of insert to the tube.
  4. Add appropriate amount of vector to the tube.
  5. Add 0.5 μL ligase.
    Vortex ligase before pipetting to ensure that it is well-mixed.
    Also, the ligase, like most enzymes, is in some percentage of glycerol which tends to stick to the sides of your tip. To ensure you add only 0.5 μL, just touch your tip to the surface of the liquid when pipetting.
  6. Let the 10 μL solution sit at 22.5°C for 30 mins
  7. Denature the ligase at 65°C for 10min
  8. Dialyze for 20 minutes if electroporating
  9. Use disks shiny side up
  10. Store at -20°C

Critical steps

Troubleshooting

Factors affecting efficiency

From Tom Ellis

A protocol analysis experiment for a typical DNA ligation (7.2 kb vector + 0.6 kb insert, sticky ends) gave optimal ligation efficiency when 50 ng of vector was ligated overnight at 16°C with a 2:1 insert:vector molar ratio and standard T4 ligase. Ligase was heat inactivated at 65°C for 20 mins before 2 μL (of 20 μL) was used to transform commercial heat-shock competent cells.

Ligation efficiency was marginally decreased by

  1. Doing a 1 hr ligation at room temperature
  2. Using 100 ng vector
  3. Using insert:vector molar ratios of 5:1 and 1:1

Ligation efficiency was noticably decreased (x100) by

  1. Sticky end ligation with a larger insert (5.2 kb vector + 2.6 kb insert)
  2. Blunt end ligation

Ligation efficiency was severely decreased (x10000) by

  1. Using DNA fragments that have been exposed to UV during the gel extraction procedure (can avoid by blind excision, or by using a black-light or 365nm UV transilluminator instead of the usual 312nm type)
  2. Using the NEB Quick Ligation Kit (heat inactivation of PEG in the buffer ruins transformation, without heat inactivation the ligation probably would’ve been fine)

For additional troublshooting, check out the NEB FAQ page for T4 ligation: [1]

Notes

  1. Make sure the buffer is completely melted and dissolved. The white precipitate is BSA according to NEB. Make sure the buffer still smells strongly like “wet dog” (to check if the DTT is still good).
  2. Because ligase buffer contains ATP, which is unstable and degraded by multiple freeze/thaw cycles, you may want to make 10-20ul aliquots from the original tube. Ligase buffer may be spiked with additional ATP.
  3. If you are having trouble with your ligation, NEB offers FAQ’s (Quick Ligation T4 DNA ligase) and tips to help.
  4. Prior to the ligation, some heat their DNA slightly (maybe ~37°C) to melt any sticky ends which may have annealed improperly at low temperatures.
  5. Tom Knight has read that ligase can inhibit transformation [1]. By heat-inactivating the ligase, this inhibition can be avoided. However, according to the NEB FAQ, heat-inactivation of PEG (which is present in the ligation reaction) also inhibits transformation, therefore a spin-column purification is recommended prior to transformation if you are having problems.
  6. Treating PCR products with proteinase K prior to restriction digest dramatically improves the efficiency of subsequent ligation reactions. [2]
  7. Using SYBR Safe DNA Gel Stain is a safer, non-carcinogenic alternative to ethidium bromide.
  8. T4 DNA Ligase is very sensitive to shear, so spinning your ligation mix or vortexing it to mix it can affect your yields. Instead try mixing with the pipette tip or slowly resuspending the solution.
  9. If there is a lot of self-ligation look into Phosphatase treatment of linearized vector.

Acknowledgments

This protocol is primarily based on Endy:DNA ligation using T4 DNA ligase.

References

  1. Michelsen BK. Transformation of Escherichia coli increases 260-fold upon inactivation of T4 DNA ligase. Anal Biochem. 1995 Feb 10;225(1):172-4. DOI:10.1006/abio.1995.1130 | PubMed ID:7778774 | HubMed [Michelsen-Anal-1995]
  2. Crowe JS, Cooper HJ, Smith MA, Sims MJ, Parker D, and Gewert D. Improved cloning efficiency of polymerase chain reaction (PCR) products after proteinase K digestion. Nucleic Acids Res. 1991 Jan 11;19(1):184. DOI:10.1093/nar/19.1.184 | PubMed ID:2011503 | HubMed [Crowe-NAR-1991]
  3. Olivera BM and Lehman IR. Linkage of polynucleotides through phosphodiester bonds by an enzyme from Escherichia coli. Proc Natl Acad Sci U S A. 1967 May;57(5):1426-33. DOI:10.1073/pnas.57.5.1426 | PubMed ID:5341238 | HubMed [Olivera-PNAS-1967]
    DNA ligation by Escherichia coli DNA ligase

All Medline abstracts: PubMed | HubMed

Specific protocols

  • Endy:DNA ligation using T4 DNA ligase — Using T4 DNA Ligase
  • Knight:DNA ligation using NEB Quick Ligation Kit — 5min ligation.
  • Knight:TOPO TA cloning — For PCR products.
  • Silver:Ligation — A protocol for sticky end ligations using the Roche Kit.
  • Richard_Lab:Ligation — Uses T4 Ligase
  • BE.109:DNA ligation — A ligation protocol for classroom use in a laboratory class taught at MIT. Uses T4 DNA ligase but has interesting tips and tricks.
  • Corum:T4_Ligation

Discussion

You can discuss this protocol.

Agarose gel electrophoresis-PDF

Overview

How to use gel electrophoresis to separate, measure, and visualize DNA pieces.

Materials

  • 6X loading dye
  • TAE + agarose 1%
  • 1X TAE (~200ml)
  • gel box (casting tray optional) and power supply
  • Ethidium Bromide staining solution
  • used TAE destaining solution
  • UV box/gel imager

Procedure

Electrophoresis

  1. Microwave TAE agarose 1% to melt. Pour 30 ml for a small gel into a small flask/beaker to cool a bit, then pour into the gel box with the correct comb for your size/number of samples.
  2. Add 6x loading dye to your samples.
  3. Make sure the red electrode is at the opposite end from the wells. You can check the progress of the DNA with the loading dyes to check the direc
  4. Set the time and settings on the power supply by pressing Mode to change fields. (typical settings for 100s bp fragments of DNA: 90V constant voltage, 45 minutes)
  5. Slide on the lid and start the power supply.

Staining and visualization

  • Wear blue/purple nitrile gloves when handling the items at the staining station and the gel imager.
  1. Place the gel in the plastic box in the hood.
  2. Stain for 2 minutes to 1 hour in EtBr solution (depending on the concentration). Cover the plastic box with the cardboard lid to prevent bleaching of the dye.
  3. Pour the EtBr back into the light-proof bottle covered in aluminum foil.
  4. Destain with used TAE for 30 seconds to 2 minutes, rocking the box gently.
  5. Pour the TAE back into the bottle with the funnel.
  6. Image the gel on a UV light box or the computerized gel documentation (geldoc) system in the Thompson lab or Polz lab.
  7. Print out the image for your notebook, annotating the lanes, marker, and bands. Also note electrophoresis details like amount of DNA loaded, dye, voltage, time.
  8. Note agreement with/variation from expected result.

Notes

NEB Gel Loading Dye, Blue (6X)

is a pre-mixed loading buffer with one tracking dye for agarose and non-denaturing poylacrylamide gel electrophoresis. This solution contains SDS, which often results in sharper bands, as some restriction enzymes are known to remain bound to DNA following cleavage. EDTA is also included to chelate magnesium (up to 10 mM) in enzymatic reactions, thereby stopping the reaction. Bromophenol blue is the standard tracking dye for electrophoresis. It migrates at approximately 300 bp on a standard 1% TBE agarose gel.

1X Gel Loading Dye, Blue (6X):

  • 2.5 % Ficoll 400
  • 11 mM EDTA
  • 3.3 mM Tris-HCl
  • 0.017 % SDS
  • 0.015 % Bromophenol Blue
  • pH 8.0 @ 25°C

IBI (Shelton Scientific) 6x loading dye

15% Ficoll in a special TRIS Dye

Dye #1: Light blue slightly slower than Xylene Cyanol migrating at around 4,000 base pairs in a 1% agarose gel.

Dye #2: Indigo dye migrates similar to Bromophenol Blue at around 600 base pair in a 1% agarose gel.

Dye #3: Magenta dye migrates at around 150 base pairs in a 1% agarose gel.

Magic Marker Medias-PDF

Overview

Media used for doing strain construction with the magic marker technology (see references)

Reagents

  • 1.7 g YNB without amino acids without ammonium sulfate (Difco, #233520)
  • 1 g Monosodium glutamate (L-glutamic acid, monosodium salt MP Biomedicals #194677)
  • back to-agar
  • glucose
  • canavanine (50mg/ml)
  • thialysine (50mg/ml)
  • clonNat (50mg/ml)
  • G418 (142 mg/ml)
  • hygromycin (50mg/ml)

For 1L of media, the final composition is:

  • 1.7g YNB without amino acids
  • 1 g Monosodium glutamate
  • 20g bacto-agar (2% bacto-agar)
  • 20g glucose (2% glucose)
  • canavanine (50mg/L final)
  • thialysine (50mg/L final)
  • clonNat (50mg/L final)
  • G418 (142mg/L final)
  • hygromycin (50mg/L final)

Procedure

Combine:

  • 1.7g YNB w/o amino acids or ammonium sulfate
  • 1g monosodium glutamate
  • 20g back to-agar

Bring volume to 900ml with mili-Q water. Autoclave.

Once the solution is cool (~55°C) add 100ml of 20% glucose and drugs as follows:

  • Canavanine 1000μL of 50mg/ml stock per 1000ml media (1μL stock per ml of media)
  • Thialysine 1000μL of 50mg/ml stock per 1000ml media (1μL stock per ml of media)
  • G418 1408μL of 142mg/ml stock per 1000ml media (1.408μL stock per ml of media)
  • clonNat 1000μL of 50mg/ml stock per 1000ml media (1μL stock per ml of media)
  • hygromycin 6ml of 50mg/ml stock per 1000ml of media (6μL of stock per ml of media)

50X Vogel-Bonner salts-PDF

Materials

1000 mL
Warm dd H2O (45°C) 670 ml
MgSO4 • 7 H2O 10 g
Citric acid monohydrate 100 g
K2HPO4 500 g
NaHNH4PO4 • 4H2O 175 g

Procedure

Add salts in the order indicated to warm water in a 2-liter flask placed on magnetic stirring hot plate. Allow each salt to dissolve completely before adding the next. Adjust the volume to 1 liter. Distribute into two 1-liter glass bottles. Autoclave for 20 min at 121°C, store at RT.


Library Generation-V1-PDF

Background

Genetic libraries are collections of genes present in some recombinant DNA form so they can be propagated. When people refer to “screening a library” they usually have some phenotype that they can select or screen for and evaluate a large number of library clones to look for a gene that alters the phenotype. People interested in eukaryotic biology usually make cDNA libraries that are derived from pools of mRNA isolated from an organism of interest. This allows them to isolate DNA fragments that encode proteins or RNA that are produced from the spliced form of the RNAs found in the cells. It has been a long time since I have worked with cDNA libraries, so I won’t go into that here (perhaps someone in another group can add a section?).

For example, suppose we have a strain of bacteria that can’t grow on lactose (like Salmonella) and we are interested in finding genes that are needed for lactose metabolism. First, we prepare a plasmid that has been digested with two different restriction enzymes so that is can accept similarly-digested DNA fragments. Second, we digest the genomic DNA of an organism that can metabolize lactose (like E. coli) and ligate the fragments into the plasmid. Third, we transform Salmonella with the recombinant plasmids we have made and look for Salmonella that can grow on lactose as a carbon source. The plasmid that contains the genes responsible for lactose metabolism can then be isolated and sequenced to identify, hopefully, the lac operon of E. coli.

In the above example, a selection was used because only the cells with the ability to use lactose for food could grow. We could have also screened for the ability to cleave lactose with β-galactosidase by putting X-Gal in the plates and looking at thousands of white colonies for a blue colony

There are many variations on library creation. An investigator may choose to randomize a small segment of a cloned gene and screen the variants for a mutant with a new phenotype. A whole gene or plasmid can be mutated can be transformed for screening. A screen can be set up for “multi-copy suppressors” that rely on having an excess of a gene to obtain a phenotype. It’s all up you and your smart noodle to figure out the best way.

Design Strategy

I am presenting this strategy to make a library of genomic E. coli fragments in plasmids that replicate in E. coli. In searching for genes or gene clusters, it’s important to keep in mind that any given pair of restriction enzymes will only cover a fraction of the DNA present in the chromosome. Because the E. coli genome is sequenced (at least several K strains), you can make an estimate of the number of times your genomic DNA prep will be cut by a particular endonuclease. When you are cutting with two enzymes to make library fragments, the number of clonable fragments from a complete digest will, at most, be twice the number of times the “least cutting” endonuclease cuts. Because of this, it is wise to set up several libraries with different endonucleases. Not only will this allow better coverage, but it will also allow the identification of a gene that may have one of the sites within it (that would never be isolated because it would always be cut in the library).

It is a good idea to use endonucleases that leave 4 bp overhangs so that the ligation efficiency is high. There are four enzymes that leave the same CTAG overhang (Avr II, Nhe I, Spe I, and Xba I). This is quite useful. You can prepare a single vector preparation cut with, say, EcoR I and Avr II, and ligate four different genomic digests into it (EcoR I and each of the four enzymes that generate complementary overhangs).

When preparing the vector for your library, you want to minimize the background of transformants lacking an insert. A trace amount of singly-cut vector can produce a lot of transformants after ligation. I generally employ one of two strategies to get around this.

  • The easiest is to add a third restriction enzyme to your digest that cuts between the two sites of interest. In doing so, vectors that were cut by only one of your library enzymes get secondarily cut to prevent self-ligation. In general cloning of fragments, I find this to be far more effective than using a phosphatase (which reduces overall ligation/transformation efficiency).
  • If your vector doesn’t have convenient sites for making the library, or if your vector is a low-copy vector, you can use PCR to amplify the replication origin and drug-resistance gene while appending convenient restriction sites on the ends (see ‘Round-the-horn site-directed mutagenesis). If you follow this route, keep in mind that most of your ligated plasmids will have large segments that are not host modified. Therefore, transform the library into cells that have no restriction system. This method greatly reduces “vector-only” transformants.

Protocol

Genomic DNA Preparation

  • Use a strain that you think contains genes you’re interested in.
  • Use a strain that does not contain obvious genes that will allow the genetic screen to be duped. For example, I did a screen in cells that were expressing a toxic gene from the araBAD promoter. The library clones that got selected as suppressors contained genes that shot down the araBAD promoter: suppressors, yes; relevant, no.

–Harvest and Lysis–

  • Grow ~30 mLs of culture to late log phase (~2-3 X 10⁹ c.f.u./mL).
  • Harvest 20 mLs of cells and resuspend in 2 mLs Rinse Buffer and re-harvest. This step greatly improves lysis. Divide the cells evenly into 4 aliquots in 1.5mL microfuge tubes.
  • Resuspend each pellet in 100 μL Lysis Buffer by pipetting up-and-down. Vortexing will foam the solution and make a mess.
  • There should be visible clearing in about 30 secs to 1 min at room temperature.
  • After clearing (there will be some turbidity, but nothing like the original suspension), add 467 μL TE Buffer and let stand 10 minutes. Here, you are allowing further lysis and RNA degradation.
  • Add 30 μL 10% SDS, mix gently to prevent foaming.
  • Add 3 μL Proteinase K stock solution (20 mg/mL). You now have 600 μL per tube (plus cell volume) and the proteinase K is ready to chew. Sometimes, you’ll see a knot of white material at this step, it should go away as the proteinase does its thing.
  • Incubate at 37 degC for about 1 hour. The solution will get pretty clear.

–DNA isolation–

  • Add 185 μL of 3M NaCl to each tube. ~700 mM final. Needed for CTAB precipitation step.
  • Add 90 μL of 10 % CTAB solution, mix, let stand 5 minutes. CTAB precipitates polysaccharides. In high salt, DNA is soluble in CTAB.
  • Add ~700 μL of chloroform and vortex to form an emulsion.
  • Spin 5 min in microfuge. You should see a nice, bright-white interface. This is your CTAB precipitate.
  • Carefully remove the supernatant to a new tube.
  • Extract the solution with ~700 μL phenol/chloroform mix, emulsify and spin.
  • Extract once more with chloroform to remove the phenol.
  • Precipitate the DNA with ~700 μL Isopropanol. After mixing, let stand on ice for a few minutes before centrifuging.
  • Spin in a microfuge for 15 minutes to collect the DNA.
  • Wash once with ~1 mL 75% ethanol.
  • Wash once with ~1 mL 95% ethanol.
  • Dry the pellets by setting the tubes on their side.
  • Resuspend and pool the DNA in 100 μ TE. This is 200 X the original culture volume. Assuming each gene was present in one copy per cell (an under-estimate), you’ll have about 6 X 10¹⁰ copies of each gene in your tube. Plenty.
  • Determine the concentration of DNA using absorbance at 260 nm. The DNA prep will most likely still have RNA fragemts in it, don’t sweat it, but keep in mind that they also add to the absorbance reading.

Digestion and Ligation

I generally don’t fuss too much here. Determine the activities of the restriction enzymes you will be using (they’re printed on the tube in units per mL).

  • Digest the DNA with a 10- to 20-fold excess of restriction enzyme. The kicker here is that companies always present activity in terms of “degrades XX μg DNA per unit time”…what does this mean? What if my plasmid has 1 site? What if it has 100 sites? So, use the activity as a guide. Let the digest go a long time to ensure complete digestion (4-6 hours).
  • Use a Qiagen “PCR Cleanup” kit to purify the fragments. The kit not only removes protein and salts, but also gts rid of very large and very small DNA fragments that you don’t want in your library. I have still cloned ?10 kb fragments after purifying my digest this way so don’t worry.
  • Determine concentration of fragments by absorbance.
  • If you want, you can run a gel of the material, but it’s generally a waste of time.

I won’t detail how to prepare a vector for receiving an insert here.

  • Set up test ligations to determine the best insert-to-vector ratio. I set up about 5 reactions in a volume of about 5 μL. Vary the insert amount and keep the vector constant.
  • Transform each test ligation, you can probably plate the whole thing on one plate. Count the colonies that form and use the insert-to-vector ratio that gave the most colonies to set up the large ligation reactions.

Recipes

(1) Rinse Buffer

  • 10 mM Tris-Cl, pH 8.0
  • 100 mM NaCl

(2) Lysis Buffer

  • B-Per (Pierce) supplemented with:
  • 5 mM EDTA (from neutral pH stock)
  • 0.1 mg/mL Lysozyme (from fresh 10 mg/mL stock in PBS or TBS)
  • 1 μg/mL RNase A

(3) TE Buffer (Tris-EDTA)

  • 10 mM Tris-Cl, pH 8.0
  • 1 mM EDTA
  • You can use other detergents instead of B-Per, that’s what I use. Bug-Buster is another commercial detergent that doesn’t disrupt proteins. There are protocols for using Tween, NP-40, and Triton as well. You just need to get the outer membranr disrupted so the lysozyme has access. I have had good luck with ~1-2% chloroform as well.

(4) 10% CTAB solution

  • 10% CTAB (some crazy name that doesn’t start with a “C”)
  • 700 mM NaCl

Transformation and Plating

  • Using the test ligations as a guide, set up a ligation reaction that will generate enough clones to thoroughly screen the number of clonable fragments you expect from the genome. Keep in mind that some genomic fragments may be under-represented in your final mixture and that some fragments may not ligate efficiently (like large fragments).
  • Transform the whole big ligation reaction into a big aliquot of competent cells. Some people are married to electroporating everything… if you want to electroporate 20 samples, go ahead. I like to mix the whole ligation reaction into fresh TSS competent cells.
  • Heal the cells for about an hour and harvest. Healing too long will cause duplications of clones.
  • Resuspend the cells at about 1/20th the volume of the healing culture.
  • Add glycerol to ~15%, mix.
  • Remove a small aliquot into a separate microfuge tube.
  • Freeze both the large and small aliquots at -80 degC.
  • After the small aliquot is frozen, thaw it on ice.
  • Plate the cells to determine how many colony-forming units there are per set volume of frozen, transformed cells in your big aliquot.
  • Plate the cells so that there are an appopriate number of colonies on each plate. For a screen, 100-500 colonies per plate will keep them mostly separated. For a selection, you can plate higher densities to reduce the number of plates.

Final Thoughts

In any genetic screen, you will find a colony that grows or has the phenotype if you look hard enough. It is a good idea to know the frequency of “spontaneous” revertants in the cell type you are screening and to be aware of this number when you go to pick colonies from your library. If your transformed library is generating the same number of positive clones as your background, it ain’t working.

Always purify the library plasmids from your selection/screen and re-transform them into naive hosts to ensure that the phenotype is propegated with the clone.

Be aware that there are a lot of ways to overcome selective pressure that you may not have thought of. If the cell finds a way to alter the copy number of a plasmid, or up-regulate a toxin exporter, they will look like good clones, but have nothing to do with what you were looking for.

Round-the-horn site-directed mutagenesis-PDF

Background

I was in graduate school and had to make several codon substitutions at the same position in a cloned gene. I came up with this protocol and called it “Around-the-Horn”, a phrase used in baseball meaning to throw the ball through all of the base positions in a circle. The phrase originally referred to “Rounding Cape Horn of South America” a very difficult, but rewarding journey (“Round-the-horn” is not difficult). Subsequently, a group published a paper describing the process, but I was first, to take full credit, and have used it in ways not described by others.

I was used to doing “Quick change” (Stratagene) wherein two complementary oligos containing the desired mutation are used to prime extensions around the plasmid. Quickchange is a linear amplification (not PCR) and each round of extensions is performed on the plasmid template. There are several problems and limitations with Quick change:

  • The size of the mutation is limited to a few base pairs.
  • Each primer has to be long to provide sufficient annealing on both sides of the mutation (money).
  • Non-optimal extension conditions will result in “end-filling” wherein the polymerase fills the recessed 3′ end of the product instead of extending the primer on the template (this is especially a problem as the reaction progresses and is why only 12 or so cycles are recommended). The blunt-end products won’t give you any transformants and also mislead the researcher into thinking their reaction went great because they see a product on a gel, but the product is a dead end.
  • For each different mutation at a given position, a new primer pair has to be ordered (mo’ money).

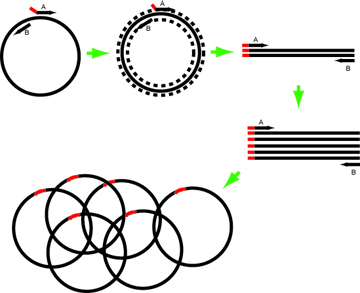
‘Round-the-horn is a PCR-based mutagenesis. The mutations are contained in one or both of the primers. The primers are phosphorylated so that the PCR product can be ligated into a circle and used to transform cells. The procedure has the advantages that the primers are smaller, a visible product on a gel means your reaction worked and must contain the encoded mutations, only one primer needs to be changed to change the mutation at the same site. If you are concerned with mutations elsewhere in your plasmid, you should sub-clone the segment of interest into a “fresh” vector (this is the case for any site-directed protocol). Finally, as opposed to standard site-directed mutagenesis, this procedure exponentially amplifies the plasmid, leading to increased yields, increased transformation efficiencies, and the potential to create a large library with randomized residues.

Horn Schematic

Citing

This protocol can be cited directly OWW, but I get frequently asked for the first paper to use it. When I was nearing the end of my graduate work, I made the first mutations in the P22 scaffolding protein; found in this reference:

PMID: 12239300

However, if my shoddy memory serves correctly, there is another publication that came out shortly before mine, also from my graduate lab, the technique was used to introduce point mutations in HIV CA. I recall advising our technician, but I may be wrong. It is simply listed as “PCR mutagenesis”.

PMID: 12507478

Primer design

In this example, the Forward primer (primer A in the image above) has intended mutation at its 5’ end. Design such that the annealing portion has Tm ~60-63º.

e.g.,

5’-NNNACGTACGTACGTACGTACG-3’

The reverse primer in this example resembles the complementary strand and abuts the site of mutation.


                       5'-NNNACGTACGTACGTACGTACG
…ACGTACGTACGTACGTACGTACGTACGTACGTACGTACGTACGTACGTACGT…
…TGCATGCATGCATGCATGCATGCATGCATGCATGCATGCATGCATGCATGCA…
       CATGCATGCATGCATGCAT-5'
  • If the change needed is large, both primers can have mutant 5’ ends. Alternately, two rounds of PCR can be performed to build the desired PCR product.
  • Primers without mutations at their 5′ ends can be spaced apart on the template with a gap between them to make deletions of any desired size.
  • You can amplify a low-copy plasmid with primers that introduce cloning sites for receiving an insert. The PCR product becomes the “vector” component of the ligation reaction. In this case, you don’t need to phosphorylate the primers because the restriction digest of the ends will leave 5′ phosphates. An advantage using PCR to prepare your vector is that background “vector re-ligation” reactions are practically eliminated.
  • Remember to transform bacteria that have no restriction system as the plasmid will be unmodified. This is not essential, but really helps.

Primer Phosphorylation

  1. Primer stock should be at 100 μM in water or TE.
  2. For each primer, mix:
    • 37 μL water
    • 5 μL 10 Kinase reaction buffer (comes with PNK)
    • 1 μL 50 mM MgSO4 (comes with most polymerases)
    • 5 μL primer (10 μM final)
    • 1 μL 100 mM ATP
    • 1 μL PNK
  3. Incubate at 37°C for 30-60 minutes.
  4. Heat each reaction to kill the PNK (65°C for 20 minutes or 95°C for 5 min).

PCR

The Mixture

Set up the following 50μL mixture on ice. After mixing, put into pre-heated PCR block. Keep in mind that your particular volumes may be different, some newer fusion polymerases (recommended) use 5X and 2X buffers.

  • 40 μL water
  • 5 μL 10X polymerase buffer
  • 1.5 μL forward primer (0.3 μM final)
  • 1.5 μL reverse primer
  • 0.5 μL dNTPs (20 mM each)
  • 1 μL template (mini-prep’d plasmid)
  • 0.5 μL polymerase (not Taq, use Vent, Deep Vent, 9°N, Pfu, or a faster fusion enzyme)

PCR program

  1. 98°C 1’
  2. 96°C 30”
  3. 55-58°C 30” (~5°C below Tm, higher for fusion enzymes)
  4. 72°C 2’ per kb being amplified (much less if using a fusion enzyme)
  5. Goto (2) 25-27 more times
  6. cool to 18°C for a minute or so (there’s no need to hold at 4, you just cooked the sample for an hour!)
  7. end

Product Preparation

Run 5 μL on a gel. I put EtBr in the gel so I can check to see if there is a product within a few minutes. If you see the band, digest the template in the PCR reactions by adding 1 μL of DpnI, mix, and incubate for at least 60 minutes at 37º.

Run a preparative gel of the PCR product, excise the band, and use a kit to extract the product.

Product ligation

  • 2.3 μL water*
  • 2 μL PCR product
  • 0.5 μL 10X ligation buffer
  • 0.2 μL ligase
  • 5 μL

If there is not much product, replace the water fraction with more PCR product.

Incubate overnight at room temp. These blunt ligations can be pretty slow. Some enzymes (e.g. 9° North and Taq) leave crap on the 3′ ends. This greatly reduces the efficiency of the blunt-end ligations.

Transformation

Works best with electroporation or fresh TSS cells. Transform 4 μL into 50 μL cells. Plate all of it. You should get 20 to 1000 colonies. Many times, I have forgotten to phosphorylate the primers before doing the PCR. You can successfully phosphorylate the purified PCR product before ligation, but the ligation/transformation will be less efficient. PNK prefers exposed 5′ ends.

Optimizations

We have been using NEB’s Q5 enzyme almost exlusively now. A rough estimate of 0.5 ng of template, 300 nM primers, and 2-3 degrees below the NEB recommended anneal. Also, use NEB’s GC enhancer and 30 sec/kb.

I have had reactions that just wouldn’t produce product (for whatever reason). When doing PCR, it is difficult to predict the yield or quality of a product. The longer the product is supposed to be, the greater the chance of competing reactions taking over. Usually, people will adjust the Mg++ concentration to influence polymerase behavior or adjust the annealing temp to influence primer annealing and polymerase extension.

Keep in mind that when the sample temperature is raised from the annealing temperature (say 55) to the optimal extension temperature (say 72), the oligo would normally melt off of the template. The reason primer extension works is the polymerase slowly extends the oligo during annealing and while the temperature is rising so that when the 72 degree mark is hit, the extended product is long enough to keep the primer attached and the polymerase happy. Therefore, oligo composition, the type of polymerase, the annealing temp, and ramp time can have significant effects on the reaction.

Take the following example: Each reaction had 1 μL of the same mini-prep, and all reactions were done with the same program at the same time. Three different primer pairs were used and three different enzymes. I have found that the surest way to get a successful ‘Horn reaction is to set up the reactions with different enzymes (historically Deep Vent and Turbo Pfu, but now an array of fusion enzymes) rather than to set up arrays of Mg++ concentration or a gradient of annealing temps. The desired product is marked with an arrow. Note that the different enzymes gave varied performance simply depending on the primer pair used. Consider the cost of your time repeating steps relative to the cost of the enzyme aliquot. We now use NEB’s Q5 enzyme with excellent results, even on >10 kb plasmids.
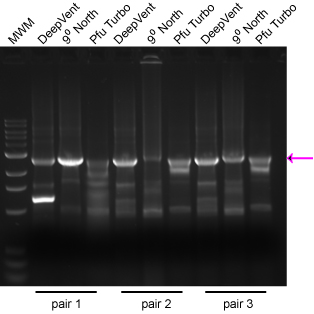
Example Horn Gel

Site-directed mutagenesis-PDF

General Information

Site-directed mutagenesis can be used to change particular base pairs in a piece of DNA. There are several methods for achieving this. The approach described here is adapted from the Stratagene site-directed mutagenesis kit, the manual can be found here. Even when using a kit it will be necessary to design primers that are suitable for the specific changes you want to make to your DNA. Most of the contents of the kit can be found in your favorite labs stocks so you may not need to buy the kit itself. If you have problems with this procedure, you can try ‘Round-the-horn site-directed mutagenesis which uses PCR to amplify the desired mutant product.

General Procedure

  1. Purify template plasmid DNA from a dam+ Escherichia coli strain (to ensure that all GATC sites are methylated for later digestion with DpnI).
  2. Design forward and reverse primers that will bind to the region of DNA you want to mutate but that contain the modifications you wish to make. See the CAD tool PrimerX.
  3. Run a primer-extension reaction with a proof-reading, non-displacing polymerase such as Pfu DNA polymerase. This results in nicked circular strands of the plasmid.
  4. Cut up the template DNA with DpnI.
  5. Transform the circular nicked DNA into a highly competent strain such as XL1-Blue. These cells will repair the nicks and not restrict the unmodified product DNA.
  6. Select colonies with the correct DNA.

References

Manuals

  • Stratagene QuikChange Site-directed Mutagenesis Kit

Publications

  1. Zheng L, Baumann U, and Reymond JL. An efficient one-step site-directed and site-saturation mutagenesis protocol. Nucleic Acids Res. 2004 Aug 10;32(14):e115. DOI:10.1093/nar/gnh110 | PubMed ID:15304544 | HubMed [Zheng-NAR-2004]
  2. Ko JK and Ma J. A rapid and efficient PCR-based mutagenesis method applicable to cell physiology study. Am J Physiol Cell Physiol. 2005 Jun;288(6):C1273-8. DOI:10.1152/ajpcell.00517.2004 | PubMed ID:15659713 | HubMed [ko-ma]
  3. ISBN:0-87969-577-3 [MolecularCloning]

All Medline abstracts: PubMed | HubMed

See Also

SC Canavanine-PDF

Overview

Synthetic complete dropout media (SC-N with the nutrient N dropped out) is the media we use in the lab for selecting strains that have repaired an auxotrophy (e.g. selection on SC-URA plates after transforming with a URA+ plasmid or DNA fragment) or for persistent selection for the ability to grow without nutrient N (e.g. for maintaining a URA+ plasmid, the strain is always grown in SC-URA media).

Synthetic complete is the name given to the media with nothing dropped out (i.e. with all amino acids and other nutrients added the media). You can use synthetic complete for microscopy (it is much better for this purpose than YPD) but low fluorescence media (LFM) is preferable.

Materials

  • Yeast Nitrogen Base without Amino Acids (Difco Cat #291940)
  • Bacto-agar (Becton-Dickinson #214030)
  • 10x Glucose Solution (20% w/v; Sigma D9434)
  • 10x Amino acid mix (with appropriate nutrient dropped out)
  • Distilled water

Stock Solutions

Canavanine 100mg/mL

Dissolve L-canavanine sulfate salt (Sigma) in water at 100mg/mL, filter-sterilize and store aliquots at 4°C

Thialysine 100mg/mL

Dissolve S-[2-aminoethyl]L-cysteine hydrochloride (Sigma) in sterile miliQ water at 100mg/mL. Filter sterilize using a syringe and store aliquots at 4°C

Protocol

For 1 liter of solid media mix together:

  • 6.7g yeast nitrogen base
  • 20g bacto-agar
  • deionized water to 900ml

Autoclave for 30 minutes on the liquid cycle. Once cooled to about 55°C add 50ml of the 20x glucose solution and 50ml of the 20x amino acid mix. Pour plates.

For 1 liter of liquid media mix together:

  • 6.7g yeast nitrogen base
  • deionized water to 900ml

Autoclave for 30 minutes on the liquid cycle. Once cooled to about 55°C add 50ml of the 20x glucose solution and 50ml of the 20x amino acid mix.

References

Burke, D. Dawson, D. & Sterns, T. 2000 Methods in Yeast Genetics: A Cold Spring Harbor Laboratory Course Manual Cold Spring Harbor Laboratory Press

Tong and Boone 2006 Synthetic genetic array analysis in Saccharomyces cerevisiae Yeast Protocols

Guthrie, C and G Fink 2004 In vivo mutagenesis and plasmid shuffling Guide to Yeast Genetics and Molecular and Cell Biology Part A