Saturday, April 19, 2025
Home Blog Page 12

Resuspension of primers-PDF

Introduction

When receiving oligonucleotide primers from a manufacturer such as Invitrogen, the oligos arrive dry and must be resuspended in buffer. The proper choice of buffer will depend on the intended application of the primers, some common ones are:

  1. Sequencing/PCR
  2. Annealing

Method

Invitrogen recommends the following reconstitution procedure –

  • Centrifuge the tube for a few seconds to get all the DNA to the bottom of the tube.
  • Resuspend in TE buffer, pH 8.0 at a concentration greater than 10μM.
  • Allow to sit for 2mins, then vortex for 15s.

However, if you are using primers for PCR/Sequencing you may want to resuspend in water or 100nM Tris, since the EDTA in TE buffer chelates Mg2+ ions inhibiting PCR. You could also keep track of the amount of EDTA in the mix to make sure there is still enough Mg2+ for your reaction to proceed successfully. Each EDTA molecule chelates one Mg2+ ion.

  • You typically want a small amount of EDTA around to chelate metals other than Mg. Heavier metals, like Fe, are more likely to wreck havoc on your favorite biological macromolecules and are chelated more strongly by EDTA than Mg. That said, I typically resuspend all of my oligos in TE buffer (mine is 10 mM Tris-HCl, pH 7.5, 1 mM EDTA) at a concentration of 100 μM. I use 0.5 μL of this in a 100 μL PCR reaction. This leaves me with 5 μM EDTA final, which is insignificant compared to the mM concentrations of Mg2+ used in the reaction. Here’s a great page I found about EDTA, including formation constant (Kf) values for metal-EDTA complexes.–Kathleen

DNA Synthesis from Oligos-PDF

Overview

Despite claims by Synthesis companies for cheap gene/DNA synthesis, there are times when manual synthesis is necessary. This can be done relatively easily by ordering the necessary oligos of both strands and a bit of thermo-cycling.

This synthesis can be accomplished using two methods: Ligase Chain Reaction (LCR) and Polymerase Chain Reaction (PCR). While both protocols are similar, they have some distinct differences which will be described here.

LCR Synthesis Procedure

1. Design oligos for your gene, of both strands (see the notes on primer design below).
2. Dilute the oligos to 100uM.
3. Kinase the oligos.
4. Thermo-cycle:

  • For Thermostable Taq Ligase: do as many cycles as necessary (10-30).
  1. 95°C (denature)
  2. 45-55°C (anneal)
  3. 65°C (ligate)
  • For T4 ligase: do 5-10 cycles, add more ligase and ATP, and do 5-10 more.
  1. 95°C (denature, 15 sec)
  2. 45-55°C (anneal, 30 sec)
  3. 20°C (ligate)

5. Clean up PCR product to remove enzyme and primers.
6. Rescue PCR with end primers, using ligation cycling product as template.
7. Gel extract.
8. Clone.

PCR Synthesis Procedure

1. Design oligos for your gene, of both strands(see the notes on primer design below).
2. Dilute the oligos to 100uM.
3. Mix together the following:

  1. 1μL of each primer
  2. 1µL dNTPs (10mM each)
  3. 1µL Taq Polymerase (1000 units/mL)
  4. 5µL 10X Buffer
  5. ?μL Sterile DI water to make a final volume of 50μL

4. Thermo-cycle the mix 30X:

  1. 95°C (denature, 20 sec)
  2. 45-55°C (anneal, 20 sec)
  3. 72°C (extend, 40 sec)

5. Take 2μL of this Synthesis product set up PCR mix as before but with only the 5′ end-primers (forward and reverse).
6. Thermo-cycle 30X:

  1. 95°C (denature, 20 sec)
  2. 72°C (anneal and extend, 60 sec)
  • Because you are using the entire oligo as a primer, the Tm will be unusually high. Because of this, annealing and extention can be done in the same step.

6. Clean up PCR product to remove enzyme and primers.
7. Gel extract.
8. Clone.

Notes

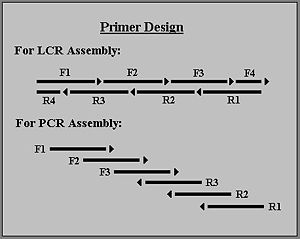
  • Primer design for the two types of synthesis are different. For a rough determination of primers see the figure to the right. Arrows point in the 5′ to 3′ direction.
  • Some online oligonucleotide design tools are Gene2Oligo and TmPrime
  • Make primers fixed 30-40mers with 15-20mer overlaps; or use the software by Rouillard et al. referenced below.
  • This works well for relatively for short fragments (300-500 bp). For longer sequences, use PCR Overlap Extension of the fragments.
  • If you want to include restriction sites at the ends of your DNA you may need to add a little bit of “junk” sequence flanking the restriction site. Check this link to find out about your specific enzyme. Some examples are:
    • BamHI needs two bases
    • EcoRI needs one base
    • HindIII needs more than three

References

Rouillard et al. Gene2Olig: oligonucleotide design for in vitro gene synthesis.

Restriction digest-PDF

General Information

Restriction digest involves the cutting of DNA at specific recognition sequences by enzymes.

General Procedure

Restriction Ligation in Genome Compiler

An intuitive cloning wizard for simulating digest and ligate with restriction enzymes or with PCR can be found in Genome Compiler

How does it work?

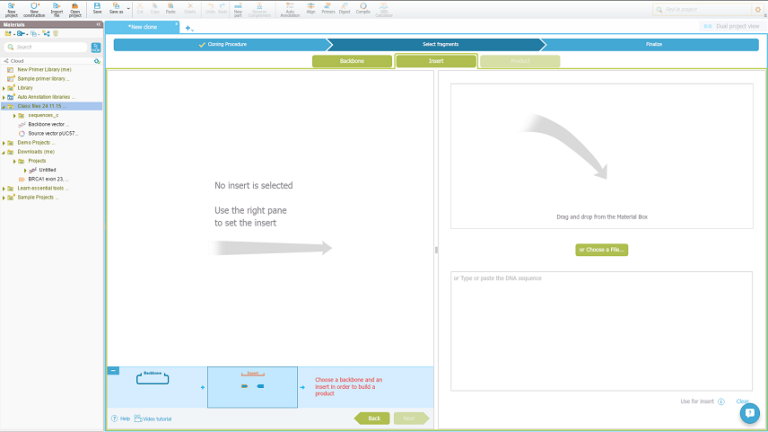
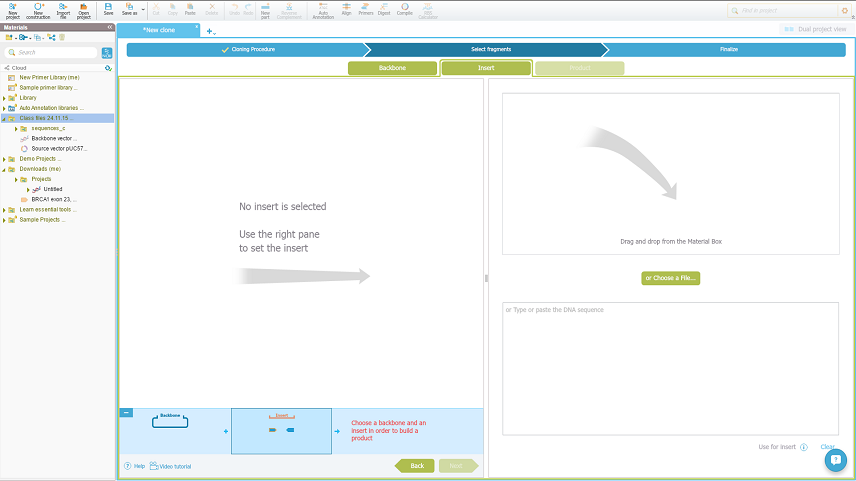
Open a new construction project and select the restriction ligation method. Start with the Insert tab within the cloning wizard:

Start working on the insert

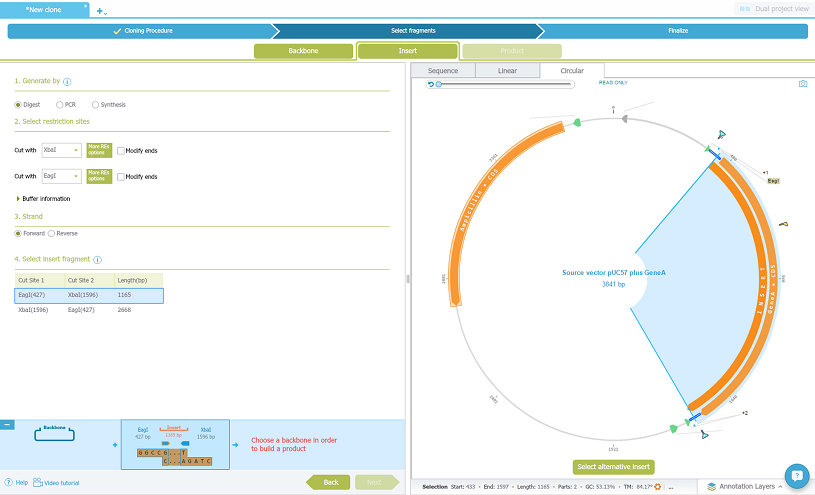
Then just drag and drop your source vector with the gene of interest, select to generate by digest, choose the restriction enzymes out from the lists, and choose the the insert fragment:

Digest your insert

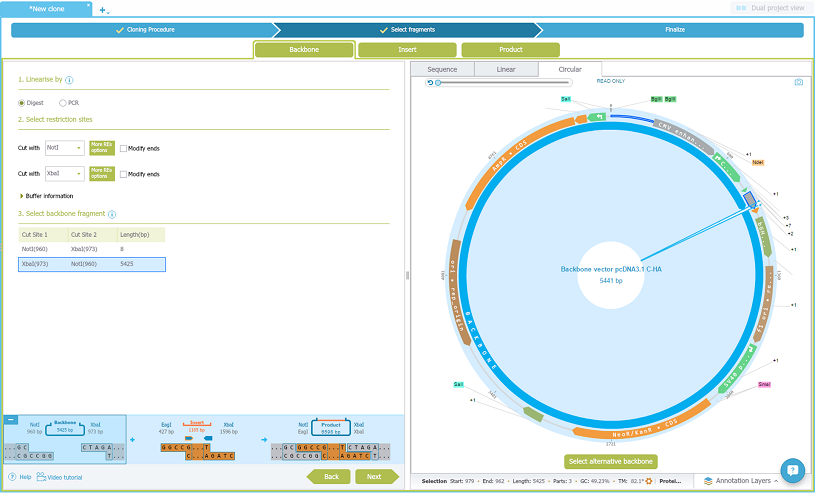
Now select the Backbone tab. Drag and drop the backbone vector from the materials box on the left, choose to linearise it by digesting and choose the restriction enzymes, and select the fragment:

Ligate to the Backbone

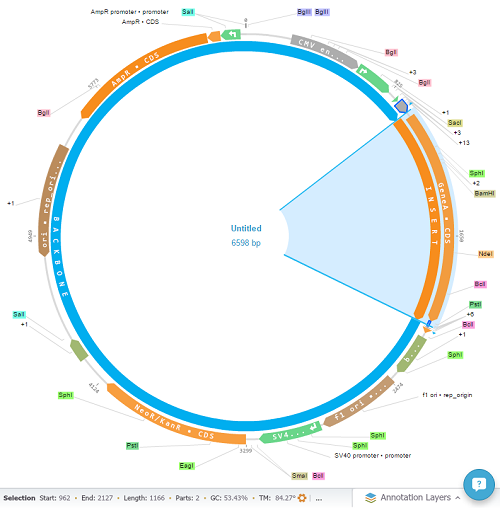
Check the final product:

Ligate to the Backbone

View the cloning process summary:

Ligate to the Backbone

Notes

  • For help with specific enzymes, see Restriction enzymes
  • For buffer composition, see Restriction digest/Buffers
  • If you are interested in cutting near the ends of the linear DNA fragment, note that some enzymes do not cut efficiently at the ends of linear DNA. So include extra bases to increase the efficiency of cutting. Many enzymes work with 4 bases supposedly but XhoI was found to require more than 4 bases (8 bases were used successfully). Thus, to be on the safe side, use 8 bases whenever possible. NEB has more information here. Read the information at NEB carefully … they recommend adding 4 bases to the numbers listed in their table.
  • Tom was once having some trouble with failed restriction digests. He called NEB and they recommended doing the digest in a larger volume. Therefore, the Knight lab typically does digests in either 50 μL or 100 μL volumes rather than the 20 μL volume that the Endy lab uses. If the sample needs to be concentrated, some method of DNA purification is used.

Sequencing DNA-PDF

Optimal Primer Design for Sequencing in E. coli

Agencourt has designed new primers for their CopyControl vector series which use 3′ ends which are low frequency in the E. coli genome. The two 7-mers are GTCTAGG and CTAGGAA which occur 3 and 7 times in the genome, respectively, and have nearly 50% GC content. The 7-mer GCCTAGG does not occur in the genome but was rejected due to self-complementarity. They chose an 8-mer which was unique, and the two primers they finally chose for their sequencing vector were GTA CAA CGA CAC CTA GAC and CAG GAA ACA GCC TAG GAA (Note that their final choice is inconsistent with their reported plan). The low frequency of the CTAG 4-mer appears to be the key insight, and this might be useful in designing novel primers and primer binding sites. See Epicentre Forum Vol 13(1) p 17, “An improved CopyControl fosmid vector maximizes end-sequencing results.

Sequencing Mammalian Genomic DNA

This approach goes for sequencing exons or DNA fragments from almost any organism.

  • Template source: Genomic DNA can be isolated from tissues using a variety of protocols. I prefer the Qiagen gDNA Tissue kit but man work. 10 – 50 nanograms of gDNA is recommended for consistent amplification using a nested PCR protocol. PCR from less DNA template is possible (even a single cell in theory) but is inconsistent.
  • Primer design: For a nested PCR approach, you’ll need 4 or 6 total primers. Nested PCR primers designed around a single exon (or ~400 bp fragment) are most likely to yield the desired product. Outside primers should be designed according to regular guidelines. For many human and mouse genes, tested primer sets may be published. The primers should be non-overlapping. For high throughput protocols, many groups will engineer M13F & M13R sequencing into the internal sequencing primers. This allows the sequencing lab to then use the same tested primers to sequence every sample.
  • Basic protocol
  1. Extract DNA.
  2. Complete external primer PCR reaction.
  3. Use 1ul of the first reaction as a template for second reaction with internal primers.
  4. Clean up the PCR reaction with your favorite PCR cleanup kit (Qiagen, Wizard) or use ExoSap-it enzyme to degrade oligos (less handling in high throughput).
  5. Elute in WATER and submit samples to sequencing according to the eColi protocol.
  • Controls and other comments:
  1. Always use a no-template control, especially in multi-sample experiments.
  2. A mutation is confirmed after detection in two independent reactions.

Notes

At the MIT biopolymers facility and probably with most sequencing centers, when doing a run-off sequencing reaction, an extra (sometimes pretty high amplitude) ‘A’ peak is seen at the end before the template ends. The workers at the biopolymers facility seemed surprised when they were told about this, but they were able to find out that the sequenase enzyme used in the sequencing reaction is a genetically modified form of Taq. Therefore, it is most probable that the extra A is the template-independent A that Taq tends to add to the 3′-end of DNA.

Q: The MIT sequencing center recommends an amount of template DNA for a sequencing reaction. If I have a mixed sample of DNA (for example, two plasmids purified from a culture) and want some of it sequenced (for example, one of the plasmids), should I submit the recommended amount of total DNA or the recommended amount of the DNA of interest?

A: It’s best to submit a pure sample…but if you cannot, I would make sure that you submit the required amount of the template that the primer that you are using will anneal to.

Any other DNA will not get labeled with the fluorescent dyes that we use to call a sequence….and will hopefully be inert…it should be inert unless your primer also anneals to the contaminant DNA.

The dynamic range of the DNAsequencer is between 10 to 1000 nanograms…so if you are in that ballpark it should work.

Phage enrichment-PDF

Overview

The goal of this method is to enrich your sample for phages capable of infecting your desired host. This is done by removing the endogenous bacteria from your sample and adding it to bacterial culture media and a growing culture of your host, and then incubating it. If even a single phage capable of infecting the inoculated bacterial strain is present in the sample, it will replicate to levels which should be detectable by normal plating techniques.

The volumes used for enrichment can vary, from as little as 1 ml of sample to many liters. Increasing the enrichment volume increases the sensitivity of the procedure, so if you expect your phages to be rare in the sample, a larger enrichment volume is needed. The method below describes enrichments in a convenient volume for many labs: 50 ml in a 250 ml culture flask. This volume can be scaled up or down depending on your individual needs and capacity.

This protocol was written by Jason J. Gill at the Center for Phage Technology at Texas A&M University (rev.7/12/11) and is posted with permission (and minor editing/formatting).

Procedure

Fluid samples (water, sewage influent, etc.)

  1. Centrifuge your sample at 8000 x g, 10 min.
  2. Filter the clarified supernatant through a 0.45 or 0.22 μm filter to remove any endogenous bacteria. For small-scale samples this may be done with a syringe filter or Millipore “Steriflip” unit; larger samples can be filtered with vacuum-driven filter flasks or tangential flow units. Store at 4 ºC.
    Your sample is now sterile and must be handled aseptically from now on.
    Note that filtered sewage may still contain human pathogenic viruses such as Hepatitis A or Norwalk virus; handle these samples accordingly.
  3. Add 10 ml of filtered sample to 40 ml of sterile broth medium in a 250 ml culture flask, inoculate with 100 μl of a fresh overnight host culture. Incubate this enrichment culture under whatever conditions the host favors, usually overnight is sufficient for most bacteria; longer incubations may be required for slow-growing bacteria.
    In order to enrich larger sample volumes in smaller culture volumes, the sample may be added to concentrated broth medium. For example, use 25 ml sample + 25 ml 2X broth, or 40 ml sample + 10 ml 5X broth.
    The amount of host culture to add is not critical, but it should be enough that would normally produce a saturated culture over the period of the enrichment if it were inoculated into the same volume of unamended broth. Typically inoculations of 1:1,000 to 1:100 are used.

Solid samples (soil, sewage sludge, etc.)

  1. Add your solid sample at a 1:4 (w/v) ratio to sterile broth medium (e.g., 50 g soil + 200 ml broth) in a beaker or centrifuge bottle. Shake or stir the resulting slurry for 1-2 hrs at RT.
  2. Centrifuge the slurry at 8000 x g, 10 min. Filter-sterilize the supernatant as described in step 1.1.2. Store at 4 ºC.
    The phages from the solid sample should have eluted into the broth medium.
    These supernatants are often difficult to filter-sterilize; samples may be spun harder (e.g., 12,000 x g, 10 min) or pre-filtered using a sterile paper filter (e.g., Whatman 597 ½ pre-folded filters).
  3. Because the sample was processed using culture medium, the sample can be aliquoted into a culture flask and inoculated with host culture directly. Add 50 ml of filter-sterilized sample to a 250 ml culture flask, inoculate with host culture and incubate as described in step 1.1.3.

Processing enrichment cultures

  1. Remove 10 ml of the enrichment culture and place into a sterile 15 ml Falcon tube, centrifuge at 8,000 x g, 10 min. Filter sterilize the resulting supernatant through a 0.22 μm syringe filter, store at 4 ºC.
    Even if an enrichment culture appears turbid, it may still contain phage. Process all enrichment culture regardless of appearance following enrichment.
  2. If you have several enrichments, it is usually a good idea to screen them for the presence of phage by simply spotting 10 – 20 μl of each undiluted enrichment to a lawn composed of the same host used for enrichment (see the Plating out Phage protocol). Those cultures that yield a clear zone under the spot probably contain phage and should be plated out and subcultured (see the Subculturing Phage protocol).


Engineering BioBrick vectors from BioBrick parts/Dephosphorylation-PDF

To minimize self-ligated vector in your transformation, treat your linearized vector with a phosphatase to remove the 5′ phosphates necessary for ligation. This should improve the percentage of colonies with inserts.

Materials

  • 5 units Antarctic Phosphatase from NEB
  • 10X Antarctic Phosphatase buffer
  • Deionized, sterile H2O
  • Linearized destination vector from restriction digest
  • Sterile 0.6mL plastic tubes

Equipment

  • DNA Engine Peltier Thermal Cycler (PTC-200) from MJ Research, Inc. (now Bio-Rad Laboratories, Inc., Hercules, CA).

Procedure

Vortex all reagents before use.

  1. Add Antarctic Phosphatase buffer to a final concentration of 1X to linearized vector sample.
  2. Add Antarctic Phosphatase.
    The phosphatase, like most enzymes, is in some percentage of glycerol which tends to stick to the sides of your tip. To ensure you add the correct amount, just touch your tip to the surface of the liquid when pipetting.
  3. Add deionized, sterile H2O.
  4. Incubate 60 mins at 37°C.
    This should be sufficient to remove 5′ phosphates even from 5′ recessed ends like those produced by Pst I.
  5. Heat-inactivate for 5 mins at 65°C.

Engineering BioBrick vectors from BioBrick parts/DNA ligation-PDF

Materials

  • T4 DNA Ligase from NEB
  • 10X T4 DNA Ligase buffer
  • Deionized, sterile H2O
  • Purified, linearized destination vector (in H2O)
  • Purified, linearized prefix part (in H2O)
  • Purified, linearized suffix part (in H2O)
  • Sterile 0.6mL plastic tubes

Ligation mix

  • 2-4 μL each purified, linearized DNA
  • 1X Ligase buffer
  • 200 units T4 DNA Ligase

deionized H2O to 10μL

Procedure

Vortex all reagents before use.

  1. Add appropriate amount of deionized H2O to sterile 0.6 mL tube.
  2. Add ligation buffer.
    Vortex buffer before pipetting to ensure that it is well-mixed.
    Remember that the buffer contains ATP so repeated freeze, thaw cycles can degrade the ATP thereby decreasing the efficiency of ligation. It is recommended that you aliquot the Ligation Buffer into smaller quantities.
  3. Add prefix part, suffix part and destination vector to the tube.
  4. Add T4 DNA Ligase.
    Vortex ligase before pipetting to ensure that it is well-mixed.
    Also, the ligase, like most enzymes, is in some percentage of glycerol which tends to stick to the sides of your tip. To ensure you add the correct amount, just touch your tip to the surface of the liquid when pipetting.
  5. Incubate 20 minutes on the benchtop at room-temperature.
  6. Place on ice until transformation.

Streptavidin purification of DNA fragments-PDF

Biotin Primers

  • Make primers for PCR reactions with a 5′ biotin modification
    • HPLC purification of these primers is desirable to eliminate short primers and ones without a biotin tag
    • Virtually all oligo manufacturers can supply 5′ biotin
    • An alternative is to make 5′ amine primers and link biotin to the amine group

PCR Reaction

  • Normal PCR reaction conditions apply.
  • Approximately 1 pmol/μl biotinylated primer should be used.
  • For some reason, Phusion does not work (no product)
  • 100 μl reaction
  • 100 μl PCR Supermix High Fidelity (Invitrogen)
  • 1.5 μl Suffix-FB biotinylated primer (30 pmol/μl)
  • 1.5 μl Prefix-RB biotinylated primer (30 pmol/μl)
  • 0.5 μl diluted plasmid backbone template DNA (10 ng/μl)
  • Cycle 36x
  • initial denature 95° 2 min
  • 36 cycles
    • 95° 20 sec
    • 62° 20 sec
    • 68° 4:00 min
  • final extension 68° 20 min

Post PCR Cleanup

  • Elimination of PCR enzymes and dNTPs is required prior to enzymatic cutting
  • Add 2 μl 500 mM EDTA
  • Add 1 μl Proteinase-K
  • digest at 50° for 1 hour
  • heat kill Proteinase K at 80° for 20 minutes
  • Add 5x (500 μl) Qiagen buffer PB, vortex
  • Spin in Qiagen column at 8000g 1 minute
  • Pour flow through back into the column, spin again
  • Discard flow through, add 500 μl buffer PB, spin again
  • Discard flow through, add 750 μl wash PE, spin again
  • Discard flow through, add 750 μl wash PE, spin again
  • Discard flow through, spin again at 12000g, 2 minutes to dry
  • Transfer column to a clean 1.7 ml tube, add 30 μl EB heated to 50°, spin at 8000g 1 minute
  • Add a further 30 μl EB, spin again
  • Discard the column and retain the eluted DNA
  • measure yield with the Nanodrop, expect 150-250 ng/μl in 45 μl

Restriction digests

  • Digest in a 300 μl final volume
  • Initial DNA is 45 μl from the elution
  • Add 30 μl Buffer 2
  • Add 3 μl BSA
  • Add 212 μl DI water
  • Add 5 μl EcoRI
  • Add 5 μl PstI
  • Add 1 μl DpnI
  • Digest 2 hours at 37°
  • Heat kill 20 minutes at 80°

Binding and removing uncut DNA and short ends to streptavidin-agarose

  • For binding uncut and short fragments, the salt concentration must be increased.
    • Adjust restriction digest to 1 M NaCl by adding 60 μl of 5M NaCl
  • During the binding reaction, the exposed cut ends must be protected from exonucleases by removing the magnesium
    • Chelate Mg++ by adding 20 μl of 500 mM EDTA
  • Use Pierce Streptavidin-agarose beads, Pierce 20349
    • These have high capacity, around 75 pmol/μl
  • Dispense 100 μl of the settled beads into a 2 ml tube
  • Add 1.7 ml of binding buffer, resuspending the beads
  • Wash 30 minutes at room temperature with agitation
  • Centrifuge at 8000g for 1 minute
  • Discard the supernatent
  • Add 1.7 ml of binding buffer, resuspending the beads
  • Wash for 30 minutes at room temperature with agitation
  • Centrifuge at 8000g for 1 minute
  • Discard the supernatent
  • Add 300 μl of binding buffer and resuspend the beads
  • Add the cut and adjusted PCR product (380 μl)
  • Bind overnight at room temperature with agitation
  • Centrifuge at 8000g for 1 minute in a Bio101 spin filter cartridge
  • Discard the filter
  • Add 1 μl of pellet-paint
  • Add 500 μl of isopropanol and mix
  • Freeze for 30 minutes at -80° to form a gel
  • Centrifuge at 17000g for 30 minutes to precipitate the recovered DNA
  • Wash the DNA pellet with 70% ethanol
  • Resuspend the purified DNA in 50 μl TE
  • Quantitate the DNA
    • expect about a 50% yield over the purified PCR product (3 to 6 μg total, 50 to 150 ng/μl)

Testing the purified DNA

  • Mix a master ligation mix containing
    • 250 ng of DNA
    • 7.5 μl T4 DNA ligase buffer
    • water to 75 μl
  • Set aside 15 μl as a reference band A and add to it 1 μl of 500 mM EDTA to remove magnesium
  • Add 0.3 μl T4 DNA ligase
  • Restriction enzymes require some salt for activity
    • Adjust salt concentration to 25 mM by addition of 1.6 μl of 1 M NaCl, mix
  • Aliquot 15 μl samples to tubes B, C, D, and E
    • Add 0.3 μl EcoRI to sample C
    • Add 0.3 μl PstI to sample D
    • Add 0.3 μl EcoRI and 0.3 μl PstI to sample E
  • Ligate 60 minutes at 16°
  • Cut for 10 minutes at 37°
  • Heat kill for 20 minutes at 80°
  • Run an 0.8% gel
    • Ligated band B should show little single length fragment and a high MW smear, with some double and quad length fragments
    • Ligated and single cut bands C and D should show double length fragments
    • Ligated and double cut band E should show single length fragments

Binding buffer

  • 1 M NaCl
  • 20 mM Tris-HCl pH 7.5
  • 5 mM EDTA pH 8.0
  • 0.1% NP-40 detergent

Construction Plasmid Biotin Primers

  • Primers amplify any Biobrick plasmid backbone
  • Order 50 nM, 5′ biotin modification, HPLC purified
  • GTT TCT TCC TCT AGA AGC GGC CGC GAA TTC,Prefix-RB
  • GT TTC TTC TAC TAG TAG CGG CCG CTG CAG,Suffix-FB
  • Dilute to 30 pmol/μl with TE
  • Optimal annealing temperature seems to be about 62°

Ligation and Restriction enzyme buffers

  • T4 DNA Ligase Buffer
    • 50 mM Tris-HCl
    • 10 mM MgCl2
    • 1 mM ATP
    • 10 mM DTT
    • 25 ng/μl BSA
    • pH 7.5
  • EcoRI buffer
    • 100 mM Tris-HCl
    • 50 mM NaCl
    • 10 mM MgCl2
    • pH 7.5
    • star activity with NaCl < 25 mM
  • PstI (Buffer 3)
    • 50 mM Tris-HCl
    • 100 mM NaCl
    • 10 mM MgCl2
    • 1 mM DTT
    • low salt gives star activity

Affymetrix DNA labelling for gene expression arrays-PDF

Affymetrix DNA labelling for gene expression arrays

This protocol will allow you to perform the labeling of DNA ready for Affymetrix expression GeneChip analysis.

Workflow

Materials

  • BioPrime Random Genomic DNA Labeling kit
  • Do not store enzymes in a frost-free freezer.
  • Miscellaneous Reagents

Protocol

BioPrime Random Genomic DNA Labeling Protocol

Extract DNA from a single leaf of each of 4 Columbia and 4 Ler plants using Qiagen DNA easy plant prep kit and re-suspended in 100ul. To extract equal amount of DNA from the 50 – 100 mutant or wild type F2 plants, take 1 leaf (or equal amount of tissue) from each plant and freeze together in liquid nitrogen. Grind tissue together and use ~100mg powder in the Qiagen DNA easy kit. Resuspend DNA in 100ul.

Total labeling reaction volume is 150ul

add ~30ul (300ng) Plant DNA 60ul 2.5X random primers (Bioprime kit). to 132ul with H20 (~42ul)

Denature at > 95C for 5-10minutes, then cool on ice.

add 15ul 10X dNTPs mix with Biotin dCTP 3ul Klenow polymerase enzyme

Incubate overnight @ 25C (room temp). This results in small labeled products about 50bp (Figure 1).

add 15ul 3M NaOAc 400ul cold 100% EtOH spin, remove supernaunt, and wash with 500ul cold 75% EtOH resuspend in 100ul water

Labeling QC

Use 5ul to check yield and quality on a gel (Figure 1).

BioPrime labeled DNA.

Figure 1. 5ul of Bioprime genome DNA labeling. Thanks Todd Michael.

All bands should be close to the same intensity.

Hybridisation

The labeled DNA is then treated the same as labeled cRNA in standard hybridization protocols for gene expression, see Eukaryotic Target Preparation Pg 51 [1] Briefly.

95ul Labeling reaction 3.3ul Control Oligo B2 (3nM) 10 ul Eukaryotic Hybridization Controls (optional) 2ul Herring Sperm DNA (10mg/ml) 2ul Acetylated BSA (50mg/ml) 110ul 2X hybridization buffer

Final Volume ~225ul Heat Denature >95C for 5 minutes, then cool Replace 1X hyb solution in pre wetted warmed chips. with 200ul (of ~225ul) labeled hybridization cocktail. Hybridize overnight @ 45C with rotation 60rpm. Wash and double stain with antibody.

Contact

  • mail to jamesdothadfieldatcancerdotorgdotuk
  • This page was created by James Hadfield on 17 October 2006. It was based on a protocol I recieved from Justin Borevitz 3/19/2004, hope you found it useful.

Electrophoretic mobility shift assay-PDF

Overview

This assay permits testing of specific binding of proteins to DNA fragments. DNA that is bound to protein will migrate slower in a nondenaturing polyacrylamide gel than unbound DNA during electrophoresis.

Most protocols rely on 32P labelling of the DNA fragment. However, it is also possible to detect the DNA via nonradioactive detection methods (like fluorescence). Ethidium bromide staining is generally not sensitive enough since usually small amounts of DNA are used in this assay.

References

Background information

  1. EMSA by Pierce
  2. Electrophoretic mobility shift assay from Wikipedia

Papers

  1. Garner MM and Revzin A. A gel electrophoresis method for quantifying the binding of proteins to specific DNA regions: application to components of the Escherichia coli lactose operon regulatory system. Nucleic Acids Res. 1981 Jul 10;9(13):3047-60. DOI:10.1093/nar/9.13.3047 | PubMed ID:6269071 | HubMed [Garner-NAR-1981]
    early paper describing gel shift assays
  2. Jing D, Beechem JM, and Patton WF. The utility of a two-color fluorescence electrophoretic mobility shift assay procedure for the analysis of DNA replication complexes. Electrophoresis. 2004 Aug;25(15):2439-46. DOI:10.1002/elps.200405994 | PubMed ID:15300760 | HubMed [Jing-Electrophoresis-2004]
  3. Jing D, Agnew J, Patton WF, Hendrickson J, and Beechem JM. A sensitive two-color electrophoretic mobility shift assay for detecting both nucleic acids and protein in gels. Proteomics. 2003 Jul;3(7):1172-80. DOI:10.1002/pmic.200300438 | PubMed ID:12872218 | HubMed [Jing-Proteomics-2003]

All Medline abstracts: PubMed | HubMed

Protocols

  1. Mobility Shift DNA-Binding Assay Using Gel Electrophoresis from Current Protocols in Molecular Biology
  2. Gel Retardation Assays for DNA-binding Proteins from Molecular Cloning (subscription required)

Kits

  1. EMSA kit from Invitrogen
    • primary advantage is that this protocol doesn’t require use of radioactivity or prelabelling of DNA, sensitivity is questionable however
    • Also see relevant papers [2, 3].
  2. LightShift Chemiluminescent EMSA Kit from Pierce
    • claimed to be more sensitive than radioactive and digoxigenin methods