Friday, April 11, 2025
Home Blog Page 13

PCR Overlap Extension-PDF

Overview

Create long DNA fragments from shorter ones. This method is also called “Splicing by Overlap Extension” or SOEing.

Procedure

  1. Design Primers:
    1. These primers are like bridges between the two parts you want to assemble together.
    2. You will order two primers which are complements of one another.
    3. These primers will each have a 60°C Tm with one part and a 60°C Tm with the other part.
    4. The “end primers” will not have any complements and will likely only have restriction sites.
  2. Extension PCR” PCR amplify the necessary fragments separately
    1. Use a proofreading polymerase enzyme.
    2. Use an annealing temp of 60°C.
  3. Clean up the product using a DNA column.
  4. Overlap PCR” Use cleaned up fragments as template in a PCR reaction:
    1. About 1/2 to 3/4 volume of the Overlap PCR reaction should be equimolar amounts of purified fragments.
    2. Do not use Phusion polymerase. Try Pfu Turbo.
    3. Do not add any primers; the templates will prime each-other.
    4. Run 15 PCR cycles without primers.
    5. Use an annealing temp of 60°C.
  5. Purification PCR” Add end primers to the Overlap PCR reaction:
    1. Continue cycling for another 15-20 rounds.
    2. Use an annealing temp of 72°C
  6. Gel extract the correct size fragment.
  7. Clone into the desired vector.
    1. Digest
    2. Ligate
    3. Transform
    4. Select
    5. Sequence

Protocol for Bioanalyzer RNA nano chip-PDF


Preparation of material

  • Prepare a maximum of 12 samples per chip.
  • Maximum concentration recommended is 500ng/µl, 1000ng/µl is okay.
  • Denature RNA 70°C 2min, cool on ice.

Cleaning, gel preparation (start 40min before experiment)

  • take out filtered gel aliquot and fluorescent dye from fridge next door 30min ahead of time (1 gel aliquot tube enough for 2 chips)
  • take out ladder from -80 freezer nextdoor (r145), column 5, nano white box / pico yellow
  • vortex dye 10s and spin down
  • mix one tube gel aliquot with 1µl of dye
  • vortex, centrifuge 13000g +-20% for 10min (12000 rpm on Biofuge pico)
  • wash electrodes 1min RNase ZAP, 2x30s water (pipette 500µl into any well, spreads from there)

Prepare chip for measurement

  • take out new RNA chip (pico or nano) from drawer below microarray machine and put into station
  • fill 9µl gel into dark circle G well (gel reservoir)
  • press down plunger and wait 30sec (gel moves through channels)
  • after 30sec release silver trigger (should jump up well above 0.3, meaning seal was tight)
  • wait 5sec, pull plunger up all the way
  • open priming station, add 9µl gel to light circle G wells
  • 5µl of marker into all sample wells and ladder well, bottom right (contains small marker to align plots)
  • 1µl of sample per well, add 1µl of water or replicates into free wells (6µl required per well for machine to run properly)
  • 1µl of ladder into ladder well
  • vortex in holder for 1min and put into machine

Start the run

  • start 2100 expert software
  • choose programme for kit: DNA/RNA pico/RNA nano and material: total RNA/mRNA, prokaryotic/eukaryotic
  • start run

Wash, export data

  • typical RNA nano run takes just over 20min
  • wash 2x30x w water immediately after the run has ended (electrodes in the lid will quickly deteriorate otherwise)
  • to export data as PDF you have to print; (PDF option checked will save file, PDF unchecked will print on paper)

Expected results

  • expect quantitative range 25–500 ng/μl [claim from the manual]
  • expect quantitation accuracy 20%CV (for ladder as sample) (CV = coefficient of variance) [claim from the manual]

Test run with mouse total RNA

  • 6 replicas, 378 ng/µl according to nanodrop, Qiagen RNeasy column purified

Bioanalyzer results:

  • mean concentration 397 ng/µl ± 18 ng/µl (CV 4%); range 371-417;
  • measured RINs: 10, 10, 10, n/a, n/a, 10

Conclusions:

  • RNA concentration in good agreement w nanodrop & tighter than expected spread
  • automatic graphical analysis of electropherograms failed in every 3rd replica!!

Protocol for Bioanalyzer RNA pico chip

The protocol is very similar for the PICO kit. Similar but reagents adjusted for this kit are used, i.e. a different ladder, marker, and gel.

  • quantitative range 50–5000 pg/μl total RNA, 250-5000 pg/µl mRNA
  • quantitation accuracy 30%CV (for ladder as sample)
  • recommended buffer 50 mM Tris or 50 mM NaCl (assay sensitive to high salt)

Unlike in the nano kit the conditional buffer well has to be filled when using the pico kit.

Stability of reagents

  • manual warns that gel-dye mix should be kept at 4°C if stored for more than 1h to prevent degradation
use gel-dye mix within 4 weeks after preparation
  • dye is light sensitive! keep in the dark (but it’s not that 2h under electric light in the lab will render your gel-dye mix unusable)

Troubleshooting & tips

A few typical problems occur once in a while:

  • small RNA marker is not properly recognised (often the next peak is selected => fragments size mislabelled)
cleak peak table, a tab at the bottom of the window; lower marker can be manually set here
  • 18S, 28S not properly assigned (=> RIN number incorrect)
  • peak baseline misplaced resulting in incorrect area calculations for rRNA peaks (adjust by hand)
  • obscure “serial port” communication errors occurs frequently but can be ignored and has no impact on the readings
  • physical movement of the bioanalyzer can cause errors but small movements like vibrations from a shaker on the same becnh are typically ok

Tips:

  • pipette gel-dye mix from the top of the tube after centrifugation to reduce the risk of larger particles obstructing the gel run or of dye agglomerates influencing the fluorescent read

Real-time PCR-PDF

Real-time PCR is a PCR technique used to quantify starting amounts of nucleic acid template by analysing the amount of DNA produced during each cycle of PCR. It is a form of quantitative PCR (Q-PCR).

Real-time PCR is often preceded by reverse transcription to quantifiy RNA via their cDNA. In fact, mRNA quantification is one of the most frequent uses of real-time PCR. The sub-technique is sometimes called qRT-PCR for quantitative reverse transcription PCR.

Principle

Amplification of DNA is exponential in the early and middle cycles of a PCR (i.e. it is linear on a logarithmic scale). This property can be exploited to infer the starting amount of PCR template (see diagram in Hunt tutorial). During the exponential or log phase each copy of DNA is being amplified, and thus can be a better measure than in endpoint PCR, where reagents such a nucleotides may become exhausted and result in inefficient amplification, resulting in inaccurate quantification of the gene of interest.

Real-time PCR is more precise than previously used reverse transcription PCR (RT PCR) because the generation of product is continuously monitored during the PCR run (this is where the term “real time” comes in), rather than at the end of a PCR reaction (“endpoint” PCR).

Generation of product is detected in one of two ways [1]. First, the amount of double stranded DNA in the tube can be measured using fluorescent dyes which intercalcate double-stranded DNA (like the DNA binding dye SYBR Green I). The intensity of fluorescence is proportional to the quantity of DNA present in the reaction. Second, the amount of PCR product can be measured by monitoring the hybridization of a set concentration of fluorescently labeled probe oligonucleotide. The oligo probe provide selectivity and only monitors the concentration of PCR product with a particular sequence. In contrast, SYBR green I will bind even nonspecific PCR products.

Notes

  • When using SYBR Green I to measure DNA concentration, it is important to run the PCR product out on a gel to verify that there is only a single amplification product [1].
  • When using SYBR Green I, the amount of fluorescence in a PCR product depends on the length and base composition of the product [1]. So it is not possible to compare the concentrations of two different templates without having control templates of known concentration for each target DNA region.

PCR techniques-PDF

Several techniques have have been derived from the basic polymerase chain reaction (PCR). Below is an overiew of important PCR methods with links to individual pages for detailed information.

  • PCR (polymerase chain reaction) is a method for exponentially amplifying a fragment of DNA in vitro.
  • Nested PCR is 2 successive PCRs with the 2nd set of primers nested inside the 1st pair. It is used to reduce unspecific products.
  • Multiplex PCR is a PCR with >1 primer pair run in a single reaction. It reduced material consumption but is hard to optimise. It is often used in mouse genotyping for example.
  • Colony PCR is a PCR technique to detect DNA in bacterial colonies. Colonies are picked, lysed, and amplified by PCR. It is used to detect successful ligations or recombinations among large numbers of bacterial colonies.
  • RT-PCR (reverse transcription PCR) is essentially normal PCR preceded by a reverse transcription converting RNA to cDNA. It is used to amplify an RNA molecule like messenger RNAs. Confusingly, RT-PCR is used as an abbreviation for real-time PCR.
  • Q-PCR (quantitative PCR) is used to determine the quantity of starting nucleic acid template. There are 2 main methods: PCR with dsDNA dyes and PCR with probes. dsDNA dyes and probes allow measurement while the PCR is running, i.e. in real-time, and are therefore often named real-time PCR (see below). Probes are superior to dsDNA dyes but also more expensive. DNA can also be quantified with a simple PCR followed by agarose gel electrophoresis (qPCR end-point assay). If done properly with serial dilutions of starting DNA template to establish a linear relationship between band intensity and starting material, this approach is also quantitative.
  • Real-time PCR is used to determine the quantity of DNA during the PCR step (i.e. in “real-time”) and thus a subset of the Q-PCR methods. It uses fluorescent dyes or fluorophore-DNA probes to measure the amount of amplification in real time. This is used to infer starting amount. Real-time PCR is often confusingly abbreviated as RT PCR which overlaps with reverse transcription PCR.
  • Quantitative RT-PCR (quantitative reverse transcription PCR) refers to quantitative PCR of cDNA (which has been reverse transcribed from RNA). Like quantitative PCR, you can quantify the starting RNA template either during the reaction (“real-time reverse transcription PCR”) or at the end of the PCR step.
    • qRT-PCT can be done either in one tube or two tubes.

Quantitating nucleic acids-PDF

Procedure

Measuring nucleic acid concentration in a spectrophotometer

Pipette your nucleic acid sample into a cuvette and record an absorbance scan from 240-340 nm.

Most calculations are done from the Abs at 260 nm.

Why scan instead of single-point reading? You want to make sure the 260 value you record is coming from the absorbance of nucleic acid and not from protein dust or phenol or any other junk that may be in your sample.

DNA

Divide the absorbance at 260 nm by 0.02 for dsDNA or 0.027 for ssDNA. This is the “concentration” in μg/mL. To get concentration, you have to know the length of your molecule and use the mass/volume to calculate a concentration.

RNA

ss RNA, Divide by 0.025. There is no good way of calculating a value for folded RNA so see the next entry. You’ll notice that the peak of absorbance for RNA is left at 260, this is normal.

Make your RNA Extinction coefficients

I couldn’t find the extinction coefficient for individual ribosomal subunits, so I did the following.

Use this reference for more info: Cavaluzzi MJ, Borer PN. 2004.

I purified the subunits. Then, I prepared several samples. Each was diluted to the same extent in the final reaction. One “Native” folded form that was in a translation buffer, one “dissociated” in Phosphate and EDTA, and one “hydrolyzed” to get an accurate concentration measurement.

The hydrolyzed sample was prepared by incubating 5 μL of the ribosome with 20 μL of 1.0 N NaOH for 1 hour at 37 degrees. Then I neutralized the sample with 20 μL of 1.0 N HCl. I Added 1 mL of 100 mM NaHXPO4 at pH 7.0 with 1 mM EDTA. (this is the same pH used by Cavaluzzi and Borer).

Measure the absorbance of all three samples. I did mine in triplicate and averaged the final values.

So, use the known extinction coefficients obtained by Cavaluzzi and Borer. Use a word processor to determine the number of nucleotide in your particular RNA and multiply by the extinction coefficient for that nucleotide. Then sum the four values. This will give a “formal” extinction coefficient for your RNA.

Ext. Coeffs at 260;

pA = 15,020

PC = 7,070

pG = 12,808

pU = 9,660

Using the observed A260 for your fully hydrolyzed RNA sample, determine the concentration of your RNA.

Now, with that known concentration and the measured A260 of the native and unfolded samples, generate extinction coefficients for these conditions. In the future, you won’t have to hydrolyze the samples, just dilute them in a buffer and measure.

I calculated the following for E. coli ribosomal subunit RNAs:

Hydrolyzed:

23S = 33,386,832

16S = 17,588,970

5S = 1,318,308

23S + 5S (large subunit) = 34,705,140

In 100mM NaHXPO4 1 mM EDTA:

50S = 25,457,162

30S = 13,646,276

70S = 39,103,438

In 100 mM K+glutamate, 6 mM MgCl2, 20 mM Tris-HEPES pH 7.8, 0.05% Tween-20, 14 mM mercaptoethanol

50S = 27,058,100

30S = 13,394,967

70S = 40,453,067

I usually dilute a ribosome prep 1/500 to 1/1000 in PO4 buffer and measure that because the tween and mercaptoethanol absorb like crazy and make variable baselines.

Ethanol precipitation of nucleic acids-PDF

Material

  • 100% ethanol (for analysis)
  • 70% ethanol (stored @ 4°C)
  • 3M sodium acetate pH 5.2 (store @ 4°C)
  • 5M ammonium acetate
  • -20°C freezer
  • Optional: you can use linear polyacrylamide, glycogen, or tRNA as a precipitation carrier
  • tabletop centrifuge

Procedure

Eppendorf Protocol

How to arrange tubes in the centrifuge.
Pellets can be very small and hard to see.

  1. Add the following to your sample in the order they appear:
    • 1/10 volume of 3M sodium acetate, pH 5.2, or 1/2 volume of 5M ammonium acetate
    • 2-3 volumes of 100% Ethanol
  2. Mix and freeze overnight at -20. This step some say is unnecessary but others swear by it. If you are in a rush you can also put it in the -80 for ten minutes to a few hours. Dry ice for 10-15 minutes also works.
    • In general, the time you need to incubate in the freezer depends on how much nucleic acid you have, how big it is, and the volume it is in. My general protocol is to freeze for 20 min to 1 hr at -80 ËšC. This seems to work well for most things, but you may want to freeze longer if you have only a small concentration of nucleic acid or if it is small in size(<15 nucleotides).–
    • If you are in a hurry, you can also dip your epi shortly into liquid nitrogen. If you add enough ethanol, the mix won’t freeze. Be careful with isopropanol – it freezes more quickly. This works well for me and saves me a lengthy incubation in the fridge.
  3. Spin at full speed in a standard microcentrifuge at 4 degrees for 30 minutes. Make sure to mark the outermost edge of the tube so you can find the pellet easily (or just put the hinge portion of the tube to the outside). It is clear and usually looks like a little smudge on the tube.
  4. Decant (or carefully pipet off) the supernatant.
  5. Dry the pellet. For this, you can air dry (tubes open, ~15 min) or dry in a speed vac. DNA and RNA (if you don’t have RNases in your sample) are typically hearty enough for you to air dry at 37 ËšC if desired.
    • Overdrying can make DNA hard to re-dissolve. Especially for longer DNA, I avoid vacuum drying and air dry only briefly before re-dissolving.
  6. Add your desired quantity of water. Vortex and spin down to resuspend.
    • Beware of using water unless you are sure of what you are getting into. The “pH” of water can vary widely (I’ve seen from pH 5 to pH 8.5), and depurination of DNA at low pH or degradation of RNA at high pH are possibilities. Water also typically contains trace metals, which can accelerate these reactions. I typically recommend resuspension in TE (10 mM Tris-HCl, pH 7.5, 1 mM EDTA). This makes sure your nucleic acid is at a neutral pH and the EDTA will chelate any trace metals. Since they are in such small amounts, neither the buffer nor the EDTA will affect most downstream reactions.

96 Well Plate Protocol

  1. Add to each 10 µl product:
    • 1.9 µl of Na acetate 3M
    • 60 µl of 85% ethanol
  2. Mix thoroughly (vortex ???) and keep at -20°C for 30 min
  3. centrifuge for 45 min at 4000 rpm and 4°C (program 3; balance)
  4. remove supernatant (invert tube on trash once)
  5. add 150 µl of 70% ethanol and mix
  6. centrifuge for 15 min at 4000 rpm and 4°C
  7. remove all supernatant (invert tube on trash)
  8. invert the tube on paper tissue
  9. centrifuge for 2 min at 500 rpm
  10. take out the tube and let it dry in the fume hood at room temperature for 10-15 min
  11. put 20 µl of formamide dye using a multi pipette (nasty chemical to manipulate in fume hood)
  12. vortex thoroughly/spin/vortex/spin
  13. transfer the 20 µl (multi pipette) to a sequencing plate
  14. put septum on top, press, tap once (do NOT mix)
  15. keep on ice in the aluminum rack
  16. Heat for 3 min at 95°C (SWATI/95-CST) to keep in single-stranded form)
  17. keep on ice in the aluminum rack

Notes

  • We tend to wash the DNA with 70% Ethanol after removing the first supernatant (the one containing sodium acetate and 100% Ethanol). This means adding 200-300µl 70% Ethanol to the DNA pellet. Then spin at full speed for 5mins @ 4°C. Carefully remove supernatant. Proceed with drying.

Phenol/chloroform extraction-PDF

General Information

Phenol/chloroform extraction is an easy way to remove proteins from your nucleic acid samples and can be carried out in a manner that is very close to quantitative. Nucleic acids remain in the aqueous phase and proteins separate into the organic phase or lie at the phase interface.

General Procedure

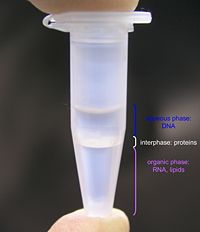
DNA extraction with phenol/chloroform/isoamyl alcohol pH 8 – aqueous top phase contains the majority of DNA, interphase mostly proteins, and lower organic phase most of the RNA and lipids

It is typically easiest to carry the extraction out in 1.7–2 mL eppendorf tubes.

  1. Dilute your nucleic acid sample to 100–700 µL or divide your samples into tubes such that you have no more than 700 µL per tube. It is difficult to do the extraction with volumes smaller than 100 µL. The sample can be concentrated again after precipitation.
  2. Add an equal volume of phenol to the tube, vortex vigorously to mix the phases.
  3. Spin in a microfuge at top speed for 1–2 min to separate the phases.
  4. Remove the aqueous phase to a new tube, being careful not to transfer any of the protein at the phase interface.
  5. Repeat the phenol extraction two more times.
  6. Extract the sample two times with an equal volume of chloroform:isoamyl alcohol to remove any trace phenol.
  7. Precipitate the nucleic acid.

Reagents

  • Phenol equilibrated to pH 7.5 (pH is important, see Notes below)
  • Chloroform:isoamyl alcohol in a 24:1 ratio

Notes

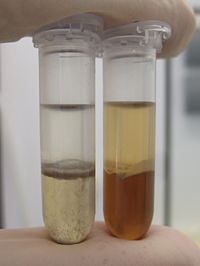
Phenol/chloroform extraction of mostly genomic DNA from different tissue samples. Left: mouse tail sample; right: parallel extraction from mouse liver sample.

  • Equilibrated phenol can typically be purchased from commercial sources. Alternatively, you can equilibrate it yourself. Be advised that this is NOT a fun procedure to carry out. The pH is important since chromosomal DNA will end up in the phenol phase if the pH is acid (arround pH 5). This fact can be used for RNA extraction but it is not a good idea to use acid phenol to clean your chromosomal DNA from proteins.
  • Phenol can undergo oxidation. Oxidized phenol will appear yellow or red in color (instead of clear) when saturated with water or buffer.
  • Phenol and chloroform should be used in a hood if possible.
  • Phenol is a dangerous substance that will burn you if it gets on your skin. WEAR GLOVES and BE CAREFUL. Check out the MSDS to verify the precautions you should take. A solution of PEG 400 is recommended for first aid. Phenol is both a systemic and local toxic agent. You want to visit the medical center.
  • If you’re in a hurry, you can shorten the protocol to two phenol extractions and one chloroform extraction. The number of repetitions also depends on what kind of sample you have and what you want to do with it. If you have whole cell extracts you want to use more phenol steps as if you have only one restriction enzyme to get rid of. In the same way you might not care about residual phenol if you just want so run your DNA or RNA on a gel so one chlorophorm step is sufficient. Some other reactions you can do with nucleic acids are more sensitive to phenol so you should use chlorophorm two times.
  • There are also commercial sources of phenol and chloroform mixed together and equilibrated. These are also sufficient for extraction, and I would recommend doing at least two extractions if you decide to go this route. Phenol:Chloroform:Isoamyl alcohol usually has an upper layer of buffer saturated water in the bottle. Do not use this buffer layer — you want the phenol/chloroform layer underneath.
  • Be careful to determine which layer is the phenol. The density of pure phenol (unlike phenol:chloroform:isoamyl alcohol) is almost 1.0. Small changes in the density of your water layer (excess salt, e.g.) can lead to layer inversion.
  • Removing the lower layer first can make it easier to recover the upper layer
  • Recovery can be improved by “washing” the upper layer by adding water, vortexing, recentrifuging, and recovering the water layer again.
  • Some people use pure chlorophorm instead of chloroform:isoamyl alcohol

Return to Protocols

Agarose gel electrophoresis-PDF

General Procedure

  1. Cast a gel
  2. Place it in gel box in running buffer
  3. Load samples
  4. Run the gel
  5. Image the gel

Casting Gels

0.7% agarose gel with 1kbp ladder in UV and white light showing different dyes

The amount of agarose to use in your gel depends on the DNA in question. Use the following table as a rough guide:

Agarose Concentration (g/100mL) Optimal DNA Resolution (kb)
0.5 1 – 30
0.7 0.8 – 12
1.0 0.5 – 10
1.2 0.4 – 7
1.5 0.2 – 3
  1. Measure out the appropriate mass of agarose into a beaker with the appropriate volume of buffer (see below). The volume required depends on your gelbox / casting system — 50mL makes a good, thick gel for a 7x10cm gelbox.
  2. Microwave until the agarose is fully melted. This depends strongly on your microwave, but a 90 seconds at full power or 3 minutes at half power seem to provide decent results. As long as you do not burn the agarose and nothing bubbles over, this step is robust.
  3. Let the agarose cool on your bench until touching the bottom of the beaker with your bare hand doesn’t burn you (~5 minutes for a 50mL gel). At this point add your DNA stain, e.g., ethidium bromide. The beaker will cool unevenly (surface first), so you must be careful not to cause ripples and bubbles.
  4. While the solution is cooling, seal the open edges of your gel box with one long piece of masking tape on each side. Make sure it is sealed well or the gel will leak.
  5. Pour the agarose solution into the taped gelbox. Carefuly pop or shove to the side any bubbles, put in the comb, and let it cool for about 30 minutes, until the gel is solid.

If your gel is at all purple, and you are using ethidium bromide as the DNA stain, you need to decrease your concentration by at least a factor of ten.

Buffers

  • TAE – better resolution of fragments >4kb;
  • TBE – better resolution of 0.1-3kb fragments; TBE is better suited for high-voltage (>150V) electrophoresis than TAE because of its higher buffering capacity and lower conductivity;
  • SB – Sodium borate – low heat generation with good resolution. Allows for higher voltage (250-200V) electrophoresis without melting.

Loading dyes

dye 0.5-1.5% agarose 2.0-3.0% agarose*
xylene cyanol 10’000-5000 bp 750 bp
bromophenol blue 400-500 bp 100 bp

*sieving agarose

Notes

  • Unless your gel box is made from temperature sensitive materials, I’ve found the cooling step unnecessary, and risky if you get distracted easily.
  • Often, the amount of dye you use can be dramatically reduced if you add it directly to your DNA sample and not to the entire gel. This is the case with SYBR green.

External links

Genomic DNA prep (LiAc SDS method)-PDF

Overview

This protocol is for rapidly isolating genomic DNA from an yeast colonies. These protocols were adapted from Lõoke M, et al. (2011). Please see the reference below and cite it if you use this protocol.

Materials

  • Yeast colonies
  • 0.2 M LiAc 1% SDS solution
  • 100% Ethanol
  • 70% Ethanol

Protocol (tubes)

  1. Pick a colony into 50 uL 0.2 M LiAc 1% SDS solution and mix well by vortexing
  2. Incubate at 70C, 5 min.
  3. Add 150 uL 100% EtOH
  4. Centrifuge at 14,000 rpm, 30 sec, room temperature
  5. Aspirate the supernatant
  6. Resuspend in pellet in 100 uL 70% EtOH
  7. Pellet and aspirate as before
  8. Resuspend pellet in 25 uL H2O
  9. Centrifuge at 14,000 rpm, 30 sec, room temperature to collect cell debris
  10. Use 1 uL supernatant for PCR

Protocol (96-well plates)

  1. Pick a colony into 50 uL 0.2M LiAc 1% SDS solution in a 96-well PCR plate
  2. Heat to 70C, 5 min
  3. Add 150 uL 100% EtOH
  4. Centrifuge at 3,000 rpm, 5 min
  5. Drain the supernatant onto paper towels, about 5 minutes
  6. Resuspend pellets in 70% EtOH
  7. Pellet and drain as before
  8. Resuspend pellet in 25 uL H2O
  9. Centrifuge at 3,000 rpm, 5 min to collect cell debris
  10. Use 1 uL supernatant for PCR

Genomic miniprep/Sigma kit-PDF

Overview

Protocol for the genomic DNA extraction of Acetobacter xylinum.

Materials

  • Sigma GenEluteâ„¢ Bacterial Genomic DNA Kit
  • Inoculate A. xylinum after at least 3 days of growth.

Protocol

See here [1] for the detailed PDF instructions that come with this kit. This protocol is tailored to the extraction of A. xylinum genomic DNA.

  1. Pre-heat water bath to 55°C.
  2. Pipette 500 ul of Column preparation solution into each pre-assembled binding column and spin down at 12,000 X g for 1 min. Discard the eluate.
  3. Pellet 1.5 ml of an overnight culture of xylinum in an eppendorf tube, centrifuge for 2 minutes at 12,000 X g.
  4. Resuspend the pellet thoroughly in 180 ul lysis buffer T.
  5. Add 20 ul of Proteinase K solution to the to the resuspension solution. Invert 4-6 times to mix and incubate for 30 minutes at 55°C.
  6. Add 200 ul of lysis solution C. Vortex mixture thoroughly for 15 seconds and incubate again at 55°C for 10 minutes.
  7. Add 200 ul of ethanol (95-100%) to the lysate and mix thoroughly by vortexing for 5-10 seconds. Ensure mixture is homogeneous.
  8. Transfer the cleared lysate into the binding column.
  9. Centrifuge at 6500 X g for 1 minute. Replace the collection tube.
  10. Add 500 ul of Wash Solution 1 to the column and centrifuge for 1 minute at 6500 X g. Replace the collection tube.
  11. Add 500 ul of Wash Solution to the column and centrifuge for 3 minutes at max speed (16,000 X g).
  12. Centrifuge the column for an additional minute to remove any excess ethanol.
  13. Add 200 ul of elution to the binding column and centifuge for 1 minute at 6500 X g.

Notes

  1. To pellet the A.xylinum inoculate, the cellulose must be removed from the media. This can be achieved by briefly vortexing the media to break up the cellulose matrix and then removing the cellulose chunks with a pipette. You will see the cells congregating in the liquid media that is left over after cellulose removal.
  2. It is highly recommended that the elution buffer be heated to around 50-60°C before the elution step of the procedure. Also, it is a good idea to warm up the binding column/collection tube as the elution solution is added in a heat block. Let the elution solution incubate for at least 3-5 mins in the heat block before the final spin down. This will improve yield slightly.
  3. Be sure to use a wide-bore pipette tip when transferring the lysate to the pre-prepared binding column.
  4. It is also recommended that a second elution of 200 ul is performed after the initial elution of 200 ul, this will improve yield greatly.
  5. The Proteinase K solution should not be stored in the fridge, keep it stored in the -20°C freezer.