Wednesday, April 2, 2025
Home Blog Page 19

RAD-seq-PDF

Overview

This is a protocol for generating RAD libraries for Illumina sequencing. With this technique, 96 samples can be multiplexed into one sequencing library, and only tags adjacent to PstI sites are sequenced. This is a cheap way to both mine and genotype large numbers of SNPs.

Materials

Reagents

  • Quant-iT Picogreen kit (Invitrogen)
  • Qiagen gel purification kit
  • Qiagen PCR cleanup kit
  • From New England Biolabs:
    • PstI-HF, 20,000 U/mL
    • MspI, 20,000 U/mL
    • T4 DNA ligase, 2,000,000 U/mL
    • ATP
  • KAPA HiFi Library Amplification Kit, without primers. In the past we used Phusion High Fidelity PCR master mix from NEB, but KAPA is supposed to be better.
  • 100 bp DNA ladder
  • Gel loading dye that does NOT have bromophenol blue. Currently we use a home-made loading dye with Orange G, glycerol, and TE. NEB also makes an orange loading dye that works well. I have also used Promega GoTaq Green PCR buffer as a loading dye.
  • You will also need a black microtiter plate for the Picogreen assay.

Note: Although MspI and PstI are not completely inactivated by heat, the adapters are designed such that the restriction cut sites are not recreated by the ligation reaction. The final ligated products will therefore not be re-digested.

Note #2: To mine additional genomic positions, additional libraries can be made in which PstI-HF is replaced with NsiI-HF. These two enzymes have the same overhang, and therefore the same adapters can be used. The nucleotides flanking the overhang are different between these two enzymes, and therefore they cut at different sites. With NsiI, if using adapters designed for PstI, some of the adapters will recreate the restriction cut site, and so care must be taken to deactivate the enzyme with the heat inactivation step.

Note #3: To mine a much smaller number of genomic positions at much greater read depth, PstI-HF can be replaced with SbfI.

Oligonucleotides

PstI adapters

This is the most expensive part of the protocol other than the sequencing itself, since 192 oligonucleotides must be ordered.

Adapter 1 top: 5'GATCTACACTCTTTCCCTACACGACGCTCTTCCGATCTxxxxTGCA3'

Adapter 1 bottom: 5'yyyyAGATCGGAAGAGCGTCGTGTAGGGAAAGAGTGTAGATC3'

Where xxxx and yyyy are the barcode and its reverse complement, respectively.

Barcodes and oligo sequences are from Pat Brown’s lab (Thurber et al. 2013).

Media:PstI-barcodes.txt

More recently (April 2015) we designed new PstI adapters ranging from six to ten nucleotides long using Deena Bioinformatics.

Other oligos

MspI adapters:

  • A2top: 5'CGCTCAGGCATCACTCGATTCCTATCAGAACAA3'
  • A2bot: 5'CAAGCAGAAGACGGCATACGAGATAGGAATCGAGTGATGCCTGAG3'

Note that the MspI adapter sequences were changed in September 2017 to be compatible with the HiSeq 4000.

Illumina PCR primers:

  • PCR1: 5'AATGATACGGCGACCACCGAGATCTACACTCTTTCCCTACACGACGCTCTTCCGATCT3'
  • PCR2: 5'CAAGCAGAAGACGGCATACGA3'

Equipment

  • Nanodrop spectrophotometer
  • BioTek Synergy plate reader (for reading fluorescence)
  • Ordinary PCR machine
  • Agarose gel rig
  • UV transilluminator for gel excision
  • Bioanalyzer
  • real-time PCR machine (we just pay the core facility to do that part)

Procedure

Adapter prep

Top and bottom strands of adapters need to be annealed 1X Annealing Buffer, which is 10 mM Tris, 50 mM NaCl.

The annealing program is:

  • 95°C 5 minutes
  • Ramp down -0.1°C every 2 seconds (or -1°C every 20 seconds) to 25°C.

My protocol:

  • We have a stock plate of PstI adapters that are at 1 μM. I took a bottle of autoclaved 1X Annealing Buffer, added 45 μl to each well of a 96-well plate, then transferred 5 μl from the 1 μM plate to make a 0.1 μM working stock.
  • MspI adapters are ordered like normal oligos, and I have 100 μM concentrated stocks in TE. To make a 10 μM stock:
    • 20 μl A2top, 100 μM
    • 20 μl A2bot, 100 μM
    • 20 μl 500 mM NaCl
    • 2 μl 1M Tris
    • 138 μl nuclease-free water
    • Mix well, add 100 μl to each of two PCR tubes, and run them on the annealing program (“Adapt” on the PCR machine).

DNA quantification and dilution

Dilution to ≤200 ng/μL (usually, just a 10x dilution)

  1. Picogreen can accurately detect very small quantities of DNA, but is not accurate over 1 ng/μL. In the Picogreen assay, DNA is diluted 200X in solution, so DNA stock solution of up to 200 ng/μL can be quantified.
  2. Our DNA extraction protocol yields concentrations of up to 2 μg/μL (2000 ng/μL). Therefore, we need to dilute 10X to ensure that we are in the range that can be measured with Picogreen.
  3. Take a 96 well PCR plate, and add 18 μL 10 mM Tris or TE to 88 wells (11 columns).
  4. Using a spreadsheet that records which sample goes in which well, add 2 μL of DNA extraction to the 18 μL of buffer. You can quantify 88 samples on one plate.

Quantify your ≤200 ng/μL dilution plate using Picogreen:

  1. Take the tube of bright orange Picogreen reagent out ahead of time to thaw. Wrap it in aluminum foil to protect it from light. It is in DMSO instead of water, so it takes a long time to thaw and will immediately freeze solid if you put it on ice.
  2. The Quant-iT Picogreen kit comes with a lambda DNA standard at 100 μg/mL. Dilute some of the 20X TE that comes with the kit to 1X TE, and use it to make a 2 μg/mL dilution of the lambda DNA. (1:50 dilution.) (Alternatively, I have made a 8 μg/mL stock that can be diluted 4X at the time the standard column is set up.)
  3. For one plate (88 samples, 8 standards) make up 20 mL of 1X TE. (1 mL of the TE that comes with the kit, plus 19 mL sterilized filtered water.)
  4. The plate you need for the assay is a black, flat-well plastic plate. (Corning makes these.)
  5. Set up a standard curve in column 1 (or column 12, doesn’t matter). Pipette 100 ul of TE into wells B-H. Add 100 ul of your 2 ug/ml lambda standard each to well A and B. Pipette well B up and down to mix, then transfer 100 ul to well C. Pipette well C up and down to mix, then transfer 100 ul to well D. Continue through well G, and leave well H as a blank. (After mixing well G, you will simply throw out 100 ul.)
  6. Add 99 μL TE to the other 88 (or however many samples you are doing) wells . Add 1 ul of ≤200 ng/μL sample DNA (from the 10X dilution plate) to each well.
  7. Add 50 μL of Quant-iT reagent to 10 mL of 1X TE. This solution needs to be used within a few hours, even if it is protected from light. Add 100 μL of the solution to each well (both sample, standard, and blank).
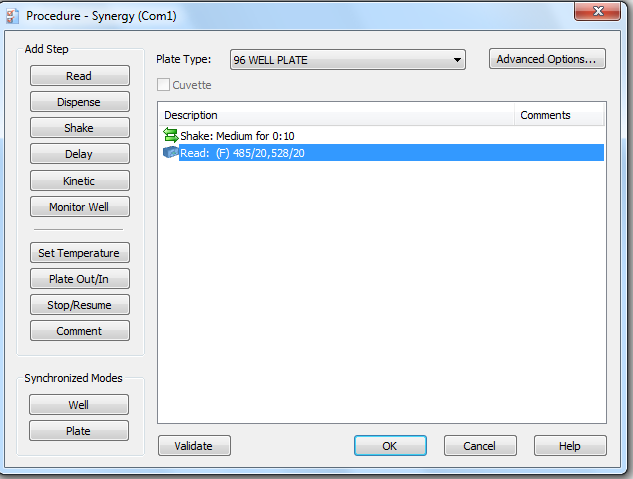
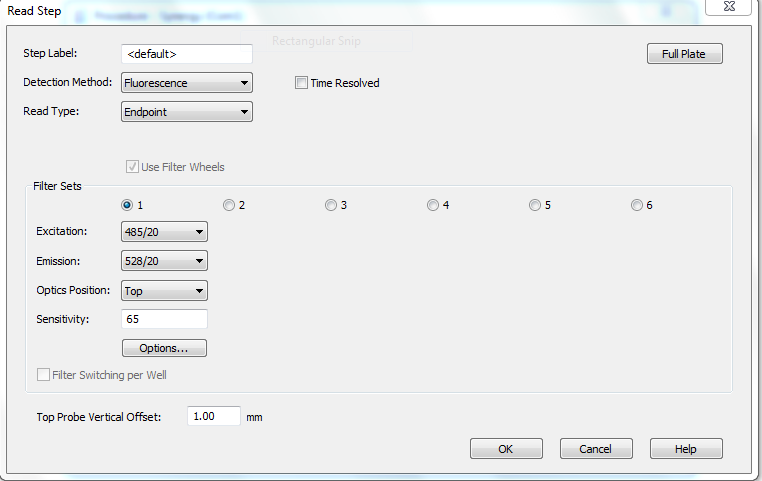
  8. Picogreen bonded to dsDNA has an excitation maximum at 480 nm and emission maximum at 520 nm. The plate readers in IGB (BioTek Synergy HT) probably already have a picogreen program on them.

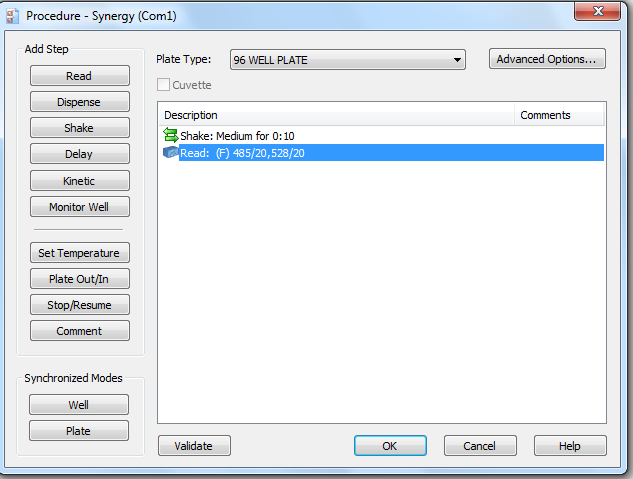
If you need to re-make the picogreen program, use the screenshots below:

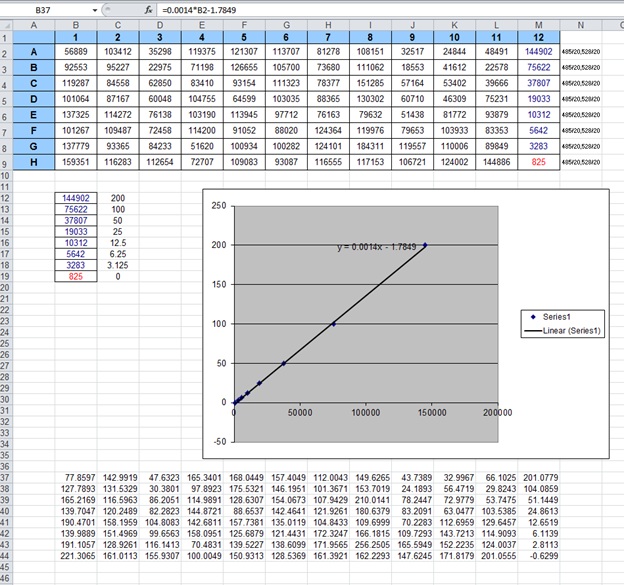
  1. Read fluorescence intensity on the plate reader, and export it to Microsoft Excel.
  2. Make a scatterplot of fluorescence intensity of the standard vs. the standard concentration. Given that the samples were diluted 2000X, the standard concentration is multiplied by 200:
    1. Well A 2000 ng/μL
    2. Well B 1000
    3. Well C 500
    4. Well D 250
    5. Well E 125
    6. Well F 62.5
    7. Well G 31.25
    8. Well H 0
  3. In Excel, fit a trendline to the scatterplot and display the equation on the chart. Use this equation to estimate the concentration of the samples.

In most cases, the concentration estimate via Picogreen should be lower than the concentration estimate via Nanodrop. This is because Nanodrop measures DNA + RNA, whereas Picogreen only measures DNA.

Based on the Picogreen concentration estimates, dilute the DNA to 50 ng/μL in 10 mM Tris (and 0.1 mM EDTA, optional).

Notes for samples of concentration lower than 50 ng/μL:

  • If you have a lot of samples that are 30-50 ng/μL, you can dilute all samples for your library to 30 ng/μL or 40 ng/μL instead of 50. The amount of adapter that you add at the ligation step (see below) should be reduced proportionately.
  • For samples in the 10-50 ng/μL range, a cheap and efficient way to concentrate them is by isopropanol precipitation:
    • Combine 200 μL DNA sample, 20 μL 3M sodium acetate, and 200 μL isopropanol.
    • Mix well by inversion. Place in the freezer for at least an hour.
    • Spin down 10 minutes in the centrifuge.
    • Pour off the liquid, taking care to keep the pellet.
    • Add 200 μL 70% ethanol to rinse. Invert a few times.
    • Spin down 1 minute, then pour off the ethanol, again being careful not to lose the pellet.
    • Allow to dry on the lab bench.
    • Resuspend the DNA in 20 μL TE.
    • Requantify with Picogreen, then dilute to 50 ng/μL.

Restriction digestion and ligation

Restriction digestion master mix:

Ingredient For one sample For one plate
50 ng/ul DNA 5 ul
10X NEBuffer 4 (or CutSmart) 1.5 ul 165 ul
PstI-HF, 20,000 U/mL 0.25 ul 27.5 ul
MspI, 20,000 U/mL 0.25 ul 27.5 ul
Nuclease-free water 8 ul 880 ul

(I have also used DNA at a concentration of 100 ng/ul because that was what Keck wanted for GoldenGate, so then I used 2.5 ul DNA and 10.5 ul water.)

Do this in a 96-well plate. Pipette the DNA into the wells and then add 10 ul of master mix to everything. Pick one well that will not have DNA in it. This will be an important control later on to demonstrate that this library was not contaminated with another library (which will have a different empty well).

Run the Digest program on the PCR machine: 3 hours at 37°C, then 20 minutes at 80°C.

Using a multichannel pipette, add 1.5 μL of 0.1 μM PstI adapters to their corresponding wells on the digestion plate. (Do add the adapter corresponding to the well that has no DNA in it.)

Ligation master mix, keep on ice until use:

Ingredient For one sample For one plate
10X Ligase buffer with ATP 1 ul 110 ul
10 μM MspI adapter 0.5 ul 55 ul
10 mM ATP 1.5 ul 165 ul
T4 Ligase, 2M U/mL 0.1 ul 11 ul
Nuclease-free water 5.4 ul 594 ul

Add 8.5 μL of ligation master mix to each well of the digestion plate.

Run on the “ligate” program on the PCR machine: 2 hours at 25°C, 20 minutes at 65°C.

Cleanup and amplification

  • Using a multichannel pipette and a PCR 8-well strip tube, pool all the columns together, adding 5 μL from each well of the plate to the wells on the strip tube.
  • Pipette the 60 μL out of each well on the strip tube into one 1.5 mL tube. Mix well so that all samples are combined evenly. Freeze or keep on ice.
  • Pour a 2% agarose gel with ethidium bromide. Make it nice and deep; my recipe is 4 g agarose, 200 mL 1X TAE, and 10 μL ethidium bromide solution. Use a wide-toothed comb.
  • Take 50 μL (or more depending on your well volume) of your pooled library and combine it with a loading dye that does not have bromophenol blue. I use 10 μL of a 6X loading dye containing 30% glycerol, 0.2% orange G, 10 mM Tris, and 1 mM EDTA.
  • I recommend cleaning out your gel rig and putting in fresh TAE, since you especially want to avoid any contamination from other Illumina libraries.
  • Run your ~60 μL of library plus loading dye on the gel. The lane with the library should have a lane of 100 bp ladder on either side of it. You can put multiple libraries on one gel, but leave several empty lanes between them.
  • The gel doesn’t need to be run very long. I would go 20 minutes at 100 V, or until the ladder bands below 500 bp are distinguishable.
  • The library should look like a smear. There may be some undigested DNA (a band in the 10’s of kb) but that is okay as long as most of the DNA is digested. There may also be a thick band of RNA and leftover adapter below 100 bp. (I have found that RNAse treatment removed most of that band but did not appear to improve DNA digestion.)
  • Using a clean razor blade for each library, cut out the smear between 200 bp and 500 bp (if using SbfI, instead cut from 200 bp to 1000 bp). There should definitely be DNA visible in this range.
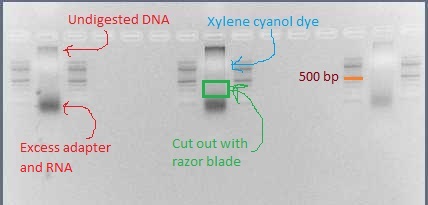
Three pooled ligations ready for gel extraction, with GoTaq Green loading dye
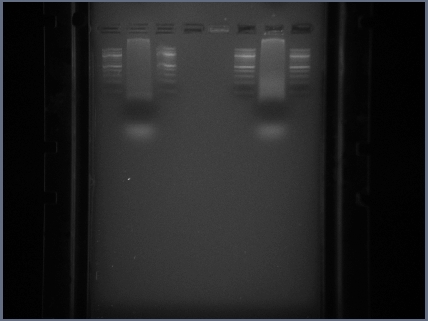
Pooled ligations when NEB orange dye is used

  • Use the Qiagen gel extraction kit to purify the DNA out of this gel slice. Do include the optional steps of washing with QG after binding the DNA to the column, as well as letting the column sit in PE for 2-5 minutes before spinning (Phusion can handle contamination from agarose/salts, but KAPA HiFi cannot). Elute in the lower volume (30 μL EB).
  • Run the Illumina PCR:
    • 3 μL gel-extracted library
    • 2 μL 10 μM forward + reverse Illumina primers (PCR1 and PCR2)
    • 25 μL 2X Kapa Hi-Fi Master mix
    • 20 μL nuclease-free water
  • PCR program:
    • 98°C 30 seconds
    • 15 cycles of 98°C 10 seconds, 65°C 30 seconds, 72°C 30 seconds
    • 72°C 5 minutes
  • The first time you do this protocol, run 5 μL of the PCR product out on a 2% agarose gel. Look to see whether there is primer-dimer visible. If there is no primer-dimer visible, use the Qiagen PCR cleanup kit to purify the remaining 45 μL of PCR product.
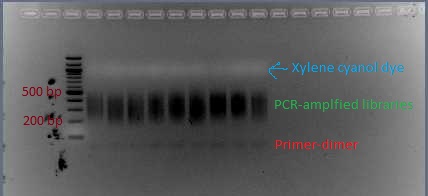
Nine libraries post-PCR, with GoTaq Green loading dye. A second gel (with space in between libraries) will be needed for extraction of the libraries, to eliminate the primer-dimer.
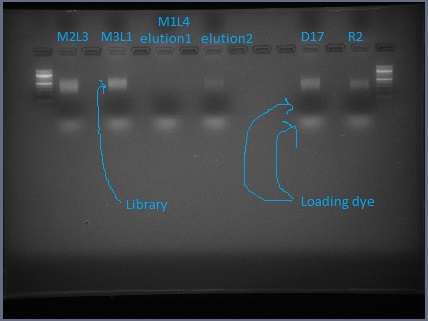
Amplified libraries, run with NEB orange dye, ready for gel extraction.

  • If there is primer-dimer visible, run the remaining 45 μL of PCR product on a 2% agarose gel and extract the library (as was done pre-PCR). Follow the instructions in the Qiagen gel extraction kit as specified for sequencing. (After binding DNA to the column, do a wash with QG. When rinsing with PE, let sit for 2-5 minutes before spinning.) Typically I get primer-dimer, so I just do this extraction and skip the previous gel to test for primer-dimer.

Quality control

  • Quantify the purified PCR product using the Picogreen protocol as above. Expected concentrations are in the 10’s of ng/μL.
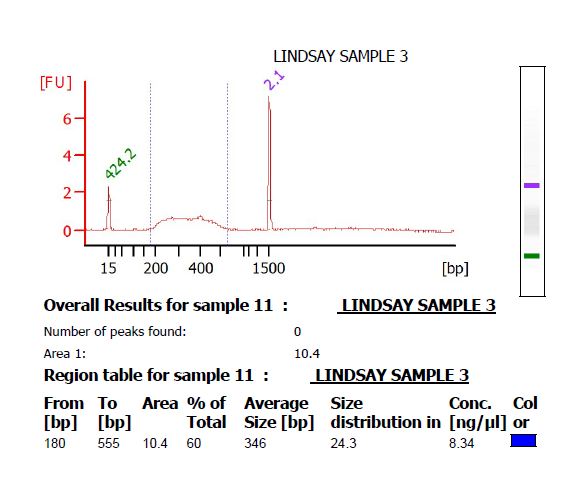
  • Make 4 μL of a 1 ng/μL dilution of the library, and submit it to the Functional Genomics center to run on a High Sensitivity DNA chip on the Bioanalyzer. There should be a smooth curve from around 200 to 500 bp. Any sharp peaks could indicate that the enzymes were cutting in a repetitive region of the genome, in which case it is best to choose different enzymes. Use the Bioanalyzer software to calculate the average fragment size.
    • If there is primer-dimer remaining in the library, it will be visible as a sharp peak at a lower molecular weight than the broad peak for the library. (The library pictured below does not have primer-dimer.)

  • Calculate the concentration of the PCR product in nM. Keck supplies a worksheet for this calculation. If [math]\displaystyle{ x }[/math] is the concentration in ng/μL, [math]\displaystyle{ y }[/math] is the average size in base pairs, and [math]\displaystyle{ z }[/math] is the concentration in nM, then [math]\displaystyle{ z = \frac{10^6*x}{649y} }[/math].
  • Dilute the purified PCR product to 10 nM in EB (10 mM Tris).
  • Give 20 μL of 10 nM library to the core facility (Keck). They will use real-time PCR to confirm a concentration of 10 nM. Using Illumina Hi-Seq, do one lane of 100 bp single-end reads.

Bioinformatics

Given the genome duplication present in Miscanthus, we have found that the UNEAK pipeline works well.

I have written an some R functions for importing the output of the UNEAK pipeline into adegenet or more generally into a numeric (0 and 2 for homozygote, 1 for heterozygote) matrix format in R.

I have also created TagDigger for cases where we already know what tag sequences we are looking for.

Notes

Please feel free to post comments, questions, or improvements to this protocol. Happy to have your input!

  1. List troubleshooting tips here.
  2. You can also link to FAQs/tips provided by other sources such as the manufacturer or other websites.
  3. Anecdotal observations that might be of use to others can also be posted here.

Please sign your name to your note by adding ”’*~~~~”’: to the beginning of your tip.

References and additional reading

This protocol was published in:

Lindsay V. Clark, Joe E. Brummer, Katarzyna GÅ‚owacka, Megan Hall, Kweon Heo, Junhua Peng, Toshihiko Yamada, Ji Hye Yoo, Chang Yeon Yu, Hua Zhao, Stephen P. Long, and Erik J. Sacks (2014) “A footprint of past climate change on the diversity and population structure of Miscanthus sinensis.” Annals of Botany. doi:10.1093/aob/mcu084. Free offprint

This protocol is based heavily upon that of:

Poland JA, Brown PJ, Sorrells ME, and Jannik J-L (2012) Development of high-density genetic maps for barley and wheat using a novel two-enzyme genotyping-by-sequencing approach. PLoS ONE 7(2):e32253. doi: 10.1371/journal.pone.0032253

Barcode sequences are published in:

Thurber CS, Ma JM, Higgins RH, and Brown PJ (2013) Retrospective genomic analysis of sorghum adaptation to temperate-zone grain production. Genome Biology 14:R68. doi: 10.1186/gb-2013-14-6-r68

Additional reading

  • Baird NA, Etter PD, Atwood TS, Currey MC, Shiver AL, et al. (2008) Rapid SNP Discovery and Genetic Mapping Using Sequenced RAD Markers. PLoS ONE 3(10): e3376. doi:10.1371/journal.pone.0003376
  • Catchen JM, Amores A, Hohenlohe P, Cresko W, and Postlethwait JH (2011) Stacks: building and genotyping loci de novo from short-read sequences. G3: Genes, Genomes, Genetics 1:171-182. doi: 10.1534/g3.111.000240
  • Davey JL and Blaxter MW (2010) RADSeq: next-generation population genetics. Briefings in Functional Genomics 9(5):416-423. doi:10.1093/bfgp/elq031
  • Davey, J. W., Cezard, T., Fuentes-Utrilla, P., Eland, C., Gharbi, K. and Blaxter, M. L. (2012), Special features of RAD Sequencing data: implications for genotyping. Molecular Ecology. doi: 10.1111/mec.12084
  • Elshire RJ, Glaubitz JC, Sun Q, Poland JA, Kawamoto K, Buckler ES, and Mitchell SE (2011) A robust, simple Genotyping-by-Sequencing (GBS) approach for high diversity species. PLoS One 6(5): e19379. doi:10.1371/journal.pone.0019379
  • Hohenlohe PA, Catchen J, Cresko WA (2012) Population Genomic Analysis of Model and Nonmodel Organisms Using Sequenced RAD Tags. In: Data Production and Analysis in Population Genomics, Pompanon F and Bonin A, eds. 235-260. doi:10.1007/978-1-61779-870-2_14
  • Peterson BK, Weber JN, Kay EH, Fisher HS, Hoekstra HE (2012) Double Digest RADseq: An Inexpensive Method for De Novo SNP Discovery and Genotyping in Model and Non-Model Species. PLoS ONE 7(5): e37135. doi:10.1371/journal.pone.0037135
  • Serang O, Mollinari M, Garcia AAF (2012) Efficient Exact Maximum a Posteriori Computation for Bayesian SNP Genotyping in Polyploids. PLoS ONE 7(2): e30906. doi:10.1371/journal.pone.0030906


Whole Plasmid PCR-PDF

Overview

It is imperative to use 5′-phosphorylated primers if the nicked DNA is going to be repaired downstream with ligase. PCR should be limited to templates of about 5 kb, but the protocol could probably be pushed up to 10 kb. See the PfuUltra II fusion manual. Primers should be sense-antisense pairs. Optimal amplification occurs with 30-35 b primers at 0.5 μM final concentration. At higher concentrations, the primers bind to each other, inhibiting amplification. For longer primers, the annealing temperature will need to be adjusted from the one mentioned in this protocol.

Materials

For a 50 μL WP-PCR reaction:

  • 37 μL H2O
  • 5 μL 10X PFU Ultra PCR buffer
  • 5 μL 10 μM sense/antisense primer mix (0.5 μM final, each)
  • 1 μL 12.5 mM (each) dNTP mix (0.25 mM final)
  • 1 μL 5 nM plasmid template (0.1 nM final)
  • 1 μL PfuUltra II fusion HS DNA polymerase

Procedure

  1. In a PCR tube, add the components on ice in the order they are listed above. Mix gently and spin.
  2. Perform the following thermocycling program:
    1. Initial melting: 95 °C 2 min
    2. Melting: 95 °C 20 s
    3. Annealing: Ta °C 20 s, where Ta = Tm – 5 °C
    4. Elongation: 72 °C 2 min / kb template
    5. Repeat steps 2-4 a total of 30 times
    6. Final elongation: 72 °C 30 min
    7. 12-16 °C hold


Probe Prep, 32P End-Labeled Probes-PDF

Phosphatase Treatment

Optional: Treat probe DNA (synthetic oligo) with Antarctic Phosphatase to dephosphorylate the 5’-ends. Dephosphorylating probe prior to end labeling increases specific activity. This step is usually not necessary for a synthetic oligo unless you ordered it with a 5´-phosphate or have phosphorylated it enzymatically.

  1. Combine:
    • 1 μL of 10x Antarctic Phosphatase reaction buffer
    • 1 μg of probe DNA
    • 1 μL (5 units) of Antarctic Phosphatase
    • H2O to 10 μL total volume
  2. Incubate15 min at 37°C (for 5’ overhang)
  3. Heat inactivate 5 min at 65°C
  4. Can scale reaction up and store a stock of dephosphorylated probes at –20°C. Label aliquots as needed.

End-Labeling

γ-ATP label 5’ ends with Polynucleotide Kinase

For phosphatase-treated ladder (forward reaction)

  1. Combine:
    • 5 μl of 10x T4 Polynucleotide Kinase reaction buffer
    • 10 μL (1 μg) of dephosphorylated DNA probe
    • 32 μL of H2O to 50 μL total volume
    • 1 μL of γ-32P ATP (6000 Ci/mmole, 10 mCi/mL)
    • 2 μL (20 units) of Polynucleotide Kinase
  2. Incubate 30 min at 37°C
  3. Heat inactivate 20 min at 65°C

For untreated ladder (exchange reaction)

  1. Combine:
    • 5 μl of 10x T4 Polynucleotide Kinase reaction buffer
    • 1 μg of DNA Probe
    • 100 μM ADP
    • H2O to 50 μL total volume
    • 1 μL of γ-32P ATP (6000 Ci/mmole, 10 mCi/mL)
    • 2 μL (20 units) of Polynucleotide Kinase
  2. Incubate 30 min at 37°C
  3. Heat inactivate 20 min at 65°C

NOTES: Fresh buffer required for optimal T4 PNK activity. Alternate phosphate donors possible, see NEB. Higher level of incorporation can be achieved for the exchange reaction in alternate buffer, see Molecular Cloning.

Removal of free ATP with sephadex spin column

probe must be >10nt. Sample volume = 25-50 μL

    • Vortex column gently to resuspend resin
    • Loosen cap 1/4 turn and snap off bottom closure
    • Place column in 1.7 mL Eppendorf tube
    • Pre-spin column 1 min at 2.8x1000rpm in sorvall biofuge pico. Discard eluted buffer and tube.
    • Place column in new 1.7mL tube. Slowly apply sample (25-50uL) to center of angled resin surface. (Don’t disturb resin. Don’t place sample on the side of the column.)
    • Spin column 2 min at 2.8x1000rpm. Purified sample is collected in the support tube.
    • Discard column after use in solid radioactive waste container.
    • Store labeled probe in compliance with Radiation Safety guidelines

Restriction Digest-PDF

Overview

This protocol is typically used to do bio-brick digests with the restriction sites consisting of the following configuration:

—–EcoRI–XbaI–Part–SpeI–PstI—–

See the biobrick assembly schedule for more information on using this technique.

Materials

  • Prepared DNA from miniprep, PCR, or Gel Extraction
  • Restriction Endonucleases
    • With corresponding 10X buffer. NEBuffer 2 can be used for most applications.
  • BSA
  • Antarctic Phosphatase
  • Distilled water

Procedure

1. Quickly vortex all ingredients (Buffer, BSA, DNA) before beginning. 2. Add the following in a micro-centrifuge tube:

  • 5μl of Buffer (usually NEBuffer 2);
  • 1μl of BSA;
  • 0.5 picomoles DNA normally uses 10μL of miniprep or 5μL of purified PCR product.
  • Water to make 48μl.

3. Vortex Enzymes and add 1μl of each to the tube.

  • If you’re digesting purified PCR product (i.e. “insert”), add 1μl of DpnI to the reaction.

4. Incubate reaction in a 37°C water bath for at least one hour.

  • If your digesting a “vector”, add 1μl Antarctic Phosphatase and 6μl of Phosphatase buffer after 2 hours of incubation and incubate for another hour.

5. Heat kill the digests for 20 minutes at 80°C. 6. Store digested DNA in the refrigerator (4°C)for use in the very near future.

Notes

Please feel free to post comments, questions, or improvements to this protocol. Happy to have your input!

  • DpnI eliminates the background from your PCR template
  • Antarctic Phosphatase eliminates background from the vector self ligating.
  • If you’re not getting good digestion it might be because your enzyme is bad. Double the digestion time and see.
  • Longer digest gives more complete digestion, especially if you have >1µg of DNA, but can sometimes give nonspecific digestion
  • Beware the the NEB double digest chart. For EcoRI and PstI double digest it recommends using the EcoRI NEBuffer. However based on my digests both NEBuffer 2 and 3 work better; with NEBuffer 2 giving the most complete double digestion. It is funny that they recommend the EcoRI buffer because their chart also says that PstI is only 50% active in that buffer.


Amplified insert assembly-PDF

Overview

This is a lab specific protocol. For more information on the benefits of Amplified Insert Assembly see the consensus protocol. A You-Tube video summary of the Amplified Insert Assembly method provides a quick and entertaining visual introduction.

This protocol is typically used to do bio-brick assembly with restriction sites consisting of the following configuration:

—–EcoRI–XbaI–Part–SpeI–PstI—–

Ocassionally other enzymes (e.g. BamHI or HindIII) are used to make protein fusions. See our bio-brick format page for more details.

The two parts you want to assemble will be labeled “insert” and “vector” and will be initially contained on separate plasmids. The eventual goal of assembly is to get these parts on the same plasmid next to one another.

Procedure

1. Miniprep both “insert” and “vector” from their respective cultures using a kit or this protocol (30 mins).
2. PCR the “insert” plasmid (This will take about 2 hrs, but start the vector digest right away while the insert PCR is cycling).

  • Use a high-fidelity polymerase (e.g. pfu Turbo or Vent).
  • Use the same primers you use for colony PCR (Annealing Temp of 55-60°C).
  • Only run 25-30 cycles as this will help ensure high fidelity.

3. Start Digesting the “vector” while the PCR is cycling.

  • For help on deciding which enzymes to use see this page.

4. Purify the PCR product using a kit or this protocol.
5. Digest insert for 1 hour (adding DpnI along with the other restriction endonucleases).
6. Once the insert is digesting add 1μL Antarctic Phosphatase and 6μL AP Buffer to the “vector” digest and incubate until the “insert” digest is done.
7. Kill all reactions by incubating for 20 mins at 80°C.
8. Ligate at a molar ratio of 4:1 (insert:vector).
9. Transform.
10. Plate on plates with the same antibiotic as the “vector” resistance.
11. Celebrate.

  • If you already have PCR insert ready to go (i.e. you ran the PCR the night before from old miniprep) then it only takes about 4 hours.

Notes

  • The DpnI eliminates any background from the insert PCR.
  • The phosphatase eliminates any background vector.
  • The “vector” will be digested for a total of thee hours (including nearly one hour with Antarctic Phosphatase)
  • The “insert” will only be digested for one hour. This is okay as there is a lot of it.
  • Detractors of this method may say that it’s risky to PCR the inserts because of mutations. We say:
  1. This hasn’t been a problem for us.
  2. This is why we use a high-fidelity polymerase
  3. We’re sequencing the constructs anyway so we’d spot any mutations.

References


Miniprep for vaccinia virus DNA isolation-PDF

Overview

This protocol is to isolate vaccinia virus DNA from one 10cm dish of infected cells.

Materials

Solutions

  • 1X PBS, 4°C
  • 10% Triton X-100
  • β-mercaptoethanol
  • 250 mM EDTA, pH 8.0
  • Proteinase K (10 mg/mL)
  • 3.0 M NaCl
  • 10% SDS
  • Phenol:chloroform
  • EtOH, 100% and 70%
  • 3M NaAcetate
  • TRIS-EDTA

Equipment

  • Rubber policeman
  • 15 mL Falcon tubes
  • Eppendorf tubes
  • Vortex
  • Centrifuge

Procedure

  1. Scrape cells from the plate, using a rubber policeman if necessary.
  2. Transfer cells to a 15 mL Falcon tube and centrifuge at 900g x 10 minutes at 4°C.
  3. Wash pellet once with 1X PBS (4°C), and repeat step 2.
  4. Resuspend pellet in 600 μL of PBS and transfer to a 1.5 mL Eppendorf tube.
  5. To each sample add:
    1. 30 μL 10% triton X-100
    2. 1.5 μL β-mercaptoethanol
    3. 48 μL 250 mM EDTA (pH 8.0)
  6. Vortex, then incubate on ice 10 minutes while vortexing occassionally (~ every 3 minutes).
  7. Centrifuge at 700g x 2.5 minutes to remove cellular material.
  8. Transfer supernatant to a new Eppendorf tube and centrifuge at 16.1K x g for 10 minutes to pellet the viral cores.
  9. Aspirate supernatant and gently resuspend the pellet in 100 μL Tris-EDTA, pH 8.0.
  10. To each sample add:
    1. 1.5 μL proteinase K (10 mg/mL)
    2. 6.7 μL 3 M NaCl
    3. 10 μL 10% SDS
    4. 0.3 μL β-mercaptoethanol
  11. Mix gently by flicking the tube, and incubate at 55°C for 30 minutes, flicking occasionally (~ every 10 minutes)

Do NOT vortex samples at any point after this line.

  1. Extract DNA twice with an equal volume of phenol:chloroform.
  2. Precipitate DNA with 10% volume Na Acetate and 2.5 volumes of 100% EtOH.
  3. Resuspend pellet in 100 μL Tris-EDTA and repeat the DNA precipitation.
  4. Wash pellet with 70% EtOH 3x, air dry, then resuspend in 20 μL Tris-EDTA.

References

Relevant papers and books

  1. Esposito J, Condit R, Obijeski J. (1981) J Virol Methods. 1981 Feb;2(3) 175-9. PMID 6268651


Making a long term stock of bacteria-S2-PDF

Introduction

Whenever you successfully transform a bacterial culture with a plasmid or whenever you obtain a new bacterial strain you will want to make a long-term stock of that bacteria. Bacteria can be stored for months and years if they are stored at -80C and in a high percentage of glycerol.

Materials

  • 40% glycerol solution
  • Day/overnight culture
  • Cryogenic vials/1.5mL microfuge tube

Method

  1. Pick a single colony of the clone off a plate and grow overnight in the appropriate selectable liquid medium (3-5ml).
  2. Add 0.5 ml of 40% glycerol in H2O to a cryogenic vial.
  3. Add 0,5 ml sample from the culture of bacteria to be stored.
  4. Gently vortex the cryogenic vial to ensure the culture and glycerol is well-mixed.
    • Alternatively, pipet to mix.
  5. On the side of the vial list all relevant information – part, vector, strain, date, researcher, etc.
  6. Freeze glycerol stock in liquid nitrogen and store it in a -80C freezer.
    • This will also be a good time to record the strain information and record the location.

Notes

  • While it is possible to make a long-term stock from cells in the stationary phase, ideally your culture should be in logarithmic growth phase.
  • Certain antibiotics in the medium should be removed first as they are supposedly toxic over time, ex)Tetracycline. To do this, spin the culture down and resuspend it in same volume of straight LB medium.

Preparing chemically competent cells (Inoue)-S2-PDF

Materials

  • Plate of cells streaked for single colonies
  • SOB
  • Ice
  • TB buffer
  • DMSO
  • Dry Ice (or liquid nitrogen)

Glassware & equipment

  • 2 liter Erlenmeyer flask (no detergent residue, rinse with 70% ethanol and DI water)
  • 220 ml conical centrifuge tubes BD 35 2075
  • Eppendorf 5410R refrigerated centrifuge with conical adapters

Preparation

  1. Pick 10 – 12 large single colonies (2-3 mm dia) from your source plate and inoculate 500 ml of sterile SOB medium (do not use LB) in a 2 liter flask. Save some medium as an OD blank.
  2. Grow to an OD of 0.6 with vigorous shaking (200-250 rpm) at 18 degrees (important). This is slow — approximately 35-40 hours.
  3. Prechill the centrifuge to 4 degrees
  4. Remove from the incubator and place on ice for 10 minutes
  5. Transfer to two 220 ml centrifuge tubes and spin at 3220 x g for 10 minutes at 4 degrees
  6. Drain the medium and resuspend each pellet first in 5 ml of ice cold TB. Add an additional 75 ml of cold TB buffer and resuspend.
  7. Place on ice for 10 minutes
  8. Spin down as above.
  9. While spinning, add 1.4 ml of DMSO to 18.6 ml of TB (7% DMSO mixture)
  10. Resuspend each pellet in 20 ml of cold TB-DMSO mixture
  11. Incubate on ice for 10 minutes
  12. Dispense cells into pre-chilled tubes
  13. Freeze cells in a dry ice / ethanol bath and store at -80 degrees indefinitely

Thoughts on improvements

  • “Methods in Yeast Genetics” book (Amberg05) suggests growth the SOB + 300 mM NaCl
  • They also control pH at 7.5, which may be a major issue
  • Centrifuging in flat bottom centrifuge tubes may make pellet resuspension easier and less damaging
  • Length of time on ice prior to transformation may make a big difference
  • The Hanahan protocol specifies dry pure DMSO, while Inoue says it doesn’t make a difference. Let’s see.
  • Warm plates for growing cells after transformation are claimed to be 2x to 4x more efficient.
  • My lab uses LB for instead of SOB media…it seems to work fine for them–mel 18:10, 14 June 2007 (EDT)

References

  1. Inoue H, Nojima H, and Okayama H. High efficiency transformation of Escherichia coli with plasmids. Gene. 1990 Nov 30;96(1):23-8. DOI:10.1016/0378-1119(90)90336-p | PubMed ID:2265755 | HubMed [Inoue90]
  2. Hengen PN. Methods and reagents. preparing ultra-competent Escherichia coli. Trends Biochem Sci. 1996 Feb;21(2):75-6. PubMed ID:8851666 | HubMed [Hengen96]

All Medline abstracts: PubMed | HubMed

Transforming chemically competent cells (Inoue)-S2-PDF

Method

  1. Thaw 25 – 200 μl TB buffer cells on ice. Do not use glass tubes, which adsorb DNA.
  2. Add DNA, pipette gently to mix (keep the volume of DNA less than 5% of the cell volume)
  3. Incubate on ice for 30 minutes
    • Note: If you are in a rush, you can shorten this incubation time to 5-10 min.
  4. Incubate cells for 30 seconds at 42°C.
  5. Incubate cells on ice for 2 min.
  6. Add 4 volumes of room temperature SOC (not critical)
  7. Incubate for 1 hour at 37°C on shaker.
    • Note: Can also save some time here by reducing incubation to ~45 min.
    • Note: Step can be eliminated if plating on Amp plates, but not most other antibiotics
  8. Spread 100-300 μl onto a plate made with appropriate antibiotic.
  9. Grow overnight at 37°C.

Experimental results

First attempt varied several parameters: incubation time on ice prior to heat shock, heat shock length, addition of DTT at 20mM.

  • DTT appeared to have little effect when added during transformation.
  • Incubating for 1/2 hour on ice had a positive effect, perhaps 1.5 to 2x efficiency gain.
  • Heat shock of 0 or 15 s rather than 30 s reduced efficiency about 8x
  • Heat shock at 30 s or 60 s gave approximately similar results. (*Edit: 50s is preferable)

Achieved efficiency was 3 x 10⁷ per microgram. A control transformation with Invitrogen cells was at 1.2 x 10⁸ per microgram.


One step ‘miniprep’ method for the isolation of plasmid DNA-S2-PDF

Overview

All ‘miniprep’ methods reported so far for the isolation of plasmid DNA involve multiple pipetting, extraction, centrifugation, and changes of miniature tubes. Screening large numbers of samples, they are therefore cumbersome, time-consuming, and not economical.

The technical report below by Chowdhury, K. (1991) is a very fast, simple, and one-step ‘miniprep’ procedure. The quality and quantity of DNA obtained by using this procedure are similar to those obtained by the other commonly used procedures of Serghini et al. (1) or Birboim and Doly (2). According to this procedure, the bacterial culture is directly extracted with a mixture of phenol-chloroform-isoamyl alcohol, and the liberated DNA is precipitated with isopropanol. This method is now being used routinely in our laboratory for isolating plasmids up to 12kb in size. A detailed description of the method is presented below:

Method

1. Take 0.5 ml of overnight E. coli culture in a microfuge tube. We routinely grow our cells in ‘standard 1’ bacteriological media supplied by Merck, Germany.

2. Add 0.5ml of phenol:chloroform: isoamyl alcohol (25:24:1). The phenol was saturated with TE (10mM Tris, 7.5, 1mM EDTA) before mixing with chloroform and isoamyl alcohol.

3. Mix by vortexing at the maximum speed for 1 minute. Alternatively, vortex for 10 seconds and then transfer to an Eppendorf mixer or an over-the-top rotator for 5 minutes.

4. Spin at 12,000g for 5 minutes. During the spin, prepare microfuge tubes with 0.5ml of isopropanol. After the spin, remove carefully about 0.45ml of the upper aqueous phase leaving the interphase undisturbed, and add it to the isopropanol. Mix well and spin immediately at 12,000 g for 5 minutes. The addition of salt and cooling is unnecessary.

5. Pour off the supernatant, add carefully 0.5ml of 70% ethanol to the side of the tube, and pour off. Repeat the washing once more. Vacuum dry the pellet and suspend in 100ul/ml RNAse). About 5-10ul of this DNA can now be cleaved with appropriate restriction enzyme(s) for analysis.

References

  • Chowdhury, K. (1991) One step ‘miniprep’ method for the isolation of plasmid DNA. Nucl. Acids Res 19:10 2792
  • Serghini, M.A. Ritzenthaler, C., and Pinck, J. (1989) Nucl. Acids Res 17, 3604
  • Birnboim, H.C., and Doly, J. (1979) Nucl. Acids Res. 13, 1513 – 1523.

Notes

  • Sterile LB broth works very well in this protocol
  • In step 1, one can pipette 1.5ml of broth spin the microfuge tube, decant 1ml, and leave behind 500ul to resuspend the pellet and continue as from step 2. This maximizes the total yield of the plasmid.
  • The largest band appearing after running a gel is usually genomic DNA. I run appropriate control markers.