Wednesday, December 25, 2024
Home Blog Page 21

In-fusion biobrick assembly-PDF

Overview

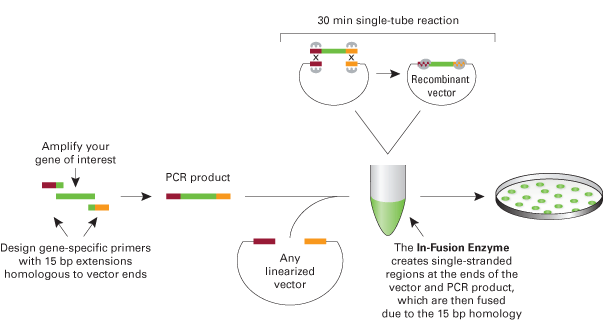
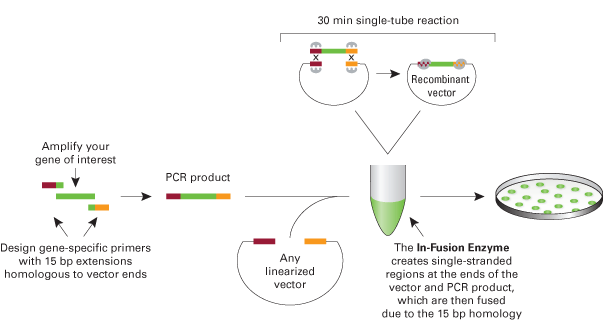
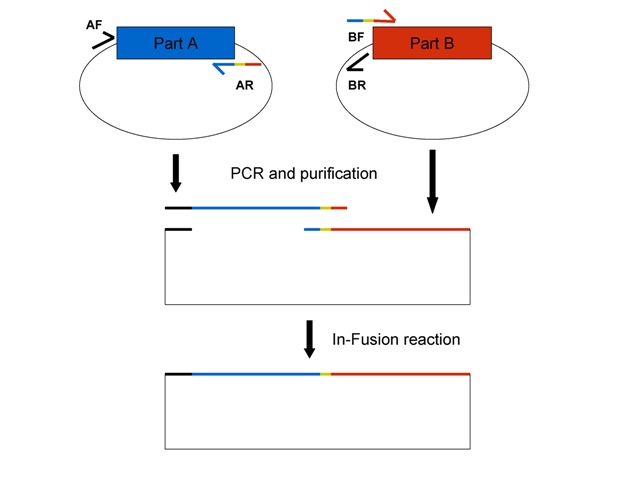
This is a method to assemble two BioBricks using the Clontech In-Fusion PCR Cloning Kit and maintains BioBrick standard formats. There are currently several BioBrick assembly standardsthat all involve assembly by restriction enzyme digestion and ligation. This method describes an alternative assembly method that allows for BioBricks to be assembled via fusion of PCR products. One PCR-amplified BioBrick has homology on each end with the second PCR-amplified BioBrick (vector amplified with the BioBrick) to allow for the fragments to be fused together in the In-Fusion reaction (see figure below). This method can be adapted to fuse more than two BioBricks together and four fragments have been successfully fused. This method can also be used to re-engineer existing BioBricks by using mutagenic primers in the PCR reaction (see the In-Fusion BioBrick Assembly Examples and Detailed Lab Protocols section below for an example of simultaneous promoter and RBS re-engineering).

The advantages of In-Fusion BioBrick assembly over standard assembly are that it is faster, does not require restriction digestions or ligations or DNA extraction from a gel, and is more flexible in the sense that there is more control over the exact engineered sequence. The disadvantages are that the supplies are more expensive, custom primers are required, and occasionally there are mutations in assembled plasmids. However, sequencing a few miniprepped plasmids from positive colony PCR screened clones usually results in at least one plasmid without mutations.

Materials

  • Thermocycler
  • PCR tubes
  • Primers
  • Phusion PCR Mastermix(or another high fidelity polymerase mastermix)
  • BioBrick template DNA (miniprepped plasmid diluted 1:1000 in water)
  • Qiagen PCR Purification Kit
  • Nanodrop (not required, but very useful)
  • Clontech In-Fusion PCR Cloning Kit (dry down kit works well)
  • TE Buffer (pH 8.0)
  • Gel box, power supply, and gel supplies
  • LB+Amp plates
  • LB+Amp media
  • Qiagen Miniprep Kit

Procedure

This figure shows the general In-Fusion BioBrick assembly scheme for BioBricks on pSB1A2 plasmids. See details below. Part A (blue) and Part B (red) are on pSB1A2 plasmids encoding ampicillin resistance. Primers described below are color-coded to show their homology. The thick black line indicates BioBrick prefix homology and the yellow sequence is the scar that is normally between parts after standard BioBrick assembly, if this is desired. If not, leave it off your primer (see below).

1. Read the In-Fusion manual and understand it completely before starting.

2. Order primers for parts to assemble. Primers can be optimized accordingly, but this general scheme should work for most BioBricks. The main rule is that the forward primer of one PCR-amplified fragment needs to have at least 15bp homology to the reverse primer of the second fragment, and vice versa, for the In-Fusion reaction to work. Also, it is better to put the vector (plasmid backbone) on the smaller BioBrick especially if the BioBrick is less than 100 bp since in my experience short fragments don’t fuse together as well as larger fragments.

Primers for Part A (upstream part = insert) + Part B with the pSB1A2 vector (d————————————————————————————————————————————————————-++++++++++++++++++++++++++++++++++++++++++++++++++++++++++++++++++++++++++++++++++++++++++++++++++++++++++++++++++++++++++++++++++++++++++ownstream part = vector):

  • Part A Forward primer (AF): 5′-TTCTGGAATTCGCGGCCGCTTCTAG-3′ (specific to the pSB1A2 prefix + 5 bases upstream of the prefix)
  • Part A Reverse primer (AR): last 20 bases Part A + scar (if wanted) + first 20 bases Part B (reverse complement of this entire sequence)
  • Part B + vector Forward primer (BF): reverse complement of Part A reverse primer
  • Part B + vector reverse primer (BR): 5′-CTAGAAGCGGCCGCGAATTCCAGAA-3′ (reverse complement of Part A forward primer)

Primers for Part A with the vector (upstream part = vector) + Part B (downstream part = insert):

  • Part A + vector Forward primer: 5′-TACTAGTAGCGGCCGCTGCAGGCTTC-3′ (specific to the pSB1A2 suffix + 5 bases downstream of the suffix)
  • Part A + vector Reverse primer: last 20 bases Part A + scar (if wanted) + first 20 bases Part B (reverse complement)
  • Part B Forward primer: reverse complement of Part A reverse primer
  • Part B reverse primer: 5′-GAAGCCTGCAGCGGCCGCTACTAGTA-3′ (reverse complement of Part A forward primer)

3. Perform a PCR reaction with a high fidelity polymerase such as Phusion using the recommended protocol. For template DNA, dilute miniprepped BioBrick plasmid DNA 1:1000 to minimize these “background” plasmids from getting transformed later. Digestion with DpnI after the PCR reaction may reduce background plasmids, but in my experience there is a high success rate (>50%) without the use of DpnI or phosphatase on the vector.

4. Run a gel with 5 ul of the purified PCR products to determine if the products are of the correct size and there are no secondary bands.

5. Purify PCR products with Qiagen PCR Purification Kit and elute with 30 ul water.

6. Measure the concentration of your PCR products with a Nanodrop or by comparing against a ladder on another gel.

7. Perform the In-Fusion reaction using the recommended protocol (this includes the transformation step with Fusion-Blue competent cells).

8. Perform colony PCR on at least 5 colonies (10-12 is ideal) using the VF2/VR primers or primers specific to your construct to find colonies that have the correct size insert.

9. Grow correct colony or colonies in LB+Amp overnight. Three is ideal since one should be correct without mutations which tend to occur most often at the junctions (regions of homology between fragments).

10. Perform miniprep(s) with the Qiagen Miniprep Kit.

11. Submit plasmid(s) for sequencing.

Discussion

Ideally an assembly standard will use the same laboratory components (e.g. restriction enzymes and ligase) so that the same components can be used to assemble any two (or more) BioBricks together. This standard has one limitation in that custom primers need to be ordered for each individual assembly and hence requires different components. Nonetheless, this In-Fusion BioBrick Assembly method has been used to make several constructs and works well for myself and others in our lab. This method can be adapted to other plasmids in your favorite standard format and to assemble more than two BioBricks together. The method described here is a work-in-progress and the up-to-date method will be located here. Please document your success with using this method in the Notes section below!


TENS miniprep-PDF

Background

TENS method of minipreps. Fast but dirty.

Protocol

  1. Transfer 1.5 mL of an overnight culture containing your plasmid to an eppendorf tube and spin at 5000 rpm for 5 min in a tabletop centrifuge to pellet the cells.
  2. Remove and discard the supernatent.
  3. Resuspend either in 50 μL of LB or P1 buffer or TE/RNAse
  4. Add 300 μL TENS buffer
  5. Mix by inverting 5 times.
  6. Add 100 μL 3M NaAc pH 5.2
  7. Mix again
  8. Spin down at top speed for 5 minutes
  9. Transfer supernatant to a new tube (pouring works)
  10. Add 1 mL 100% EtOH (ideally ice cold)
  11. Spin down at top speed for 5 minutes (ideally at 4˚C.)
  12. Wash with 0.5 mL of 70% EtOH
  13. Pour out the supernatant
  14. Spin again to find the rest of the supernatant
  15. Air dry for 10 minutes
  16. Resuspend the dried pellet in 30 μL of water or TE buffer.
  17. Do your molecular bio

Buffers

TE

10 mM Tris-HCl, pH 8
1 mM EDTA

TENS

(500 mL recipe)

5 mL 1M Tris-HCl pH 8.0
12.5 mL 20% SDS
5 mL 10N NaOH
Enough H20 to 500 mL

Colony PCR-PDF

Protocol

  • Use a sterile toothpick or pipet tip to resuspend a plated colony in 50 μl sterile water.
  • store the colony resuspension at 4C so you can start cultures if necessary (should be OK for a couple of days, if you need it to last longer you should use an Index plate.

Reaction Mix

Use the following reaction mix for each PCR:

  • 1 μl 10x Thermo polymerase buffer
  • 1 μl 10x dNTPs (10x = 2.5 mM each dNTP)
  • 0.15 μl 40 μM FWD primer
  • 0.15 μl 40 μM REV primer
  • 0.1 μl Polymerase (taq or vent)
  • 6.6 μl H2O
  • 1.0 μl template suspension

PCR protocol

  • 95 C for 6 minutes (disrupt cells, separate DNA)
  • Cycle 35 times:
    • 95 C for 30 s (melting)
    • 53 C (or whatever temperature is appropriate) for 30 s (annealing)
    • 72 C for X s (elongation)
  • 72 C for 10 minutes (final elongation)
  • 4 C forever
  • For long amplicons, X = 1 minute + 2.5 s per 100bp
  • For shorter amplicons, under ~1kb, this can be shortened judiciously.


JCB Protocol for plasmid based GFP-PDF

Sample preparation

  • Start a new culture at OD 0.02 from an exponentially growing culture when it reaches ~0.4 OD.
  • At the desired OD, take your sample. Alternatively, a sample from a chemostat. Remember to record OD.
  • Pull 1 mL of culture.
  • Immediately spin the cells 13 K (max on tabletop centrifuge) for 2 minutes to pellet.
  • Resuspend cells in lysis buffer.
  • Final cell concentration will be 2 E6 cells/uL (use OD/cfu curve). This concentration is about right for MC4100-pSB4A3.I7101; adjust as necessary.
  • Cell lysates can be frozen at this point (-20 C). Aliquot if desired.

Gel Preparation

see trick-tricine acrylamide gel protocol for pouring vertical acrylamide gels

  • Boil samples for 10 minutes (use 95 C sand block).
  • Spin at 13 K for 10 minutes.
  • Mix samples and standards with 2X sample buffer (in PCR tubes) and boil for 10 minutes (95 C heat block). Spin down and load onto tric-tricine acrylamide gel (see JcBAcrylGel_protocol) immediately.

Run ~1 E7 cells per lane (5 uL of lysis sup’n and 5 uL of 2X sample buffer). 1 E7 cell/lane is good for pSB4A3.I7101. Adjust for higher or lower expression levels. Run GFPssrA standards (10 ng, 20 ng, 40 ng, 60 ng, 80 ng) in water (or neg. control sup’n) to a volume of 5 uL mixed with 5 uL 2X sample buffer. (20 ng/uL purified GFP aliquots at –80C; keep on ice until use) Run 3 uL Amersham Rainbow marker #755 as size marker.

Transfer and Incubations

  • After running gel, cut away stacking gel, cut a corner to mark orientation, and soak in transfer buffer for 45 minutes.
  • Cut PVDF and 3mm Whatman blotting paper to the correct size.
  • Cut the corner on PVDF and wet it with methanol, then soak for 5 minutes in H20, followed by 10 minutes in transfer buffer. Wet 4 pieces of blotting paper in a transfer buffer.
  • Set up transfer bottom to top: 2 pieces blotting paper, gel, PVDF, two pieces blotting paper. Be sure to preserve the orientation of the blot and avoid bubbles.
  • Transfer 2 mA/cm^2 until transfer is complete (i.e. rainbow marker is fully transferred to PVDF membrane). For one 8.5 X 5 blot, this works out to 85 mA for about 2 hours.
  • Block membrane for 1 hr with 5% milk/TBS-Tween (0.1 %). Use the lid of a pipette tip box and 15 mL fluid to cover the
  • blot. (for two blots, use a large tip box and 25 mL fluid for all incubations/washes) Place blot on the shaker table for all incubations.
  • Incubate overnight with 1:10000 dilution of anti-GFP in 2% milk/TBS-Tween (0.1%)
  • Wash 3X in 15 mL TBS-Tween (0.1%) for 10 minutes.
  • Incubate 30 minutes with 1:10000 dilution of ECF secondary antibody in TBS-Tween (0.1%)
  • Wash 3X in 15 mL TBS-Tween (0.1%) for 10 minutes.

Analyzing Western

  • Turn on Fluorimager 30 minutes before use. Put in 570 filters.
  • Settings are PVDF 488/570 of 30, PMT = 500. Select an area to scan.
  • Place 1 mL/gel of ECF substrate on a transparency. ECF substrate in the buffer is stored in 1 mL aliquots at –80C.
  • Using forceps, lay the blot face down on top of the substrate (no bubbles) for about one minute (less if bands become visible). Transfer the blot face down to the fluorimeter plate.
  • Insert the plate into the machine. Scan image. Remove the plate immediately.
  • Remove the plate before shutting down the scanner. Leave software open if anyone is signed up within two hours.
  • Clean the plate with DI and Kim wipes, then with ethanol from the glass bottle.

Quantification in ImageQuant

  • Use a rectangle tool to draw objects around the band. Copy and paste objects so that all objects have the same area.
  • It is not necessary to define a background in ImageQuant. Do volume report without background correction, and set the negative control equal to 0 ng/lane for your standard curve. Alternatively, make a new object to define the background and set the background on all lanes equal to “object ave” for this object. (analyze>>” background correction” to set background correction, then analyze>>” volume report”) (“local average” sets the background equal to the average pixel value of the object perimeter. This will be problematic if bands are not well separated.)

volume = (average pixel value – background value) * object area

  • Double-click click report to make it an Excel file. Save images and Excel volume report.
  • Use the standard curve to estimate ng gfp/lane for samples and calculate gfp/cell. The molecular weight of GFP-SsrA is about 28.3 kDa.

2X Tricine Sample Buffer

  • 2 mL 4X Tris-Cl/SDS, pH 8.8
  • 6 mL 40% glycerol (24% final)
  • 0.8 g SDS (8% final)
  • 0.31 g DTT (0.2 M final)
  • 2 mg Coomassie blue G-250 (0.02% final) (used C. Blue G)
  • to 10 mL with MilliQ H2O and mix
  • aliquot 500 uL/tube and store at –20 C

4X Tris-Cl/SDS pH 8.8

  • 91 g Tris
  • dissolve in 300 mL H2O
  • pH to 8.8 with 1N HCl (about 120 mL)
  • to 500 mL with H2O
  • filter 0.45 um
  • add 2g SDS and store 4 C

Lysis Buffer (12.5 mM Tris pH 6.8, 4% SDS

  • 1.25 mL 1M Tris (pH 8)
  • to 80 mL with st. H2O
  • pH if necessary
  • to 100 mL with st. H2O
  • add 4g SDS

TBS-Tween (0.1%)

  • 100 mL 10X TBS
  • 900 mL H2O
  • 1 mL Tween (Polyoxyethylene sorbitan monolaurate)

10X TBS (500 mM Tris, 1.5 M NaCl)

  • 150 mL 5M NaCl
  • 250 mL 1M Tris, pH 7.5
  • to 500 mL with H2O

1M Tris-Cl, pH 8 (or 7.5)

  • 121 g tris base
  • 700 mL MilliQ H2O
  • to pH 8 with 6N HCl (about 100 mL)
  • to 1 L with MilliQ H2O
  • filter 0.45 um or autoclave (fluid, 20 psi, 250 F, 20 min)

Transfer Buffer (“Towbin Buffer”)

  • 3 g Tris
  • 14.4 g glycine
  • 800 mL dI
  • 200 mL methanol

note: anti-GFP is Assay Designs 915-059, rabbit (store one aliquot at 4 C to avoid freeze/thaw, rest at –20C) ECF Western Blotting kit is Amersham RPN5783 (rabbit) To connect to Bionet from fluorimeter: \\18.79.1.147\endy DNA-NET\username

Preparing electrocompetent cells-PDF

Materials

Equipment

  • -80°C freezer
  • 37°C incubator
  • Refrigerated centrifuge that accepts 225 mL culture tubes

Chemicals and reagents

  • ~500 mL LB Lennox supplemented with appropriate concentration of antibiotic if appropriate.
  • ~600 mL sterile deionized water chilled to 4°C
  • 50 mL sterile 10% glycerol in deionized water chilled to 4°C
  • Ice bucket and ice
  • Dry ice, ethanol bath

Supplies

  • Many 1.5 mL plastic tubes chilled to -80 °C
  • 14 mL culture tube for starter culture
  • 2 L flask for culture
  • 225 mL plastic tubes for centrifugation
  • Pipets

Procedure

  1. Prechill all tubes and pipets at 4°C or -80°C as appropriate.
    Also rinse all flasks with H2O prior to autoclaving in order to remove residual detergents that may remain on glassware from dishwashing. This step may increase competency. Autoclaving with water, which is then discarded, is even better.
  2. Inoculate 5mL LB medium and grow overnight at 37°C with rotation.
    Use LB Lennox rather than LB Miller in order to lessen salt content of media
  3. Add the 5mL overnight culture to 450mL LB medium and incubate at 37°C with vigorous shaking until the OD 600nm is between 0.5 and 1.0. It should take about 3 hours.
    For recA strains, the OD 600 nm should be between 0.5 and 0.7 according to one online source.
  4. Fast cool the centrifuge with the correct rotor to 4°C
  5. Pour the culture into two 225 mL centrifuge tubes.
  6. Place the tubes on ice for 15 minutes.
    This step can vary in incubation time between 15 minutes and 1 hr. Longer incubation times may lead to higher competency.
    For the following steps it is important to keep cells cold and remove all the supernatant in each step to remove residual ions.
  7. Centrifuge for 10 mins at 2000g at 4°C
  8. Remove supernatant and gently resuspend pellets with 200mL cold sterile water.
    Initially add 10-20 mL of water and resuspend by pipetting. Then add the rest of the water.
  9. Centrifuge for 15 mins at 2000g at 4°C
  10. Remove supernatant and gently resuspend pellets with 200mL cold sterile water.
    Initially add 10-20 mL of water and resuspend by pipetting. Then add the rest of the water.
  11. Hold on ice for 30 minutes
  12. Centrifuge for 15 mins at 2000g at 4°C
  13. Remove supernatant and gently resuspend pellets with 25mL cold 10% glycerol.
    This can be optionally transferred to a 50 mL conical tube.
  14. Hold on ice for 30 minutes
  15. Centrifuge for 15 mins at 1500g at 4°C
  16. Remove the supernatant and add 500 μl of 10% glycerol
  17. Resuspend the cells in a final volume of approximately 1 ml
  18. Aliquot 50 μL per tube (tubes on ice)
  19. Shock freeze cell suspensions in a dry ice and ethanol bath.
    One website recommended against using liquid nitrogen but did not justify this recommendation.
  20. Store at -80°C

Electroporation-PDF

This protocol is for transforming plasmid DNA into Escherichia coli cells.

Materials

  • Electrocompetent cells
  • Plasmid DNA (from a ligation reaction)
  • Ice
  • Ice bucket

For the following, you need one per DNA sample

  • Electroporation cuvette (either 1mm or 2mm gap width)
  • Electroporator
  • 1.5 mL eppendorf tube
  • LB-agar plate with appropriate antibiotic
  • 1mL SOC at room temperature

Procedure

  1. Chill electroporation cuvettes, DNA samples, and tubes on ice.
  2. Place LB-agar plates in a 37°C incubator to warm.
  3. Once cuvettes are cold, remove electrocompetent cells from the -80°C freezer and thaw on ice. Alternatively, freshly prepared electrocompetent cells may be used immediately.
  4. If electrocompetent cells are not already in individual aliquots, then aliquot out into pre-chilled 0.6mL tubes.
  5. Turn on electroporator and set voltage to either 1.25 kV (1mm cuvettes) or 2.5 kV (2mm cuvettes).
  6. Dial a P2 pipeman to either 1 or 2μL depending on the salt content of your DNA sample. Use 2μL for samples that have been purified in some way.
  7. Dial a P200 pipeman to 50μL or whatever volume of electrocompetent cells you want to use. Usually 20-50μL.
  8. Dial a P1000 pipetman to 950μL and pipet in SOC. Place the pipeman on counter such that tip doesn’t touch anything.
  9. Pipet 1-2μL of DNA sample and add to electrocompetent cells. Swirl the tip around gently in cells to mix DNA and cells. Do not pipet up and down.
  10. Place cells back on ice to ensure they remain cold.
  11. Transfer cell-DNA mixture to cuvettes using a P200 pipetman. Try not to handle the cuvette base too much so that it stays cold.
  12. Tap the cuvette on the counter gently so that cells are at the bottom and remove any air bubbles.
  13. Wipe off excess moisture from outside of the cuvette.
  14. Place in the chamber of electroporator.
  15. Slide the chamber in so that the cuvette sits snugly between electrodes.
  16. Pulse the cells with a shock by pressing the button on the electroporator.
  17. Remove the cuvette from the chamber and immediately add SOC. This step should be done as quickly as possible to prevent cells from dying off.
  18. Transfer the SOC-cell mixture to a chilled Eppendorf tube.
  19. Chill the sample on ice for 2 minutes to permit the cells to recover.
  20. Transfer the Eppendorf tube to a 37°C incubator and shake to promote aeration. Incubate for 1 hr to permit expression of antibiotic resistance gene.
  21. Plate transformation onto a prewarmed LB-agar plate supplemented with the appropriate antibiotic. I generally plate 200μL but the appropriate plating volume depends on the efficiency of the transformation.
  22. Incubate the plate overnight at 37°C.
  23. Leave the remaining SOC-cell mixture on the benchtop overnight.
  24. If you don’t have any transformants, plate the rest of the transformation in the morning.

Notes

If you are in a hurry and your selection marker is ampicillin, you can go ahead and plate immediately because ampicillin takes a while to be pumped into cells at a high enough concentration to have an effect.

Electrocompetent Cells-PDF

Electrocompetent Cells

From Danijela Dukovski at Harvard Medical School. This protocol works well. –Julie Norville

Materials

  • DI water
  • 10% Glycerol

Special Equipment

  • Centrifuge
  • Ice water bath
  • Liquid nitrogen

Method

  1. Grow 500ml culture to OD 0.5 (approximately).
  2. Spin down cells 5 times in ice cold 10% sterile glycerol.
  3. Keep everything on ice and use a refrigerated centrifuge.
  4. Each time you resuspend use a progressively smaller volume, and make sure all the cells are well resuspended. At the end resuspend in an appropriate volume. It should be pretty cloudy but not super dense. I just do it by eye, so it comes out about like the competent cells you buy.
  5. Aliquot into Eppendorf tubes (I use 250-500uL, depending on how much I have and how lazy I am), freeze in liquid nitrogen, and store at -80.
  6. How I usually do the washes: spin, resuspend in 250ml spin, resuspend in 100ml spin, resuspend in 50ml (can switch to Falcon tubes here) spin, resuspend in 25ml spin, resuspend in 10ml spin, final resuspension
  7. Sometimes I cut one of these out depending on how much of a hurry I am in. I think the final volume (depends on the intial OD of your cells) usually ends up being 5-10mL, so you can get quite a few aliquots.
  8. For transformation usually use 40-50uL of competent cells per transformation with a few ul (2-3) of ligation.

Quick transformant screen-PDF

Overview

This is an easy method for screening a large amount of transformants in a cloning procedure, relieving you of the need to worry about optimizing your ligation or doing a huge amount of minipreps. Works best if a vector-only control ligation is transformed as well.

Materials

  • Maniatis Sample Buffer III (6x)
    • 0.25% Bromophenol Blue
    • 0.25% Xylene Cyanol FF
    • 30% Glycerol
    • Bring up to 100% in H2O
  • P2 Lysis Buffer
    • 8g NaOH pellets
    • 10g SDS
    • Bring up to 1L with H2O
  • Supercoiled DNA Ladder

Procedure

  1. Perform your ligation and transformation as usual, plating overnight on selection. You may want to perform a ligation and transformation with a vector-only negative control for comparison purposes.
  2. The next day, pick single colonies from your vector+insert transformation plates with a toothpick onto a second plate with selection. Spread colony with toothpick into a small (5mm x 5mm) patch on the new plate in a grid, so you can keep individual transformants identified and isolated. I usually pick 30 to 50 colonies at this stage. Incubate this plate at 37°C overnight.
    • You may want to pick one or two colonies from your vector only control, if you get any, and patch these as well.
  3. The next day, cast a large 1% agarose gel, with 1 well per colony you wish to screen (plus a few for your supercoiled ladder). DO NOT add ethidium bromide just yet, as we’ll be running supercoiled DNA, and EtBR affects the mobility of supercoiled DNA.
  4. Fill however many wells of a 96-well microtiter plate (U-bottom works best) with 10 μL H2O
  5. Scrape up about half of the patch with a toothpick or sterile loop, and resuspend as best you can in the H2O. If the H2O becomes cloudy, you probably have enough cells suspended.
  6. Once you’ve finished loading up the wells with cells, use a multipipettor to load 20 μL P2 Lysis Buffer into the wells. Mix briefly with the pipet tip by swirling, NOT pipetting up and down. Example result
  7. Let this sit ~5 minutes
  8. Use the multipipettor again to load 6 μL Maniatis Sample Buffer III to the wells. Be careful about pipetting up and down to mix, as the lysis mix is pretty sticky, and you don’t want to lose your sample.
  9. Take your gel out and put it on your bench. Don’t load the gel with it sitting in the buffer, your sample will float out. Load the entire contents of the microtiter wells into the comb (usually you can only get about 30 μl of volume out of these, as they’re pretty gooey by this stage). Don’t worry about bubbles or anything like that in the wells. Remember also to load a supercoiled ladder (not a linear ladder).
  10. Fill the gel running chamber with your electrophoresis buffer, and carefully lower your loaded gel in. Some of your sample will probably float out, this is okay.
  11. Run the gel until the bromophenol blue front (dark blue) runs about 3/4 of the way down.
  12. Stain ~15′ in EtBr, visualize on UV.

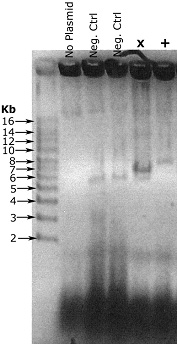
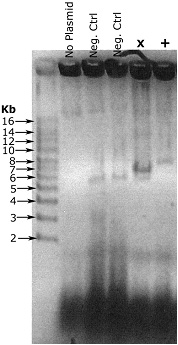
In this example, my vector is 5.5 kb, and the insert is ~1.8 kb. The negative control colonies are recircularized vector, and run at the right size. The lane marked X is a failure. It contains the recircularized vector that we’re not interested in, and while I’m not entirely sure what that strong band is, it’s not what we’re looking for either. The final lane, marked +, is correct, a single band running at around 7.5 kb.

Notes

*Khturner 10:19, 7 December 2006 (EST): The first couple of times you try this, it might be tough to get a feel for the viscosity of the sample at each stage, but once you get the method to work, it pretty much eliminates the need to optimize your ligation and transformation.

Sean Moore Feb. 5, 2007 Is this necessary? This adds a whole day to the screening procedure? You could have done PCR on the colonies in a few hours from the original plate if you needed to screen for colonies with the correct insert. I don’t see more colonies on the “vector + insert” plate than the “vector only” plate, I usually don’t even bother screening and assume something is wrong with the fragments. I have never “optimized” ligations. Also, some replication origins cause significant catenation so analysis in the supercoiled form is impractical/unreliable.

*Khturner 16:51, 15 April 2007 (EDT): You know, you’re probably right. It used to help me when I had problems cloning and a successful construct was rare, but now it’s become pretty routine, and the screening does only take a day by colony PCR. I’ll happily remove this from the protocols page, thanks for the comments.

*Bentley Lim May 9, 2009: Don’t take down this protocol. While many basic cloning experiments use sequenced and up-to-date vectors from companies, etc., many plasmids that still exist have no NCBI entry. Sometimes, it’s impossible to reconstruct the plasmid yourself from papers published before 1990. Therefore, with some cloning experiments, you just need a quick-and-dirty way to see if an insert went in and then you can sequence out to carry out the rest of your cloning procedures.


Quick Transformant Screen-PDF

Overview

This allows you to screen a large number of inserts the day after completing a transformation, rather than waiting for overnight cultures and performing many unnecessary minipreps. A small amount of DNA is isolated directly from colonies on your plate. PCR amplification using primers complementary to your plasmid lets you determine the presence and approximate size of inserts. The protocol works best for ligation reactions with known insert size(s).

Materials

  • LB (or other suitable media)
  • Selectable marker of choice
  • Sterile deionized water
  • PCR Reagents
    • dNTPs
    • Thermostable polymerase
    • Buffer
      • 50 mM MgCl2
      • 500 mM KCl
      • 200 mM Tris-Hcl (ph 8.4)
    • Primers
    • Red Juice
      • Cresol Red
      • Sucrose
      • MilliQ Water
      • Note: Red Juice is a loading dye for agarose gels. Our lab adds it to PCRs as it saves a step between performing the reaction and running a sample on a gel. There is no negative impact to including this particular loading dye, and anecdotal evidence that it actually improves PCR results. Other loading dyes may have undesirable effects or completely impede the reaction.
  • Agarose
  • Ethidium Bromide
  • DNA Marker

Procedure

  1. After performing your ligation reactions and transformations, plate the transformed cells on agar plates with an appropriate selectable marker. We typically use plasmids with ampicillin resistance.
  2. Grow plates overnight at 37°C
  3. The next day prepare a 96-well plate by adding 20 μL of MilliQ water to as many wells as you have colonies for.
  4. Pick a colony with a micropipet tip and resuspend thoroughly in the water by pipetting. Cells will lyse over the next several minutes. Begin setting up your PCR immediately. Alternatively, bacteria could be resuspended in LB without risk of lysis. Include a negative control.
  5. Prepare a master mix for PCR.
  6. Use 10μL of your lysed cells for template.
  7. As soon as you have taken your template DNA, add 50μL of LB + ampicillin (or whatever selection you are using) to the remaining cells. Cover the plate with parafilm and place at 4°C.
  8. Place samples in a thermal cycler and set program
    • When using M13, T7, or Sp6 primers we use an annealling temperature of 55°C.
    • Adjust extension time depending on your insert size. Be sure to keep in mind the amplified portion of your vector when determining size.
  9. Pour a 1% agarose gel with ethidium bromide.
  10. Load PCR samples and an appropriate ladder (ie 2 log, 1kb, 100 bp)
  11. Electrophorese gel
  12. Visualize your gel and determine which clones have the desired insert.
  13. In a 14 ml culture tube, innoculate 2ml LB + ampicillin with 5μL of the cells from your 96-well plate.
  14. Grow overnight at 37°C and continue to miniprep.

Notes

  • This protocol is meant to be a time and resource saving method, but is not appropriate for every ligation and

transformation. Experiments that yield a large range of fragment sizes or very large fragments, such as BAC or genomic digests (shotgun type cloning), may exceed the limitations of PCR or your particular taq. Very large inserts may necessitate such lengthy extension times that the PCR is no longer a time saving tool. Still, with a pool of fragments we often find this technique useful as it lets us select one or two clones of each size, or choose the clone with our expected length product.

  • Because you are priming your PCR off the plasmid, there will be a small fragment in every lane of your gel, even if a clone had no insert. This also means that when looking on your gel you want to factor in that additional DNA when approximating fragment length. If a lane is completely empty there may have been a problem with your PCR. A template negative PCR reaction is always a recommended control.
  • Btarlow: note

I do this with a couple modifications.

  1. I resuspend my colony directly in 10ul LB broth. This way, I don’t worry about lysis. Sterile LB won’t affect the PCR, but it’s always good to include a negative control.
  2. Then I use 1uL of the culture as a template for 50uL PCR reaction.
  3. When avaiable, I like to use primers to the vector that span the multiple cloning site (MCS) so that I always get PCR product for every template. Many plasmids already have sequences designed for sequencing primers built in (ie T7, T4, M13F, M13R) and these work well. In a recent experiment, I ligated a 1800bp fragment into the backbone. If I had empty vector, I saw a 250bp band. If the plasmid contained the insert, I got a 2050bp band.

DNA Spots-PDF

Materials

  • For making Spots:
    • 1% Cresol Red
    • DNA (100 ng/μL)
    • Crane & Co. 100% cotton, acid free thesis paper
  • For using spots to transform:
    • Harris Uni-Core Punch, 2mm and Olfa Cutting Mat
    • TE
    • Competent Cells

Procedure

Making Spots

Spotted Grid

  • Mix 1 part 1% Cresol Red with 4 parts DNA that is at least 100 ng/μL
    • The exact amounts depend on how many 2 μL spots you plan to make
    • Using the excess of Cresol Red is helpful for when you transform, since you can visibly tell which cells have had DNA added and which have not
  • Make 2 μL spots on 100% cotton, acid free thesis paper
    • Place a second sheet of paper under the one to be spotted to keep it free from contamination
  • Leave spots to dry at room temperature. This takes between 45 minutes and an hour
  • Once dry, spots can be used right away or stored at -20 °C. To store – place the spotted paper between two others to protect it.

Using spots to transform E. coli

Olfa cutting mat and Uni-Core Punch
Punched Spot

  • Cut out spot from surrounding paper using the Uni-Core Punch on the Olfa cutting mat
  • Soak spot in 20 μL TE for 15 minutes.
  • Thaw competent cells on ice while spots soak
    • I used TOP10 chemically competent cells
  • Add 5 μL of the TE the spot soaked in to 50 μL competent cells
    • Spots could also be directly added to cells. Soaking in TE is better though, since there is DNA left over if the transformation does not work for some reason.
  • Incubate cells on ice for 30 minutes
  • Heat shock cells at 43 °C
    • If cells are in individual tubes, heat shock for 30 seconds. If cells are in a 96-well plate extend the heat shock to 1 minute.
  • Incubate cells on ice for 2 minutes
  • Add 200 μL SOC
  • Incubate at 37 °C for 2 hours
  • Spread cells on previously made LB plates with proper antibiotic
  • Grow overnight at 37 °C