Tuesday, December 24, 2024
Home Blog Page 25

Sex genotyping of mice-PDF

Common male-specific PCRs

Sry Sex-determining region of the Y chromosome

  • forward SRY F : TTG TCT AGA GAG CAT GGA GGG CCA TGT CAA
  • reverse SRY R : CCA CTC CTC TGT GAC ACT TTA GCC CTC CGA
  • PCR product: 273 base pair
Uni Washington, St. Louis, Mouse Genetics Core
  • forward sry1 AACAACTGGGCTTTGCACATTG
  • reverse sry2 GTTTATCAGGGTTTCTCTCTAGC
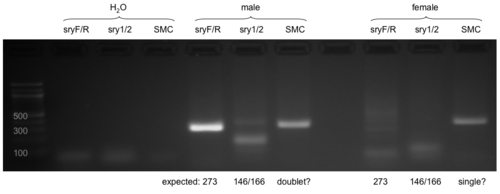
  • PCR product: 146/166 bp doublet
MMRRC’s genotyping protocol including Sry primers


Homologous pair SmcX/SmcY

  • SMCX-1 5′-CCGCTGCCAAATTCTTTGG-3′
  • SMC4-1 5′-TGAAGCTTTTGGCTTTGAG-3′
  • PCR product: females single band, males 2 bands because of an intron difference between the X and Y genes (Agulnik 1997, PMID 9060413); adapted from Case Western Transgenic Facility
X chromosomal SmcX = Kdm5c
[3]
Y chromosomal SmcY = Kdm5d
[4]


Test PCR with adult tail genomic samples

Conditions: Templates are known adult male and female tail gDNA samples. Standard PCR cycled using progressively lowered annealing temperature (65-58°C for first cycles, then 58°C); same conditions for all reactions. Primers as listed above. 12μL of a 25μL + 5μL Orange G run on a 2% agarose gel.

Interpretation: The sry F/R pair worked best but does show weak unspecific products of similar size as the male-specific 273bp band. The sry 1/2 pair is probably also specific but bands are harder to recognise. For the SMC, we didn’t observe the described doublet expected in males.

Keep in mind that this is a standard PCR. Amplification and specificity can probably be increased by optimisation of the PCR reaction.

Saponin Lysis of RBCs-PDF

Abstract

Lyse red blood cells while leaving the Plasmodium falciparum parasite intact with its parasite membrane and parasitophorous vacuole membrane. Typically used right before freezing down parasites for genomic DNA extraction, or for getting rid of hemoglobin right before running a Western Blot on parasite extracts.

Reagents

  • 0.15% Saponin in PBS
  • 1X PBS
  • 12 mL of Plasmodium falciparum blood culture at 4% hematocrit

Equipment

  • Refrigerated centrifuge capable of holding 15 mL conical tubes
  • Microcentrifuge

Procedure

  1. Centrifuge parasite culture at 1400 rpm (~484xg) for 3 minutes.
  2. Aspirate media.
  3. Resuspend pellet in 1 ml of 0.15% Saponin (in aliquots in freezer) and transfer to a 1.5 ml eppendorf tube.
  4. Incubate for 5 minutes on ice and vortex each minute.
  5. Spin at 6000 rpm for 3 minutes at 4 degrees C.
  6. Wash with 1 ml 1X PBS (spin at 6000 rpm for 3 minutes) 3 to 4 times.
    1. Each wash step consists of aspirating the supernatant and resuspending the pellet with new wash buffer, before centrifuging.
  7. Aspirate off last wash.
  8. Store at -20 degrees C until ready to use.


Immunofluorescence Microscopy (Pf, live)-PDF

Abstract

Use antibodies or sera to localize proteins to the surface of live, intact Plasmodium falciparum-infected red blood cells.

Reagents

  • 1% gelatin (w/v) in RPMI
  • RPMI Media
    • Store at 4C, warm up to 37C right before use.
  • PBS
    • Phosphate buffered saline, keep on ice.
  • Blocking Buffer
    • 3% Bovine Serum Albumin (BSA) (w/v) in PBS
    • 1.5 g in 50 mL, make fresh, sterile filter, and keep on ice during use.
  • Antibodies
  • DAPI, hoechst dye, or some other membrane permeable DNA dye (to stain nucleus)
  • Glass Coverslip
    • No. 1.5 (0.17 mm, 0.16 – 0.19 mm) thickness is best for DeltaVision Deconvolution microscope
  • Microscope Slide
  • Nail Polish
    • To seal coverslips on microscope slide
  • Mounting Medium
    • Right before using, place 2-3 crystals p-phenylenediamine (~1 mm diameter) in a microcentrifuge tube and add 100 uL water. Vortex and let sit in dark for 5 minutes. Centrifuge briefly and use the supernatant as antifade solution. Make fresh every time.

Equipment

  • Heat block set to 37C
  • Refrigerated microcentrifuge, or a microcentrifuge placed in a cold room (4C)
  • Bunsen burner

Notes

  1. In this protocol, examples assume 12 mL (1 plate) of culture that is gelatin purified, which will be suspended in a 1 mL volume after purification.
  2. All centrifuge steps are at 2000 rpm in the microcentrifuge for 2 minutes at 4C.
  3. NEVER vortex to resuspend cells. If need be, gently flick the tube or pipet slowly up and down with a 1 mL pipet tip.
  4. Be gentle with cells! Keep them on ice at all times!
  5. Keep all solutions with fluorescent dye in the dark whenever possible!

Procedure

  1. Gelatin purify 12 mL of parasite culture to enrich for troph and schizont stage parasites
    1. Thaw an aliquot of frozen 1% gelatin at 37C. Use two tubes for 12 mL of culture.
    2. Spin culture at 1400 rpm (394 g) for 5 minutes with a brake of 1 (low) and discard supernatant.
    3. Add a volume of RPMI that is equal to the volume of the pellet. (12 mL culture at 4% hematocrit should be 480 uL pellet)
    4. Add four times the org. pellet volume of 1% gelatin and aliquot 1 mL volumes to 1.5 mL eppendorf tubes.
      1. For example, if pellet is 480 uL, add 480 uL RPMI and mix. Aliquot 240 uL of this mixture into each of four tubes. Add 960 uL of 1% gelatin to each of the tubes.
    5. Incubate at 37C for 10 minutes (Use different times for different applications, e.g. 20 minutes to get really pure trophs). Uninfected blood and ring stage infected red blood cells (iRBCs) will sediment in the pellet and mature stage iRBCs remain in the suspension.
    6. Transfer upper layer to another tube.
    7. Wash the pellet and upper suspension three times with PBS.
      1. Washing can take place in multiple tubes, but in the end, the 12 mL of culture after gelatin purification should yield roughly 40 uL of pellet. Resuspend this in a final volume of 1 mL to roughly recreate 4% hematocrit.
  2. Smear the iRBCs from the pellet and upper suspension to determine percentage of parasites.
  3. Block parasites with 2% BSA (w/v) in PBS for 45 minutes on ice or at 4C by resuspending 2 uL pellet in 200uL blocking buffer.
  4. Centrifuge parasites and remove blocking buffer.
  5. Aliquot 5 uL of parasite pellet per slide into separate tubes, then add 5 uL of primary antibody to make it a 1:2 dilution of antibody. You can also add 1 uL of antibody and 4 uL of 2% BSA (w/v) in PBS to make it a 1:10 dilution. Incubate at 4C for 1 hr with slow rotation.
  6. From now on, the instructions will be for each tube.
  7. Wash cells 3 times with 200 uL of 2% BSA (w/v) in PBS.
  8. Resuspend parasites in 25 uL of secondary antibody solution, which should consist of secondary antibody at 1:25 and 1:500 of 10 mg/mL DAPI, and incubate at 4C for 30 min with slow rotation. Don’t add the DAPI in this step if you will do a tertiary antibody incubation.
  9. Wash cells 3 times with 200 uL of 2% BSA (w/v) in PBS.
  10. (Optional) Resuspend parasites in 25 uL of tertiary antibody solution, which should consist of tertiary antibody at 1:25 and 1:500 of 10 mg/mL DAPI, and incubate at 4C for 30 min with slow rotation.
  11. Wash cells 3 times with 200 uL of 2% BSA (w/v) in PBS.
  12. Add cells: Pipet 1 uL of pellet resuspended in 5 uL 2% BSA (w/v) in PBS on the center of the coverslip and let sit for a few minutes.
  13. Add mounting media: Add 1 uL to the middle of the coverslip and mix by pipetting
    1. Don’t mount multiple slides at the same time. If you have multiple samples, do one and keep the other samples on ice.
  14. Add Slide: Flame a slide, let it cool, then place over the coverslip. Keep slides in dark as much as possible to prevent photobleaching of dyes.
  15. Seal slide by painting the edges of the coverslip with nailpolish or Valap (1:1:1 vaseline:lanolin:paraffin wax) and let the nailpolish dry in the dark.
  16. Go to the microscope and take some pretty pictures!


Immunofluorescence Microscopy (Pf, fixed)-PDF

Abstract

Use antibodies or sera to localize proteins to the surface of fixed, permeabilized Plasmodium falciparum-infected red blood cells.

Reagents

  • 1% gelatin (w/v) in RPMI
  • RPMI Media
    • Store at 4C, warm up to 37C right before use.
  • PBS
    • Phosphate buffered saline, keep on ice.
  • Fixative Solution
    • 4% formaldehyde + 0.0075% glutaraldehyde in PBS
    • Make fresh for every use. Thaw a fresh frozen aliquot of 25% glutaraldehyde every time you make this.
  • Permeabilization Solution
    • PBS + 0.1% Triton X-100
  • Blocking Buffer
    • 3% Bovine Serum Albumin (BSA) (w/v) in PBS
    • 1.5 g in 50 mL, make a fresh, sterile filter, and keep it on ice during use.
    • Alternative blocking solutions: 5% animal serum in PBS, or 5% nonfat dried milk powder in PBS.
  • Antibodies and Nuclear Dye
  • 1% (v/v) Polyethyleneimine (PEI) in water
    • PEI is very viscous
    • Sigma Cat. No. 408727-100mL
  • Glass Coverslip
    • No. 1.5 (0.17 mm, 0.16 – 0.19 mm) thickness is best for the DeltaVision Deconvolution microscope
  • Microscope Slide
  • Nail Polish
    • To seal coverslips on a microscope slide
  • Mounting Medium
    • Right before using, place 2-3 crystals of p-phenylenediamine (~1 mm diameter) in a microcentrifuge tube and add 100 uL water. Vortex and let sit in the dark for 5 minutes. Centrifuge briefly and use the supernatant as an antifade solution. Make fresh every time.

Equipment

  • Heat block set to 37 C
  • Refrigerated microcentrifuge, or a microcentrifuge placed in a cold room (4C)
  • Bunsen burner

Notes

  1. In this protocol, examples assume 12 mL (1 plate) of culture that is gelatin purified, which will be suspended in a 1 mL volume after purification.
  2. All centrifuge steps are at 2000 rpm in the microcentrifuge for 2 minutes.
  3. NEVER vortex to resuspend cells. If need be, gently flick the tube or pipet slowly up and down with a 1 mL pipet tip.
  4. Keep all solutions with fluorescent dye in the dark whenever possible!

Procedure

  1. Gelatin purify 12 mL of parasite culture to enrich for trophy and schizont stage parasites
    1. Thaw an aliquot of frozen 1% gelatin at 37C. Use two tubes for 12 mL of culture.
    2. Spin culture at 1400 rpm (394 g) for 5 minutes with a brake of 1 (low) and discard supernatant.
    3. Add a volume of RPMI that is equal to the volume of the pellet. (12 mL culture at 4% hematocrit should be 480 uL pellet)
    4. Add four times the org. pellet volume of 1% gelatin and aliquot 1 mL volumes to 1.5 mL Eppendorf tubes.
      1. For example, if the pellet is 480 uL, add 480 uL RPMI and mix. Aliquot 240 uL of this mixture into each of the four tubes. Add 960 uL of 1% gelatin to each of the tubes.
    5. Incubate at 37C for 10 minutes (Use different times for different applications, e.g. 20 minutes to get pure trophy). Uninfected blood and ring-stage infected red blood cells (iRBCs) will sediment in the pellet and mature-stage iRBCs remain in the suspension.
    6. Transfer the upper layer to another tube.
    7. Wash the pellet and upper suspension three times with PBS.
      1. Washing can take place in multiple tubes, but in the end, the 12 mL of culture after gelatin purification should yield roughly 40 uL of pellets. Resuspend this in a final volume of 1 mL to roughly recreate 4% hematocrit.
  2. Smear the iRBCs from the pellet and upper suspension to determine the percentage of parasites.
  3. Wash cells: Gently centrifuge cells and exchange media with room-temp PBS.
  4. Fix cells: Centrifuge cells and exchange media with a fixative solution. Incubate for 30 min @ RT
  5. Wash cells: To remove the fixative, centrifuge and wash cells in PBS twice.
  6. Permeabilise cells: To gently permeabilize cells, incubate in 0.1% triton/PBS for 10 min. Check for permeabilization – supernatant should be pink from released hemoglobin.
  7. Wash cells: Centrifuge and wash cells in PBS twice to remove detergent.
  8. Blocking step: Resuspend cells in a blocking buffer for a few hours at RT or overnight at 4C on a rotator or rocker.
    1. You can keep the cells at 4C for up to a week.
  9. Primary Antibody Step: Resuspend cells in antibody diluted 1:50 to 1:100 in blocking buffer for 1 hour at RT on a rotating or rocking platform.
    1. If you started with 12 mL culture, you don’t need to use all of it for one microscope slide. Use 125 uL suspension (5 uL pellet) per slide.
  10. Wash cells: Wash cells two times in PBS.
  11. Secondary Antibody Step: Resuspend cells in secondary antibody diluted 1:200 and DAPI (10mg/mL) diluted 1:500 in blocking buffer for 30 min at RT on a rotating or rocking platform. If you have a tertiary antibody, don’t add the DAPI until the tertiary antibody incubation step.
  12. Wash cells: Wash cells two times in PBS.
  13. (Optional) Tertiary Antibody Step: Resuspend cells in tertiary antibody diluted 1:200 and DAPI (10mg/mL) diluted 1:500 in blocking buffer for 30 min at RT on a rotating or rocking platform.
  14. Wash cells: Wash cells two times in PBS.
  15. Resuspend cells in PBS, wrap them in foil, and leave them to sit while you prepare the slides.
  16. Coat Coverslip with 1% PEI in water: Flame a coverslip over a Bunsen burner. With a glass capillary or pipet tip, drop a spot of PEI solution and spread it over the coverslip with the side of the capillary. Leave to dry.
  17. Add cells: Put a small drop (5-10 uL) of cells on the center of the coverslip and let sit for a few minutes.
  18. Add mounting media: Add 1.5 uL to the middle of the coverslip and mix by pipetting
  19. Add Slide: Flame a slide, let it cool, then place it over the coverslip. Keep slides in the dark as much as possible to prevent photobleaching of dyes.
  20. Seal the slide by painting the edges of the coverslip with nail polish or Valap (1:1:1 vaseline:lanolin: paraffin wax)

Studier Lysate Prep-PDF

Protocol

  1. Add 5mL fresh overnight (BL21 if wild-type T7) into 15 mL of T broth (125 mL flask).
    • I often use LB –Sri Kosuri 15:18, 3 Jun 2005 (EDT)
  2. Add a single plaque to the above (or a drop of lysate)
  3. Shake at 30°C until lysis is visually apparent (2-3hr)
  4. As soon as lysis is observed and appears to be complete, add 1g of NaCl to the flask and dissolve by shaking.
    • Adding NaCl prevents phage particles from getting pulled down during centrifugation.
  5. Once NaCl is dissolved, centrifuge for 10 min at 10,000 rpm at 4°C.
    • Studier has observed that leaving released phage in the cell debris causes a reduction in the kinetics of phage binding (personal communication). It becomes difficult to get good time courses in this case. This can often happen even over an hour. So it is important to catch lysis and spin down the debris as soon as possible. It is recommended when making a large stock that will be used in timing experiments, that you check that most of your phage adsorb to the cell in the first 30 seconds.
  6. Store the tube in the fridge away from light (usually good indefinitely, e.g., retains absorption well).

References

  1. Studier FW. The genetics and physiology of bacteriophage T7. Virology. 1969 Nov;39(3):562-74. DOI:10.1016/0042-6822(69)90104-4 | PubMed ID:4902069 | HubMed [Studier-Virology-1969]

Time-Lapse Microscopy-PDF

Pad Preparation

1. Microwave 2% agarose (mix of low-melt and normal, to taste) in Thorn media (see below). (If you have used different percentages of agarose pads please let us know, Bruno)

2. Apply 2mL to a 24×60 mm coverslip.

3. Cover with an additional coverslip, creating a sandwich. Let cool for 30 minutes. (1h seems to work better)

Cell Preparation

4. Grow 5mL culture in Thorn media to OD 600 = 0.3. Back dilute if necessary.

5. Centrifuge at 2000 rpm for 2 minutes. Resuspend in 1mL Thorn media and transfer to a 1.5mL Eppendorf tube.

6. Spin in a microfuge for 15 seconds to pellet. Resuspend in 100-200 µL Thorn media.

7. Once cooled cut a 5×5 mm square from the agarose pad. Apply 0.2 µL of cells to the top surface.

8. Invert square onto a glass-bottom imaging dish. Add a few drops of water to the dish (for moisture), and cover edges with parafilm.

9. Image.

Thorn Media

Standard media except with low-fluorescence yeast nitrogen base.

(Yeast nitrogen base without riboflavin and folic acid.)

  • 5 g/l (NH4)2SO4
  • 1 g/l KH2PO4
  • 0.5 g/l MgSO4
  • 0.1 g/l NaCl
  • 0.1 g/l Ca2Cl
  • 0.5 mg/l H3BO4
  • 0.04 mg/l CuSO4
  • 0.1 mg/l KI
  • 0.2 mg/l FeCl3
  • 0.4 mg/l MnSO4
  • 0.2 mg/l Na2MoO4
  • 0.4 mg/l ZnSO4
  • 2 µg/l biotin
  • 0.4 mg/l calcium pantothenate
  • 2 mg/l inositol
  • 0.4 mg/l niacin
  • 0.2 mg/l PABA
  • 0.4 mg/l pyridoxine HCl
  • 0.4 mg/l thiamine

(Sheff MA, Thorn KS. Optimized cassettes for fluorescent protein tagging in Saccharomyces cerevisiae. Yeast 2004; 21: 661–670.)

Cesium Chloride Purification of T7-PDF

Overview

Cleaner stocks of T7 that concentrate and purify T7 bacteriophage.

Protocol

  1. Grow 100mL permissive cells to a density of 108 to 109 cells/ml at 30°C in a rotary shaking water bath. Inoculate the cells with a drop from a master phage stock. Continue to shake cells in the water bath at 30°C until culture clarifies. Be careful not to let the culture sit for long (>15 minutes) after the culture clarifies.
  2. Add NaCl to the lysate to make the final concentration 1 molar. Centrifuge the lysate at 10,000 rpm for 10 min, Discard the cellular debris, and add 10 grams polyethylene glycol (PEG) m.w. 8000 (10% w/v) to the supernatant. Gently stir the mixture until the PEG has dissolved. Keep lysate on ice for 1 hour.
    • Need to check the 1-hour incubation step because of a warning from Studier on leaving cultures too long in the cell debris. See Studier Lysate Prep
  3. Pellet the phage at 5,000 rpm for 15 min. Decant the supernatant, and very gently resuspend the pellet in 3.5 mL of T7 Buffer. Centrifuge the lysate at 5,000 rpm for 10 min, and keep the supernatant.
  4. Pour a cesium chloride step gradient: add 0.5 mL of cesium chloride with a density of 1.6 to the bottom of a centrifuge tube that fits in a SW 40.1 rotor. Gently layer 0.5 mL of cesium chloride ρ=1.5 onto the ρ=1.6 layer. Finally, add 0.5 mL of cesium chloride ρ=1.4 onto the ρ=1.5 layer.
  5. Gently layer the phage supernatant onto the cesium chloride step gradient. Centrifuge the phage in a SW 50.1 rotor at 30,000 rpm for 2 to 3 hours. The phage will band at the ρ=1.5 layer.
  6. Remove the phage band from the side of the tube with a syringe.
  7. Remove the cesium chloride by dialysis against 0.5 to 1 Liter of T7 Buffer at 4°C.


Making plate lysates-PDF

Materials

Setting up plate lysates

  • Host culture
  • Petri plates containing solid culture medium appropriate for the host bacterium
  • Aliquots of molten soft agar for overlays (4 – 5 ml each, enough to cover one plate), held at ~50 ºC in a heat block or water bath
  • Tubes, tube racks, pipettors, sterile tips
  • Aseptic working area (near a flame or in an aseptic cabinet)

Harvesting plate lysates

  • SM buffer (100 mM NaCl, 25 mM Tris-HCl pH 7.5, 8 mM MgSO4, 0.01% (w/v) gelatin) or sterile liquid culture medium
  • 25 ml serological pipettes and bulb or Pipetboy
  • Falcon tubes (15 or 50 ml, depending on amount of lysate)
  • 10 ml syringes and 0.22 μm syringe filters
  • Tube racks
  • Aseptic working area (near a flame or in an aseptic cabinet)

Procedure

Setting up plate lysates

  1. Label 1-5 plates for each phage isolate you will be propagating. The number of plates depends on how much lysate you need, but generally 1 plate will yield about 6-7 ml of lysate. Label the plate(s) with the phage isolate name.
  2. Aliquot 4 ml of top agar into tubes and keep in the heat block. Make enough aliquots depending on how many plates per phage isolate you will be propagating.
  3. In a second set of tubes, add 100 μl of host culture and 100 μl of appropriately diluted phage. Mix briefly.
    Ideally, a plate lysate should be inoculated with enough phage to cause nearly-confluent lysis: the plate should be covered in plaques, with just a lacey remnant of the lawn visible. This usually translates into 104 – 105 PFU/plate for a standard 10-cm Petri plate, depending on the size of the plaques. Therefore, it is helpful to know at least the approximate titer of the phage stock or pickate you are using to inoculate the plate lysates. If you do not know, make your best guess on the phage concentration, remembering it is better to be too high than too low.
  4. Pour a top agar aliquot into a tube containing the host culture/phage mixture, vortex briefly and pour over the appropriately labeled plate. Allow the lawns to set for 5 min, then invert and incubate as appropriate for your host organism.

Harvesting plate lysates

  1. Place the plate face-up and, using a pipette, flood the plate with 6-8 ml of broth or SM buffer. Use the pipette to GENTLY disrupt the lawn surface and then aspirate the resulting slurry back into the same pipette. Be tidy! Don’t slosh the lysate out of the plate! You only want to disrupt the soft top agar layer…do not gouge into the firmer bottom agar layer.
  2. Place the lysate into a clean 15 or 50 ml Falcon tube and label it with the isolate name.
    To avoid cross-contaminating your phage isolates, flood plates and transfer the slurry to tubes one isolate at a time. Periodically wipe the work surface with sanitizer or EtOH.
  3. Centrifuge the lysates at 10,000 x g, 10 min.
  4. Filter sterilize the phage-containing supernatant.
    1. Remove a 10 ml syringe from its wrapper and remove the plunger from the syringe; place the syringe barrel on the bench and stand the plunger upright.
    2. Place a 0.22 μm syringe filter onto the syringe barrel, and twist until it is locked on securely.
    3. Pour the supernatant lysate into the syringe barrel, avoid disturbing the pelleted agar and cell debris.
    4. Holding the tip of the syringe over a new tube, place the syringe plunger back into the barrel, and press to force the phage lysate through the filter.
    5. Label the new tube containing the filter-sterilized phage lysate with the isolate name and date. Store at 4 ºC.


Phage genomic DNA extraction-PDF

Overview

n this protocol you extract the genomic DNA from the phages in a lysate. The lysates are “dirty” in that they contain spent media components, cell wall debris, flagella, nucleic acids, bacterial proteins and unassembled phage proteins in addition to the phage themselves. There are many methods for purifying phage DNA from the rest of the lysate, and in this protocol we will use a modified method with commercial DNA extraction kit, the Promega Wizard DNA Clean-up kit (Promega catalog #A7280). If you publish using this method, please use the following citation: Summer EJ, 2009. Preparation of a phage DNA fragment library for whole genome shotgun sequencing. Methods Mol Biol 502:27-46; PMID 19082550.

As a rule of thumb, 1 ml of phage lysate with a titer of 1 x 10¹⁰ contains about 0.5 μg of phage DNA, assuming the phage has a 50 kb genome. Typically 10 ml of a high-titer phage lysate is used for DNA extraction. More or less lysate (up to 20 ml) may be used depending on the phage stock titer and the expected genome size of the phage. For low-titer phage stocks, up to 20 ml of lysate may be used. With high titer stocks of large-genome phages, use 10 ml of lysate or less or else the column will be overloaded and clog. The columns have a maximum capacity of about 30 μg of DNA.

This protocol was written by Jason J. Gill at the Center for Phage Technology at Texas A&M University (rev.7/12/11) and is posted with permission (and minor editing/formatting).

Materials

Reagents required

  • Promega Wizard DNA cleanup kit (cat# A7280)
  • Phage lysate (10-20 ml, >109 PFU/ml)
  • Nuclease solution (20 mg/ml DNase I, 20 mg/ml RNase A)
  • Precipitant solution (30% w/v PEG-8000, 3 M NaCl)
    Preparation (200 ml): in a clean bottle add 110 ml ddH2O and 35 g NaCl, dissolve completely. Add 60 g PEG-8000, cap bottle and shake. Incubate bottle in a 50 – 60 ºC water bath for about 2 h, shaking occasionally (at this point, it is normal for the solution to be turbid and separated into two phases). Remove and let cool to RT, shaking occasionally. Solution should be clear or slightly turbid. Add ddH2O to 200 ml, store at RT.
  • Resuspension buffer (5 mM MgSO4 in water)
  • 80% (v/v) isopropanol
  • Sterile molecular biology-grade water

Materials required

  • 50 ml centrifuge tubes
  • Sterile 1.5 and 2 ml microcentrifuge tubes
  • 3 cc syringes
  • Heat block, 80 ºC

Procedure

  1. Prepare your phage lysate by plate lysate or liquid culture methods. Lysates should be clarified by filter sterilization (0.45 or 0.22 μm). Lysates may be in broth (LB, TSB, etc) or in λ-dil.
  2. Place the lysate into a clean 50 ml centrifuge tube. Add 0.5 μl of nuclease solution per ml of lysate (10 μg/ml DNase & RNase final). Incubate the lysates at 37 ºC for 30 min, or at RT for 2 h.
  3. Add precipitant solution to the lysate at a rate of 1:2 precipitant:lysate (10% PEG-8000, 1 M NaCl final). Mix gently by inversion. Incubate on ice for at least 60 min; precipitation works best when incubated at 4 ºC overnight. Most phages are stable in this state for up to several days.
    Alternative method: phages may be pelleted from the lysate by centrifugation in a normal high-speed centrifuge (e.g., about 7,000 x g overnight) or in an ultracentrifuge (e.g., about 1 hour at 50,000 x g). dsDNA phages have weights of about 400-1000 S, and pelleting time (in hours) can be calculated from the rotor’s k-factor by the formula: time = k/S.
  4. Centrifuge the precipitated phage lysate at 10,000 x g, 4 ºC, 10 min.
  5. Carefully pour off the supernatant and retain the pellet. The pellet may be transparent or opaque, and may be spread up the wall of the tube.
  6. Resuspend the pellet in 500 μl of resuspension buffer (5 mM MgSO4) by pipetting gently up and down; be sure to rinse down the sides of the tube to obtain all of the pellet.
  7. Transfer the resuspended phage to a labeled 1.5 ml microcentrifuge tube.
  8. Centrifuge for 5-10 sec to pellet any insoluble particles. Transfer the supernatant to a new labeled 2 ml microcentrifuge tube.
    Optional step: some bacteria, such as Staphylococcus aureus, produce heat-stable nucleases that are resistant to denaturation. The nuclease will be present in the phage precipitate and degrade the phage DNA once it is released from the phage capsid. In these cases, the nuclease can be degraded by addition of proteinase K. To each 500 μl aliquot of resuspended phage, add 10 μl of 0.5 M EDTA pH 8 and add proteinase K to a final concentration of 100 μg/ml. Incubate at 50 ºC for 30 min. Allow the tube to cool to RT and continue to the next step.
  9. Thoroughly resuspend the purification resin contained in the Promega Wizard kit (swirl gently, do not shake) and add 1 ml of resin to the phage suspension. Mix by inverting the tube 5-6 times.
  10. Label a 1.5 ml microcentrifuge tube for each DNA prep you are extracting, and place into a tube rack with the lid open. Place a Wizard minicolumn into each tube.
  11. Remove the plunger from a 3 ml syringe, attach the syringe barrel to the minicolumns in the tube rack, and leave them standing in the tube rack. Place the plunger on a clean paper towel on the bench.
  12. Pipet the resin/lysate mix into the syringe. Holding the syringe over a waste beaker, insert the syringe barrel and push the resin into the minicolumn. Keep pressing until all the liquid has been forced through the resin. A slow flow rate usually means a good DNA yield.
  13. Detach the minicolumn from the syringe and place it back into its microcentrifuge tube. Remove the plunger from the syringe, then reattach the syringe barrel to the minicolumn.
  14. Wash the column by adding 2 ml of 80% isopropanol to the syringe. Holding the syringe over a waste beaker, insert the syringe barrel and push the isopropanol through the minicolumn. Keep pressing until all the liquid has been forced through the resin.
  15. Remove the syringe from the minicolumn and discard the syringe.
  16. Cut the lid off of a new 1.5 ml microcentrifuge tube, label it and place the minicolumn into it. Centrifuge for 2 min at 13,000 x g, RT to dry the resin.
  17. Cut the lid off of a new 1.5 ml microcentrifuge tube, label it and place the minicolumn into it. Place the tube + minicolumn into the microcentrifuge. Pipet 100 μl of water, preheated to 80 ºC, into the top of each column and immediately centrifuge at 13,000 x g, RT for 1 min to elute the DNA.
    Check the eluate volume after the spin. If it is much less than 100 μl, add another 100 μl of heated water and spin again.
  18. Obtain a new 1.5 ml microcentrifuge tube and label it. Transfer the eluted DNA from step 17 into the new tube. Discard the minicolumn. Close the lid and store at -20 ºC.


Yeast DNA Prep-PDF

Protocol

  1. grow up yeast culture to appropriate density (near saturation)
  2. spin 1.5 ml of culture for 1 min in microfuge and aspirate off supernatant
  3. resuspend pellet in 200 ul breaking buffer
  4. wear gloves and add:
    • 200 ul phenol:chloroform: isoamyl alcohol (25:24:1)
    • 200 ul (@200 mg) glass beads
  5. close the cap tightly and vortex for 2.5 min.
    • Be careful when vortexing; the label can be dissolved by the phenol.
    • Hold the cap tightly so it doesn’t open or spill.
  6. add 200 ul TE buffer and spin for 5 min, in microfuge
  7. transfer 350 ml aqueous (top) layer to fresh Eppendorf.
  8. add 1 ml 95% ethanol and mix well, let sit for 10 minutes
  9. spin for 2 min, take off the supernatant, and let dry upside down for 10 min.
  10. resuspend the pellet in 50 ul TE buffer or water.

You can now use 1-2 ul of this crude yeast plasmid DNA prep to transform E. coli.

Materials

  • breaking buffer
    • 2% (v/v) Triton X-100
    • 1% (w/v) SDS
    • 100 mM NaCl
    • 10 mM Tris-Cl, pH 8.0
    • 1 mM EDTA, pH 8.0
  • T.E. buffer (pH 8.0)
    • 10 mM Tris-Cl, pH 8.0
    • 1 mM EDTA, pH 8.0
  • chilled phenol:chloroform: isoamyl alcohol (25:24:1)
  • chilled 95% ethanol
  • acid-washed glass beads (Sigma, G 3753, See CPMB, 13.12.1)