Tuesday, December 24, 2024
Home Blog Page 4

Oligonucleotide phosphorylation, Annealing and Ligation-PDF

Overview

This is a protocol for oligo phosphorylation, annealing for cloning.

Materials

  • Forward oligo
  • Reverse oligo
  • 1X TE buffer
  • 10X Annealing Buffer
  • 10X T4 DNA Ligase Buffer
  • T4 Polynucleotide Kinase

Stock Solutions

1X TE buffer

  • This is a very simple solution, so we only need a one line description of how to make it.

10X Annealing Buffer

  • Recipe for 4ml, add
                     400ul 1M Tris pH 8
                     80ul 0.5M EDTA pH8
                     800ul 2.5M NaCl
                     2720ul Water


Protocol

  1. Resuspend oligos to a stock concentration of 100uM in 1X TE buffer. Store oligo stocks at -20oC when not using.
  2. To a PCR tube, add
                    2 ul of the proper Top or Bottom strand oligo 
                    2 ul of 10X T4 DNA Ligase Buffer 
                    1 ul of T4 Polynucleotide Kinase
                    15 ul of water
  Mix well and spin down. Oligo final concertration is 10 uM.
                    
  1. Incubate the PCR tube in the thermocycler with the program at 37 degree for 60 minutes, then at 65 degree for 20 minutes then end.
  2. Annealing the phosphorylated FW and RV Oligos:
                                                FW oligo 5ul
                                                RV oligo 5ul
                                    10X Annealing Buffer 5ul
                                                   Water 35ul
   Mix well and spin down. The final oligo concertration is 1uM.
  1. Incubate the PCR tube in the thermocycler with the program at 95 degree for 3 minutes, then -1 degree every cycle for 60 cycles, at 25 degree for 5 minutes then end.
  2. Calculate the molarity of vector and annealed oligos to be used for the ligation.
For Vector: (__ ng vector)/(670 ng/nmol-base pair x __ base pairs x 10 exp-6 L) = ___ nM (nmol/L)
For Oligo: 1uM = 1000nM 
  1. Use proper amount of vector and oligo to ligate and transform to DH5 alpha cells.

References

http://gcat.davidson.edu/mediawiki-1.15.0/index.php/Annealing_Oligos_for_Cloning


Miniprep/Kit-free high-throughput protocol-PDF

Background

This protocol is adapted from “Molecular Cloning: A Laboratory Manual”, Second Edition, Sambrook, Fritsch, and Maniatis. It is a quick, inexpensive way to purify large numbers of plasmids (I used to routinely do 80 at a time.–Kathleen) and yields DNA that is clean enough for sequencing or for use as a PCR template.

Protocol

  1. Transfer 1.5 mL of an overnight culture containing your plasmid to an eppendorf tube and spin at 5000 rpm for 5 min in a tabletop centrifuge to pellet the cells.
  2. Remove and discard the supernatent.
  3. Add 300 μL STET buffer, and resuspend cells by vortexing.
  4. Add 10 μL lysozyme (10 mg/mL), vortex, and submerse in boiling water for 40 sec.
  5. Spin for 30 min in a tabletop centrifuge at maximum speed at 4 ˚C.
  6. Remove pellet from each tube with a toothpick. The cellular debris should stick well to the toothpick. Try to insert and remove the toothpick from the center of the tube so you don’t get any cellular debris on the sides of the tube.
  7. Add 300 μL ice cold isopropanol to precipitate the DNA (or 300μL of 2:1 isopropanol:ammonium acetate, mixed just before you use it. See this discussion of precipitating nucleic acids.)
  8. Spin for 10 min in a tabletop centrifuge at maximum speed at 4 ˚C.
  9. Remove supernatent.
  10. Add 200 μL ice cold 80% ethanol to wash pellet and spin for 5 min in a tabletop centrifuge at maximum speed at 4 ˚C.
  11. Remove supernatent.
  12. Dry pellet (air dry at room temperature or 37 ˚C or dry in a speedvac).
  13. Rehydrate in 50 μL TE.

Buffers

STET

  • 8% sucrose
  • 50 mM Tris-HCl, pH 8
  • 0.5% Triton X-100
  • 50 mM EDTA

TE

  • 10 mM Tris-HCl, pH 8
  • 1 mM EDTA

Annealing Oligos-PDF

Overview

This is a protocol for annealing oligos for yeast transformation.

Materials

  • Forward Oligo
  • Reverse Oligo
  • 10X Annealing Buffer
  • 1X TE buffer

Stock Solutions

10X annealing buffer

  • Recipe for 4ml, add
     400ul 1M Tris pH 8
     80ul 0.5M EDTA pH8
     800ul 2.5M NaCl
     2720ul Water

Protocol

  1. Resuspend oligos to a stock concentration of 100uM in 1X TE buffer. Store oligo stocks at -20oC when not using.
  2. To a PCR tube, add 5 ul of the proper Top and Bottom strand oligos (reverse complements for each other) and 5 ul of 10X Annealing Buffer and then 35ul water,mix well and briefly spin down . The final concentration of each oligo is now 10 uM.
  3. Incubate the PCR tube in the thermocycler with the program at 95 degree for 3 minutes, then -1 degree every cycle for 60 cycles, at 25 degree for 5 minutes then end.
  4. Use 3ul of the annealed product for yeast transformation.

Preparing phage specimens for TEM-PDF

Materials

  • Phage sample
  • 5 mM MgSO4 (or lambda dil)
  • 2% Uranyl acetate in water
    Uranyl acetate is highly toxic—wear gloves and safety glasses while handling. Protect from light. If a cloudy precipitate forms, discard the stain. The stain should last for six months to a year.
  • Isopropanol
  • Uncoated 300 mesh copper grids
  • Carbon film (mica coated with carbon to a thickness of 10-15 nm)
  • Whatman filter paper, grade 1
  • Forceps
    Make sure the tips of the forceps are not blunt or damaged.
  • Small scissors
  • Grid mats
  • Glass culture tube
  • Funnel
  • Beaker
  • Glass petri dishes
  • Parafilm
  • Scotch tape

Procedure

  1. If the plate lysate was prepared in a nutrient rich media such as LB…
    1. Centrifuge 1 ml of the lysate at 14K RPM for two hours at room temperature.
    2. Discard the supernatant and pipette 200 uL 5 mM MgSO4 onto the pellet.
    3. Allow the pellet to soak overnight in a 5°C fridge.
    4. Re-suspend the pellet by gently pipetting up and down. Do not vortex.
  2. Dilute the phage sample 2x and 4x in 5 mM MgSO4.
  3. Shake some copper grids into a glass culture tube. Pour enough isopropanol into the tube to cover the grids.
  4. Vortex the grids.
    Optional: let the grids soak in isopropanol for a few hours.
  5. Place a couple layers of filter paper into a petri dish.
  6. Put a funnel in a beaker. Fold the filter paper into a cone and place in the funnel.
  7. Vortex the grids and quickly pour into the funnel so the grids do not stick to the sides of the tube. Pour off the isopropanol or let it drain into the beaker.
  8. Take the filter paper out of the funnel and touch it to the filter paper in the petri dish to transfer the grids. Use forceps to transfer any remaining grids.
  9. Allow the grids to dry with the lid off for about ten minutes.
  10. Place a round grid mat into a petri dish.
  11. Place a layer of filter paper into another petri dish. Tape one side of a sheet of carbon film to the filter paper.
  12. Cut filter paper into small, triangular pieces.
  13. Place a paper towel on the bench. Cut a strip of Parafilm, remove the paper backing, and place it on the paper towel.
  14. Cut off the bottom edge of the carbon film and discard.
  15. Mix the diluted phage samples by flicking. Pipette 50 ul of each dilution onto the Parafilm.
  16. Pipette 50 ul of 2% uranyl acetate onto the Parafilm for each of the grids to be prepared.
    The sample drops can be re-used to make multiple grids, but the drops of stain can only be used once.
  17. Wipe off the tips of the forceps on the paper towel.
  18. Holding the carbon film with forceps, cut off a 5 mm strip.
  19. With the carbon side facing up, insert the carbon film into the drop of phage sample at a shallow (~30 degree) angle. Hold on to an edge of the mica with the forceps (don’t fully submerge the carbon film, so that you can pull it back out). Wait for 1 minute. The carbon should detach and float on top of the drop, adhering phage particles on its bottom side.
  20. Pull the film out of the sample and place it on a drop of stain. Leave the film in the stain for 10-15 seconds.
  21. Pick up a grid using forceps and touch it to the carbon floating on the surface of the stain. The carbon film should stick to the grid.
    Use either the dull or the shiny side of the grid—just be consistent.
  22. Pick up the grid and touch a triangular piece of filter paper to the edges to wick off the stain.
  23. Place the grid onto a grid mat to dry, sample side up. Note which grids are in which sectors. Store the grids in a desiccator.
  24. Image the grids at a magnification of 25K. Higher magnifications have less contrast and are more likely to burn a hole through the grid.


Acetobacter Xylinum Culture-PDF

Overview

General guidelines on how to grow a culture of Acetobacter xylinum, ATCC strain 53582.

Preparation of Acetobacter Media

To prepare ∼500 ml of liquid Acetobacter media, add the following:

  • Glucose – 10 g
  • Peptone – 2.5 g
  • Yeast extract – 2.5 g
  • Na2HPO4 – 1.35 g
  • Citric acid – 0.75 g
  • Distilled water – 500 ml
  • If you are making plates, use the same protocol but add 7.5 g of agar.

Procedure

  1. Prepare media as outlined
  2. Autoclave to sterilize media.
  3. Streak/inoculate Acetobacter onto plates or in media.
  4. Incubate cells at 26°C for 2-3 days.
  5. If using a freeze dried source of Acetobacter (ex. ATCC shipment), growth may take up to 4 days.

Notes

  1. The growth of Acetobacter does not give a cloudy appearance in the media, the media will remain transparent to slightly translucent in appearance.
  2. The growth of Acetobacter is accompanied by the formation of a thick cellulose matrix within the media that must be removed before cells can be pelleted for a miniprep procedure. Simply vortex briefly to break up the cellulose into chunks and remove the cellulose chunks from the media with a pipette while carefully avoiding the removal of cells.
  3. Acetobacter will grow well at room temperature in aerobic conditions.
  4. For information on the growth conditions of other Acetobacter strains, please visit


Membrane stripping-PDF

Overview

This is a protocol for stripping the probed western membrane to re-probe.

Materials

  • Probed membrane
  • b-Mercaptoethanol
  • 0.5M Tris-HCl pH6.8
  • 1M Tris-HCL pH8.0
  • 10% SDS
  • Tween 20
  • 2.5M NaCl

Stock Solutions

0.5M Tris-HCl pH6.8

  • Add 60.5g Tris base to 700ml milliQ water, adjust the pH to 6.8 with HCl and top with water to 1L.

1M Tris-HCl pH8.0

  • Add 121g Tris base to 700ml milliQ water, adjust the pH to 8.0 with HCl and top with water to 1L.

Stripping buffer

  • To make 100ml stripping buffer, add 20ml 10% SDS, 12.5ml 0.5M Tris-HCl pH6.8, 67.5ml milliQ water and 800ul b-Mercaptoethanol.

TBST

  • To make 1L TBST, add 10ml 1M Tris-HCL pH8.0, 60ml 2.5M NaCl, 1ml Tween 20 to water up to 1L.

Protocol

  1. Submerge the membrane in stripping buffer (100 mM 2-Mercaptoethanol, 2% SDS, 62.5 mM Tris-HCl pH 6.8) and incubate at 50°C for 30 minutes with agitation.
  2. Rinse the membrane with large volume of DI water for several times.
  3. Wash the membrane for 5 minutes 3 times in TBST at RT using large volumes of buffer.
  4. Block the membrane in 5% non-fat dried milk in TBST for 1 hour and wash the membrane for 5 minutes 4 times in TBST at RT.
  5. Proceed with the standard western blot protocol.

References

abcam.com/technical

Subculturing phage isolates-PDF

Overview

Environmental enrichments or other phage mixtures must be purified to produce pure phage isolates suitable for characterization. Analogous to bacteria, each phage plaque is presumed to be clonal, having originated from a single virion. The picking and subculturing of plaques ensure that a phage population is descended from a single virion and is, therefore, clonal, or “pure”. Streaking the phage on bacterial lawns is an efficient way of isolating single plaques from a phage suspension. As a general rule, phages should be subcultured (a plaque picked, streaked out, and picked again) three times to ensure it is pure.

This protocol was written by Jason J. Gill at the Center for Phage Technology at Texas A&M University (rev.7/12/11) and is posted with permission (and minor editing/formatting).

Materials

  • Host culture
  • SM buffer (100 mM NaCl, 25 mM Tris-HCl pH 7.5, 8 mM MgSO4, 0.01% (w/v) gelatin) or in sterile liquid culture medium
  • Sterile paper strips
    Many types of paper will work for this method, try using a heavy bond document paper or Whatman #1 filter paper. Cut the paper into strips of about 1 x 10 cm and autoclave to sterilize.
  • Petri plates containing solid culture medium
  • Aliquots of molten soft agar for overlays (4 – 5 ml each, enough to cover one plate), held at ~50 ºC in a heat block or water bath
  • Tube racks, pipettors, sterile tips
  • Aseptic working area (near a flame or in an aseptic cabinet)

Procedure

Making “pickates”

  1. Using standard aseptic technique, pipet 1 ml of sterile broth or SM buffer into sterile microcentrifuge tubes. Make one tube for each plaque you want to subculture. Close each tube to minimize airborne contamination.
  2. First, on the back of a plate, circle and label the plaque you have chosen. Record in your notes the general morphology of the plaque (e.g., big, small, clear, turbid). Punch out the plaque using a sterile Pasteur pipette with a rubber bulb attached. Try to punch out the soft agar of the entire plaque; it does not matter if you also get some of the surrounding lawn, as long as you do not touch another plaque. Blow the plaque out into one of the tubes containing the 1 ml of diluent. Rinse the tip several times with the diluent by gently squeezing and releasing the bulb, but try not to blow too many bubbles (air can denature phage proteins). Close the tube and discard the pipette. Label the tube on the lid appropriately. Vortex the tube briefly, and store at 4°C.

Guidelines for choosing the plaques

  1. First, examine your plates. If possible, pick plaques with different morphologies (plaque size, turbidity, “sharp” edged vs “fuzzy”). There is usually not much use in picking many identical-looking plaques from a single sample, as these are likely just clones of the same phage. Also, some phages produce plaques with heterogeneous morphology, e.g. big and small plaques. Take note of the morphology of each plaque you pick and see if it looks the same (“plates true”) in subsequent subcultures.
  2. If you have a choice, choose plaques which are the farthest away from other plaques. (This is to minimize cross-contamination of plaques; the virions are diffusing through the agar even as you are picking them!)

Streaking out plaques

  1. For each pickate you have, label a plate on the back, appropriately. Also, mark an X to indicate the initial spot for the pickate. Then use each labelled, marked plate to prepare a lawn (soft agar overlay, see the protocol Plating out phage) of your indicator bacteria. This is done by adding 100 μl of a bacterial culture to a 4 ml aliquot of molten top agar in a small glass tube, vortexing and pouring over the agar surface of the plate.
  2. Allow the lawn to solidify for ~5 min.
  3. Spot 10 μl of the pickate over the spot marked by the X. Avoid touching the agar; just let the droplet touch it. It should transfer cleanly to the lawn. Allow this to soak into the lawn for ~5 min.
  4. Choose a sterile paper strip from a glass tube. Holding it at the end that was sticking out of the tube, observe the two points at the other end. You can usually discern whether the corner tips are “uppies” or “downies”. The idea is to dip one of the corner tips into the spot (marked X) where you deposited some of the pickate and then drag the (hopefully) phage-bearing tip across the surface of the soft agar, just like using a toothpick or sterile loop to drag bacteria from a colony across the surface of an agar plate. If you use a “downie” tip on the soft agar, it will gouge the agar and create micro-canyons where the phage will have a hard time making a nice plaque. So if you have an uppie, use that corner to dip into the X spot and then drag it carefully along the surface in several parallel paths. (You can always turn the paper upside down to make downies into uppies!)
  5. Now, take the other corner tip, which has not touched anything yet, and do a cross-streak across the first streaks, at approximately a right angle. Then take a new sterile paper strip and do a few more streaks at right angles to the second streaks. Hopefully, this will dilute the pickate enough to where single plaques will be visible on the second or third streaks.
  6. Incubate these plates as appropriate. Use a Pasteur pipette to make new pickates from an isolated plaque on these streak plates, using the same technique described above.


Blue Light Overview-PDF

Overview

Working with blue light constructs (our CRY2 and CIB1- based induction system) requires working knowledge in yeast genetics and plasmid construction, simple electronics, and programming (in the Arduino environment.)

Plasmid & Strain Considerations

Generally, our CIB1 constructs are in plasmid backbones that are LEU2+, our CRY2 constructs are in those that are TRP1+, and our reporter constructs are in those that are URA3+. Thus, if following this convention, you must be using a strain that is prototrophic for these (i.e. LEU2, TRP1, and URA3 deficient.) We generally use either one of two strains for these purposes, yMM1146 or yMM1204. Most of our blue light plasmids are constructed with the pRS41(x) vectors (Sikorski and Hieter, 1989.) These are in our collection as pMM5-8. Note that these are the CEN/ARS (read: single copy) plasmids.

Setting Up an LED Array for Testing

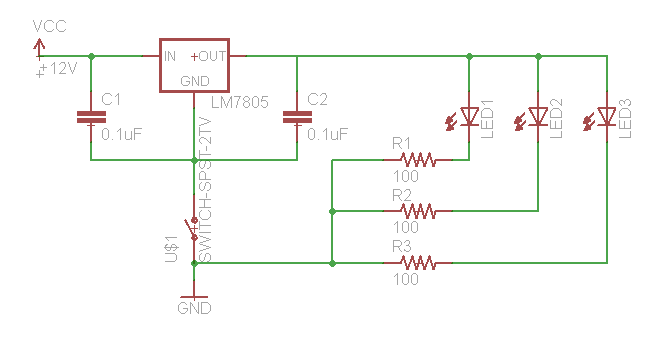
If you need to test your constructs to see if they “work,” this is best performed in batch on a roller drum. Arrange three LED’s (460 nm emittance for these constructs) at the 3, 9, and 12 o’clock positions of the roller drum so that they face the side of the drum (where they will be able to shine directly on culture tubes. Hook up the LED’s as follows:
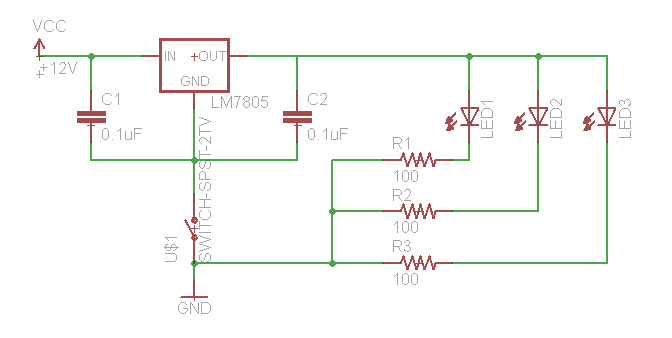
We use a 12V wall-wart with a 2.1 mm plug.

Take an overnight culture of your cells, grown in SC -Leu-Trp-Ura, and use it to innoculate a 1:50 subculture in SC -Leu-Trp-Ura in a foil-wrapped tube as to exclude ambient light. Grow it at 30°C for 5 hours. Take this culture and aliquot about half of it into a new, clear culture tube. Place both sets of tubes on the outer lane of the roller drum at room temperature and turn the LEDs on. When sampling, take from 100 to 800 μL of culture and add it to an equal volume of cold PBS + 0.1% Tween and hold this solution at 4°C until ready to run at the FACS facility.

Modifying the LED Array to Vary Light Pulses

You may want to vary the blue light exposure time for your cultures. We will use an Arduino microcontroller to control the switching. Use the Arduino IDE to upload the code:

//set pin that led is hooked up to int LEDPin = 6;

void setup() { //define LEDPin as an output

 pinMode(LEDPin, OUTPUT);

}

void loop() { //enter time units in milliseconds

 ledControl(3000, 3000);  

}

void ledControl(int timeOn, int timeOff) {

 //turn led on, wait, turn led off, wait
 digitalWrite(LEDPin, HIGH);
 delay(timeOn);
 digitalWrite(ledPin, LOW);
 delay(timeOff);

}

Remember that times are in milliseconds. Keep in mind that this code is very simple and uses the delay() function, which will need to be modified if you need to add additional functionality to this program.

Hook up your LED array to the microcontroller as follows:
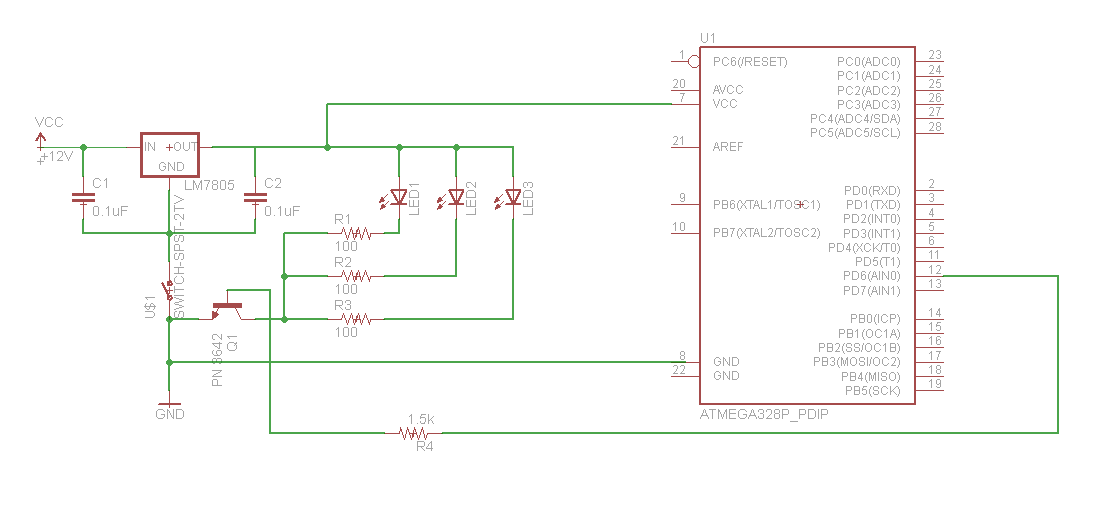
We have some extra PN 3642 transistors, or you should be able to get some in the Physics Stockroom.

Parts List

You can find these in the physics stockroom: 0.1 uF capacitors Bin #101065; 100 ohm 1/4 watt resistor #105917 (bin # not critical as long as it’s 100 ohm); 1.5 K ohm (or close to that) 1/4 watt resistor (not sure of the bin # but it’ll be by the other resistor in cabinet 10); 22 gauge solid core wire, gonna need a lot of it so get like 10 ft each of red and black; toggle switch, maybe like in bin #108170; 2N3642 transistor, Bin #108482 in cabinet 9 drawer 4;

Get these from Newark through Princeton Marketplace: Arduino: Newark part #63W3545; lm7805: #09J6572; 12V power supply #40P7518; breadboard #99W1760;

Get from sparkfun.com: barrel jack PRT-10811; LED’s(3): COM-08718 ;

References

Gietz, R.D. and R.A. Woods. (2002) TRANSFORMATION OF YEAST BY THE Liac/SS CARRIER DNA/PEG METHOD. Methods in Enzymology 350: 87-96.

Sikorski, R.S. and Hieter, P. (1989) A system of shuttle vectors and yeast host strains designed for efficient manipulation of DNA in Saccharomyces cerevisiae. Genetics 122(1): 19-27.


Restriction Digest-PDF

Materials

  • Restriction enzymes (EcoR I, Spe I, Xba I or Pst I) from NEB
  • NEB2 buffer
  • BSA
  • Deionized, sterile H2O

Digest Mix

Example – 50 μL reaction. 100 μL reactions are also common especially if your DNA to be cut is dilute.

  • 5 μL NEB2 buffer (for all digests with BioBricks enzymes, we use NEB2 buffer. It keeps things simple and seems to work).
  • X μL DNA (usually ~500 ng depending on downstream uses).
  • 0.5 μL 100X BSA (added to all digests because BSA never hurts a restriction digest)
  • 1 μL BioBricks enzyme 1 (regardless of the volume of the reaction, 1 μL enzyme is used because generally this represents a 10-25 fold excess of enzyme and is therefore sufficient for most digests. Also, it can be difficult to accurately pipet less than 1 μL of enzyme since it is sticky due to the glycerol content.)
  • 1 μL BioBricks enzyme 2
  • (42.5 – X) μL deionized, sterile H2O

Procedure

  1. Add appropriate amount of deionized H2O to sterile 0.6 mL tube
  2. Add restriction enzyme buffer to the tube.
    Vortex buffer before pipetting to ensure that it is well-mixed.
  3. Add BSA to the tube.
    Vortex BSA before pipetting to ensure that it is well-mixed.
  4. Add appropriate amount of DNA to be cut to the tube.
    Vortex DNA before pipetting to ensure that it is well-mixed.
  5. Add 1 μL of each enzyme.
    Vortex enzyme before pipetting to ensure that it is well-mixed.
    Also, the enzyme is in some percentage of glycerol which tends to stick to the sides of your tip. To ensure you add only 1 μL, just touch your tip to the surface of the liquid when pipetting.
  6. Place in thermal cycler (MJ Research, PT-200) and run digest protocol.
    1. 4-6 hour incubation at 37°C
      Use a longer incubation time if you have time or are worried about the efficiency of cutting. I think this time can be shortened to 2 hrs while still cutting to completion.
    2. 20 mins at 80°C to heat inactivate enzyme.
      This step is sufficient to inactivate even Pst I.
    3. 4°C forever (or until you pull the reaction out of the thermal cycler).
  7. Generally, use some method of DNA purification to eliminate enzymes and salt from the reaction.

Templiphi-PDF

Use this if you want amplify a plasmid that cannot be induced. Can be used to amplify most kinds of circular DNA. The kit is intended to amplify circular DNA prior to sequencing but we won’t normally be doing that. The starting point for the protocol described below assumes you are starting from a streaked plate. The manual describes the process for other starting points also.

Concept

We begin by denaturing the DNA. We add random primers to this mix, as it cools, the primers can hybridize to the ssDNA. Polymerase is then added to the mixture. It can “roll” around the plasmid many times, starting from everywhere a primer has bound. This leads to massive amplification of the plasmid. The end result is a branched mess of DNA where the plasmid is now in linear form, with many copies concatenated together. A restriction digest can be used to chop up the mix into individual copies of our original plasmid.

Materials

  1. A colony of cells containing your circular DNA of choice
  2. Templiphi manual – find this on the side of the refrigerator named – “Marilla”
  3. The Templiphi reagents – find these in the SMUG section of the –80C. They are kept in a small box labeled, surprisingly, Templiphi reagents.
  4. One sterile toothpick for each plasmid you want to use.
  5. Some small PCR tubes.
  6. Ice box to keep Templiphi reagents as cold as possible for as long as possible.

Method

Steps 1-8 can be done in about an hour. The protocol normally requires an overnight step and about 20 mins of work the next morning. At a squeeze, you could get it all done in a day if you have to (shorten the incubation step to 5-6 hours).

  1. Take part of one colony using the toothpick. It’s important that you get as little as possible in order to get the greatest amplification in the end, non-intuitive. Basically, if you have too much of your sample, it will compete with the enzymes you’ll use and you’ll get a lower yield.
  2. Add this part of a colony to 100uL of water in a PCR tube and mix gently with the toothpick.
  3. Do a serial dilution by adding 1uL from this mixture to 4uL of water in a second PCR tube. Add one 1uL of this mixture to another PCR tube containing 4uL of water. I’ll confirm the success of these dilution levels later.
  4. Add 5uL of sample buffer (white cap) to each of the above PCR tubes (we’ll do the experiment at three different dilutions to make sure we get one that works well). You will have to thaw the buffer.
  5. Heat these samples at 95C for 3mins. This denatures the DNA.
  6. Add one 5uL aliquot of reaction buffer (blue cap) to a master mix in a PCR tube for each sample PCR tube you have. Add 0.2uL of enzyme mix to the master mix. You need to use this the same day you make it.
  7. Add 5uL of this mix to each of the sample PCR tubes once they have cooled down.
  8. Put the (labeled) PCR tubes in the 30C room overnight.
  9. To finish the reaction you need to inactivate the enzymes – heat the PCR tubes at 65C for ten minutes.
  10. Allow them to cool to 4C and store as you would the results of a mini-prep.
  11. If you are following the manual protocol, you can ignore the steps referring to cycle sequencing.