Friday, April 4, 2025
Home Blog Page 6

Purification of His-tagged proteins/Native-PDF

Overview

Native purifications permit purification of the folded protein potentially at the cost of protein purity.

Materials

  • Lysozyme
  • Sonicator

Lysis and column equilibration buffer

  • 50mM NaH2PO4
  • 300mM NaCl
  • 10mM imidazole
    • can vary between 1mM and 20mM
  • pH8.0

Wash buffer

  • 50mM NaH2PO4
  • 300mM NaCl
  • 20mM imidazole
  • pH8.0

Elution buffer

  • 50mM NaH2PO4
  • 300mM NaCl
  • 250mM imidazole
  • pH8.0

Notes

  • Do not use 5X phosphate buffer solution supplied with the kit to make these buffers. It contains Tris.

Procedure

  1. Grow up an overnight 5mL culture in LB plus the appropriate antibiotic.
  2. The following morning, dilute back the culture 1:60 to the appropriate culture volume (which depends on the expected yield of the protein).
    • Maybe try 100mL cultures. 100mL was too much. I think 50mL might be preferable.
  3. Harvest the cells by centrifugation at 4000 x g for 15 mins at 4°C.
  4. Decant supernatant.
  5. The cell pellet can be stored at -70°C or processed immediately.
  6. Chill the following on ice …
    • lysis buffer
    • wash buffer
    • elution buffer
    • 2mL eppendorf tube
  7. Thaw for 15 mins on ice.
    • May take longer than 15 mins.
  8. Transferred to 2mL eppendorf tube.
  9. Resuspend in 1mL lysis buffer (see above).
    • The lysis buffer contains 10mM imidazole to reduce untagged, contaminating proteins. The imidazole concentration can be reduced to either 1-5 mM or increased to 20 mM as appropriate.
  10. Add 10 μL 100 mg/mL lysozyme to 1 mg/mL final concentration.
  11. Add a protease inhibitor here?
    • Trying 1/4 of a mini, EDTA-free protease inhibitor cocktail tablet from Roche.
  12. Incubate cells on ice for 30 mins.
  13. Freeze the cells at -80°C and thaw for 3 cycles.
    • To speed things up, try quick freezing in an ethanol-dry ice bath and thaw on slushy ice.
    • The Qiagen protocols calls for you to sonicate or homogenize on ice to lyse cells six times for 10s each time with 5s pauses in between. However sonication is difficult in small volumes and tends to heat up your sample. Freeze thaw cycles should be sufficient to lyse the cells.
    • It may be that the thaw process needs to take place at 37°C rather than in slushy ice.[1]
    • An alternative option is to use the bead beater to mechanically lyse the cells.
  14. Centrifuge lysate at 10000 x g for 30 mins at 4°C to pellet cellular debris. Collect supernatant.
    • 20 mins may be enough.
  15. Add 600 μL lysis buffer to Ni-NTA column to equilibrate.
  16. Centrifuge Ni-NTA column 2 mins at 700 x g with open lid to remove equilibration buffer at 4°C.
  17. Save 20μL cleared lysate.
  18. Load 600 μL cleared lysate to Ni-NTA column.
  19. Centrifuge Ni-NTA column 5 mins at 700 x g with closed lid at 4°C.
    • The closed lid increases binding time.
    • Repeat this step to load the rest of my cleared lysate?
    • Save flow through.
  20. Add 600 μL wash buffer to Ni-NTA column.
  21. Centrifuge Ni-NTA column 2 mins at 700 x g with open lid at 4°C.
    • Save flow through.
  22. Add 600 μL wash buffer to Ni-NTA column.
  23. Centrifuge Ni-NTA column 2 mins at 700 x g with open lid at 4°C.
    • Save flow through.
  24. Tranfer to clean 1.5mL eppendorf tube.
  25. Add 200μL elution buffer.
  26. Centrifuge Ni-NTA column 2 mins at 700 x g with open lid at 4°C.
    • Most of the protein should elute in this elution step.
  27. Tranfer to clean 1.5mL eppendorf tube.
  28. Add 200μL elution buffer.
  29. Centrifuge Ni-NTA column 2 mins at 700 x g with open lid at 4°C.
    • Just in case.

Notes

  • Sauer lab uses a Qiagen Ni-NTA resin but this protocol uses spin columns. (Smaller scale purification).
  • Using the Qiagen Ni-NTA resin may be preferable for proteins with low yields.
  • Contaminating proteins tend to be less of an issue in bacteria because there are few proteins with neighboring histidines that tend to bind to the column. However, consider using a SlyD knockout strain. SlyD is a 20-25 kDa protein that has several histidines near each other and can often contaminate Ni column purifications from Escherichia coli.
  • 20 year old spin columns don’t work.  🙂
  • The Sauer lab tends to use a higher salt concentration in the lysis, wash and elution buffers. It may give a better wash and may be useful with DNA binding proteins.
  • Can lyse cells by doing repeated freeze-thaw cycles at -80°C or sonication also works.

Safety

References

  1. Cell lysis technical information from Pierce[PierceCellLysis]
  2. Qiagen Ni NTA Spin Kit manual[QiagenNTAManual]

Centrifuge desalting/Zeba columns-PDF

Overview

This protocol is for doing buffer exchange on small sample volumes (30-130 μL) volumes.

Materials

  • Zeba Desalt Spin Columns, 0.5 ml from Pierce
  • Variable-speed bench-top microcentrifuge
  • 2.0 mL collection tubes
  • Buffer for exchange

Procedure

  1. Remove the column’s bottom closure.
  2. Loosen cap.
  3. Place the column in a 2.0 mL microcentrifuge collection tube.
  4. Centrifuge at 1500 x g for 1 minute.
    • Removes storage solution.
  5. Discard storage solution.
  6. Mark the orientation of the column in the centrifuge so that the column is placed in the same orientation each time.
  7. Add 300 μL Buffer.
  8. Centrifuge at 1500 x g for 1 minute.
  9. Discard buffer.
  10. Add 300 μL Buffer.
  11. Centrifuge at 1500 x g for 1 minute.
  12. Discard buffer.
  13. Add 300 μL Buffer.
  14. Centrifuge at 1500 x g for 1 minute.
  15. Discard buffer.
  16. Add 300 μL Buffer.
  17. Centrifuge at 1500 x g for 1 minute.
  18. Discard buffer.
  19. Move the column to the new 2.0 mL collection tube.
  20. Apply 30-130 μL of sample to the top of the compact resin bed.
    • For volumes less than 70 μL, apply a 15 μL stacker of ultrapure water or buffer to the top of the compact resin bed after the sample has been absorbed to improve sample recovery.
  21. Centrifuge at 1500 x g for 1 minute.
  22. Discard the desalting column.

NuPAGE electrophoresis-PDF

Purpose

To run a denaturing protein gel. Note that a preferable version of this protocol is available at Sauer:bis-Tris SDS-PAGE, the very best (recommended by Kathleen). But since we seem to already have the Invitrogen kit contents in lab, this protocol describes use of the Invitrogen system.

Materials

  • NuPAGE Novex 10% Bis-Tris Gel 1.0 mm, 10 well (for small proteins e.g. 13kD) or NuPAGE Novex 4-12% Bis-Tris Gel 1.0 mm, 10 well (for medium proteins e.g. 50-60kD)
  • XCell SureLock Mini-Cell electrophoresis apparatus
  • 20X MES or MOPS Running Buffer
  • NuPAGE LDS Sample Buffer (4X)
  • NuPAGE Reducing Agent (10X)
  • NuPAGE Antioxidant
  • SeeBlue Plus2 Pre-Stained Standard
  • Invitrogen SimplyBlue SafeStain

Procedure

Running buffer preparation

Do this step first.

  1. Prepare 1000mL 1X NuPAGE SDS running buffer
    • 50mL 20X MES Running Buffer (for very small proteins e.g. 13kD) or 20X MOPS Running Buffer (for medium-sized proteins e.g. 50-60kD).
    • 950mL deionized water
  2. Mix well.
  3. Set aside 200mL buffer for use in Upper (Inner) buffer chamber).
    • Add 500μL NuPAGE Antioxidant immediately before running the gel.
    • Mix well.

Sample preparation

  1. Wells can accommodate 25μL loading volume.
    • Likely they can accommodate more … maybe 40μL.
  2. Let sample buffer warm to room temperature.
  3. Each sample should contain
    • 13 μL protein sample (max 0.5μg per band)
    • 5 μL NuPAGE LDS Sample Buffer
    • 2 μL NuPAGE Reducing Agent
  4. Heat samples at 70°C for 10 mins.

Set up the gel apparatus during the 10 mins sample heating step.

Note that prestained molecular weight marker doesn’t need any preparation.

Running the gel

  1. Wear gloves.
  2. Remove the NuPAGE gel from the pouch.
  3. Rinse the gel cassette with deionized water.
  4. Peel the tape from the bottom of the cassette.
  5. Gently pull the comb from the cassette in one smooth motion.
  6. Rinse the sample wells with 1X NuPAGE SDS running buffer.
    • Use a pipetman and pipet to squirt in running buffer.
  7. Invert and shake to remove buffer.
  8. Repeat rinse two more times.
  9. Orient the two gels in the Mini-Cell such that the notched “well” side of the cassette faces inward towards the buffer core.
  10. Seat the gels on the bottom of the Mini-Cell and lock into place with the gel tension wedge.
    • Use the plastic buffer dam if you are only running one gel.
  11. Fill the upper buffer chamber with a small amount of upper buffer chamber running buffer (with antioxidant) to check tightness of seal.
    • If there is a leak, discard buffer, reseal chamber and try again.
  12. Fill upper buffer chamber. Buffer level should exceed level of the wells. Requires about 200mL
  13. Load samples.
  14. Load protein molecular weight marker (20 μL per lane but 10μL also seems to work).
  15. Fill lower buffer chamber at the gap near locking mechanism with 600mL NuPAGE SDS running buffer.
  16. Run at 200V for 30 minutes.

Staining the gel

  1. Shut off the power.
  2. Disconnect electrodes.
  3. Remove gels.
  4. Insert a knife in between the two plates and pry the plates apart.
    • You should hear a cracking noise as you break the bond between the two plates.
  5. Gently separate the two plates attempting to leave the gel on the bottom slotted plate.
  6. Cut to separate gel from bottom lip.
  7. Flip over and transfer gel to staining tray that has been prefilled with 100mL deionized water (see below).
    • Use lid of a 1000μL pipette tip box.

Marker Sizes

  • The SeeBlue Plus 2 marker (blue unless another color is indicated); 10 μL samples have around 1-2 μg of protein per band
    • Myosin 188 KD (MES buffer) 191 KD (MOPS buffer)
    • Phosphorylase B 98 KD (MES buffer) 97 KD (MOPS buffer) (orange)
    • BSA 62 KD (MES buffer) 64 KD (MOPS buffer)
    • Glutamic dehydrogenase 49 KD (MES buffer) 51 KD (MOPS buffer)
    • Alcohol dehydrogenase 38 KD (MES buffer) 39 KD (MOPS buffer)
    • Carbonic anhydrase 28 KD
    • Myoglobin 17 KD (MES buffer) 19 KD (MOPS buffer) (purple)
    • Lysozyme 14 KD
    • Aprotinin 9 KD
    • Insulin B chain 3 KD
  • Marker chart for Invitrogen Bis-Tris and Tris-Acetate Nupage gels

Notes

  • To date, the best staining tray I’ve found is the lid of a 1000μL pipette tip box. Then use a piece of mesh that just fits inside the lide to either keep the gel in place while changing solutions or to move the gel to and from the light box. This method requires smaller volumes of stain than the staining tray from Invitrogen.
  • There are several ways to screw up this protocol, I list them here in the hopes that it may help people avoid these trivial mistakes.
    1. Failing to remove the seal at the bottom of the precast gel
    2. The inner and outer chambers of running buffer are not sealed from one another.
    3. Reverse the electrodes in the power supply.
    4. Putting the gel in backwards in the apparatus.

Safety

  • Use nitrile gloves when handling acrylamide.
  • Dispose of acrylamide gels and trays as hazardous.

References

  1. NuPAGE Technical Guide[NuPAGETechnicalGuide]

Experimental Protocols: HPLC-PDF

HPLC General Protocol for new proteins

(This is more of a summary than a protocol, more details to be added later)

  1. If your protein contains Cys residues, you probably want to fully reduce them before purification (think about whether this is the case for your application). This can be accomplished by stirring in 200 mM DTT at pH ~8 for at least 30 minutes.
  2. Confirm that the column was left clean by the previous user by checking the wash trace.
  3. Run a blank. To the extent possible, use the same exact buffers you will use in your sample preparation, e.g. include DTT if you are using that, use dialysis solution if you have dialyzed your sample.
  4. Run a 1%/min gradient on an analytical scale (~75 ug). Run the gradient from 10% to X%, where X is 80, except for Bcl-2 proteins, where X=100.
  5. Calculate %B where sample comes off (remember to account for the dead time), call it M. RECORD this.
  6. Run slower 0.1%/min gradient on an analytical sample. Sample should come off 3% B earlier than calculated M. Want the slower gradient to be 5% B on each side of elution, to make sure you catch your peaks of interest. So run 0.1% gradient from ((M-3)-5)% to ((M-3)+5)%.
  7. Calculate %B where sample comes off, call it N. RECORD this.
  8. If you want to purify your protein at this point, you can now run a gradient that starts at N-2%B (see note below). Make the gradient long enough that you are confident you will get all of your peaks off. When doing prep runs, after you have collected your last peak you can switch to a program that immediately ramps from the current conditions up to 100%B and then re-equilibrates the column, you don’t have to wait for the entire programmed run to finish. When changing from analytical scale to prep scale, you can expect your peak approx. 3 minutes earlier. Don’t miss it!
  9. Run wash gradient until CLEAN.

NOTE 1: Once you know where your protein comes off at 0.1%/min, future slow gradients can be run starting 2% B before the expected elution point. This will leave the sample on the column for ~ 20 minutes before it elutes, which is necessary for good separation.

NOTE 2: Once you are sure you know what you are doing and how your protein behaves, you may want to deviate from this procedure or skip some steps.

NOTE 3: Buffer B is 90% Acetonitrile, 0.1% TFA

Protein solubility-PDF

Overview

This is a quick protocol to assess how soluble a particular protein is.

Materials

  • Denaturing lysis buffer
  • Native lysis buffer
  • Triton X-100
  • 2 mL centrifuge tubes
  • Centrifuge

Procedure

  1. Grow a 6mL culture.
  2. Take 2mL of culture and move to 2mL centrifuge tube.
    1. Pellet cells by spinning at 4000 x g for 15 mins at 4°C.
    2. Resuspend in 50 μL denaturing lysis buffer + 2% SDS.
    3. Freeze the cells at -80°C and thaw for 3 cycles.
      • To speed things up, try quick freezing in an ethanol-dry ice bath and thaw on slushy ice.
    4. Add 1% Triton X-100 (v/v) [1]
      • Helps to keep the cellular proteins in the soluble fraction. Otherwise, most of the cellular protein appears to come out in the insoluble fraction without this step which it shouldn’t.
    5. Incubate cells with agitation for 1 hr at room temperature.
      • Use an orbis shaker on the bench to do this temp (usually kept in 37° incubator). Note that the shaker moves during shaking.
      • Kathleen suggests just lysing by heating at 90°C for 10 mins but this may require the presence of SDS loading buffer?
    6. Centrifuge lysate at 10000 x g for 30 mins at room temperature.
      • 10 mins might be enough.
    7. Save 13 μL to run on a gel. (This is the total protein.)
  3. Take another 2mL aliquot of culture and move to 2 mL centrifuge tube
    1. Pellet cells by spinning at 4000 x g for 15 mins at 4°C.
    2. Resuspend in 50 μL of native lysis buffer.
    3. Optional: Add 0.5 μL 100 mg/mL lysozyme to 1 mg/mL final concentration.
      • Note that lysozyme is ~14 kDa so it will run close to my protein on a gel! Kathleen says if it is going to be a problem, freeze-thaw only should work reasonably well for this test. It is hard to sonicate small volumes. Could also try a commercial “mild lysis” reagent, although people in the Sauer lab have had varied success with these.
    4. Freeze the cells at -80°C and thaw for 3 cycles.
      • To speed things up, try quick freezing in an ethanol-dry ice bath and thaw on slushy ice.
    5. Add 1% Triton X-100 (v/v) [1]
      • Helps to keep the cellular proteins in the soluble fraction. Otherwise, most of the cellular protein appears to come out in the insoluble fraction without this step which it shouldn’t.
    6. Incubate for 1 hr at 4 °C
    7. Centrifuge lysate at 10000 x g for 30 mins at 4°C.
      • 10 mins might be enough.
    8. Save 13 μL of supernatant to run on a gel. (This is the soluble fraction).
    9. Resuspend pellet in 50 μL denaturing lysis buffer + 2% SDS.
      • Letting this incubate at room temperature with agitation for 20 minutes decreases the viscosity of this fraction (facilitating gel loading).
    10. Centrifuge at 10000 x g for 20 mins at 4°C.
    11. Save 13 μL resuspended pellet to load on a gel. (This is the insoluble fraction).

Notes

  • The amount of material you load from the supernatant and pellet should add up to the total protein so that you are comparing equivalent amounts.
  • Tom pointed out that a confounding factor is how well my cells lyse in the “native” versus “denatured” conditions. If my cells don’t lyse in the native conditions then my protein will end up in the pellet even if they are soluble. However, it turns out that the “native” lysis protocol above seems to be more efficient than typical “denaturing” lysis (add denaturing lysis buffer and incubate with shaking for 1 hr at room temperature). Thus, the freeze thaw method may result in more complete cell lysis.

References

  1. Marblestone JG, Edavettal SC, Lim Y, Lim P, Zuo X, and Butt TR. Comparison of SUMO fusion technology with traditional gene fusion systems: enhanced expression and solubility with SUMO. Protein Sci. 2006 Jan;15(1):182-9. DOI:10.1110/ps.051812706 | PubMed ID:16322573 | HubMed [Marblestone-ProtSci-2006]
  2. This protocol is derived from a talk with Kathleen and modified according to how I’ve been doing my protein purifications and running gels to date.[Kathleen]

Beta-glucuronidase protocols-PDF

Plate Screen

Materials

  • Media of choice
  • Agar
  • X-gluc stock solution (50mg/mL in DMF)

Method

  1. Prepare your liquid media and add the desired amount of agar (usually 1-2%).
  2. Autoclave the media for the requisite time.
  3. Add 1.2μL of X-gluc stock solution for every mL of media (e.g. if making 1L of media add 1.2ml of stock solution)
  4. If desired, add antibiotic.
  5. Pour plates.

Notes

Culture Screen

Materials

  • Cultured Cells
  • Suspension Buffer (50mM NaH2PO4
  • X-gluc stock solution (50mg/mL)
  • Premeabilization Solution (9:1 acetone to toluene (v/v))

Method

  1. Pellet 1ml of culture by centrifugation
  2. Discard the supernatant and resuspend the pellet in 400μL Suspension Buffer
  3. Add 25ul of Permeabilization Solution to cell suspension.
  4. Incubate at 37°C for 30-60 minutes.
  5. Add 5μL of X-gluc stock solution.
  6. A green/blue color should develop shortly in positive cultures.

Notes

  • Depending on what cells you’re using, the solvent mix may not permeabilize your cells. In such a case you might attempt using 25μL of chloroform or 12.5μL of 1%SDS or both.

Assay 1

Materials

  • Suspension Solution (50mM NaH2PO4)
  • Permeabilization solution (9:1 acetone to toluene (v/v))
  • GUS Buffer (50mM NaH2PO4, 10mM β-mercaptoethanol, 1mM EDTA and 0.1% Triton X-100)
  • 4-Nitrophenyl β-D-glucuronide (4-NPG) stock solution (10mg/ml in 50mM NaH2PO4)
  • Stop Buffer (200mM Na2CO3)

Method

  1. Measure and record the OD600 of the cell culture
  2. Pellet 1mL of culture by centrifugation.
  3. Resuspend the pellet in 400μL of Suspension Solution.
  4. Add 25ul of permeabilization solution.
  5. Incubate for 30 to 60 minutes at 37°C
  6. Take 50μL of this cell suspension and add it to 200μL of GUS Buffer.
  7. Add 20μL of 4-NPG stock solution.
  8. Let the reaction run for 10-30 minutes.
  9. Add 200μL Stop Solution to halt the reaction.
  10. Centrifuge to pellet cell debris.
  11. Measure the OD405 of the stopped reaction.

Notes

  • Use this one for E. coli.

Assay 2

Materials

  • 100mM sodium phosphate buffer (pH=7)
  • 40mM NaH2PO4
  • 60mM Na2HPO4
  • 0.1M potassium chloride solution
  • 10mM magnesium sulfate solution
  • 1M Na2CO3
  • 4-Nitrophenyl β-D-glucuronide (4-NPG) stock solution (10mg/ml in 50mM sodium phosphate buffer (pH=7)) only make 1mL of this!!!
  • β-mercaptoethanol
  • 10% Triton X-100 (in water)

Method

1. Grow culture until OD
600 is between 0.6 and 1.0
2. Prepare 10mL of GUS Buffer (measures 10 samples) by adding:

  • 5mL of sodium phosphate buffer (pH=7)
  • 3mL H2O
  • 1mL of potassium chloride solution
  • 1mL of magnesium sulfate solution
  • 35μL β-mercaptoethanol
  • 20mg Lysozyme
3. Pellet 1.5 ml of culture by centrifugation for 1 minute.
4. Resuspend in 1ml 100mM sodium phosphate buffer.
5. Pellet again by centrifugation.
6. Resuspend in 750μL GUS buffer.
7. Vortex briefly to mix.
8. Incubate for 30 min in 37°C water bath.
9. Add 8ul of 10% Triton-X.
10. Vortex briefly and incubate on ice for 5 mins.
11. Add 80ul of 4-NPG solution and start the timer.
12. Incubate in 37°C water bath.
13. When the color is clearly yellow (between 10 and 30 mins), stop reaction by adding 300μL 1M Na
2CO
3
14. Record the time.
15. Centrifuge the reaction for 1 minute at full speed.
16. Measure the OD
405 of the supernatant.

Notes

Use this one for Lactobacillus spp.

Staining

RNA electrophoresis/Native-PDF

Overview

Electrophoresis permits the assessment of RNA by size and amount. However, in native gels RNA, electrophoretic mobility will depend on not only the size of the RNA but also its secondary structure. Since this is a native gel you are more likely to see a smear of RNA and/or multiple bands because of RNA secondary structure.

Procedure

The procedure for running a native RNA gel is very similar to that for running a DNA agarose gel. Here are a few things to note.

  1. Generally load 1 μg and 2.5 μg samples.
  2. Use TBE buffer (89 mM Tris-HCl pH 7.8, 89 mM borate, 2 mM EDTA).TAE buffer also seems to work equally well in my hands for ~1000bp transcripts.
  3. An aliquot of intact RNA should always be run as a positive control to rule out unusual results due to gel artifacts.
  4. Run the gel at low voltage (reports of 5-6 V/cm or 8V/cm are common as measured between the electrodes).
    • I tried ~65V total.
  5. Use an RNase-free aliquot of loading buffer (i.e. made with RNase-free water).
  6. RNA Ladder
    • 2 μL RNA ladder
    • 2 μL loading dye
    • 8 μL H2O
  7. Also run a DNA ladder

Staining

  1. Dilute SYBR Gold 10,000-fold into 1X running buffer.
    • Note that SYBR gold is preferable to SYBR green II
  2. Incubate agarose gel in staining solution for 40 minutes.
  3. Visualize on gel imager. (No destaining needed).

Notes

  • These are run at low voltages – 8V/cm – and 1 x TBE to prevent denaturation of small fragments of RNA by the heat generated in the gel during electrophoresis. The rate of migration is approximately inversely proportional to log10 of their size. However, the base sequence composition can alter the electrophoretic mobility of RNAs such that two RNAs of the same size may show up to a 10% difference in electrophoretic mobility. [1]
  • Native agarose gel electrophoresis may be sufficient to judge the integrity and overall quality of a total RNA preparation by inspection of the 28S and 18S rRNA bands. The secondary structure of RNA alters its migration pattern in native gels so that it will not migrate according to its true size. Bands are generally not as sharp as in denaturating gels, and a single RNA species may migrate as multiple bands representing different structures. [2]
  • TAE buffer is recommended for analysis of larger RNA, and TBE buffer is used for smaller than 1500 nt RNA and for denaturing polyacrylamide gel electrophoresis. [3]

References

  1. ProtocolsOnline Gel Electrophoresis of RNA – general
  2. Ambion Agarose Gel Electrophoresis of RNA
  3. Fermentas Introduction: RNA Electrophoresis

Intro to yeast-PDF

Overview

This introductory exercise is designed to get you started working with yeast. You will also take some data that will be useful to you anytime you are working with yeast in the lab.

Streaking Yeast out from Glycerol Stocks

  • Wipe down your bench area with 70% ethanol to give yourself a clean workspace.
  • Based on the yMM number, determine the location of the construct you want to streak out. It will be located in the -80°C freezer. Know where you are looking before you open the freezer door, sitting around with the door open is a no-no.
  • Take the tube back to your bench. Ideally, store it on dry ice while streaking or be really quick.
  • Take a sterile applicator stick. Scrape off a portion of the top of the frozen glycerol stock and streak it onto the edge of your plate.
  • Return the construct to the -80°C freezer as quickly as possible. DO NOT LET THE GLYCEROL STOCK THAW! REPEATED FREEZE THAW CYCLES WILL KILL THE STOCK! If you need to streak out multiple constructs take out only 1-2 from the freezer at a time or store them on dry ice while streaking.
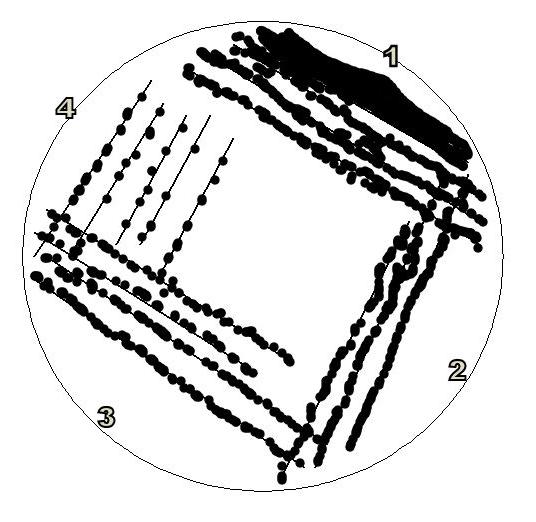
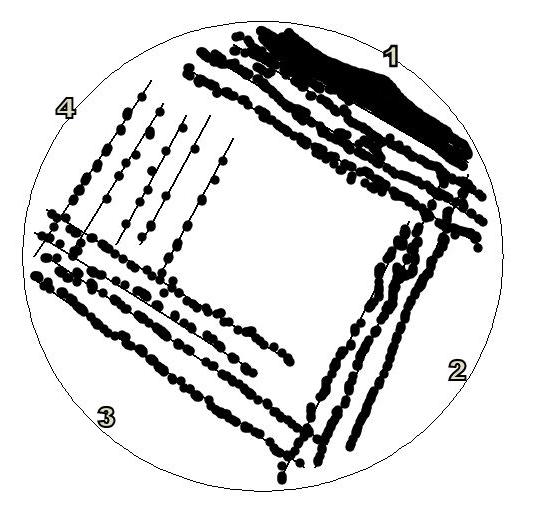
  • Use sterile toothpicks to finish streaking the clone all over the plate so that you isolate single colonies. In the image below, (1) corresponds to your streaks directly from the glycerol stock and (2),(3),(4) correspond to fresh toothpicks. Use a new toothpick for numbers (2),(3),(4) or you won’t achieve enough dilution to get nice single colonies.

Comparing Optical Density and Klett and Cell Count

The idea is to take a saturated culture of yeast (if it is truly saturated, it will max out to Klett and similarly provide little useful data on the spectrophotometer) and dilute it over a range and measure these diluted cultures using OD, Klett, and a hemacytometer to count cell number. This will tell you both the linear range of your measurement techniques, as well as the conversion parameters between the three measurement modalities.

  • Begin with a 50ml saturated overnight culture of yeast in YPD.
  • Start an excel sheet or similar to keep track of your data.
  • Dilute your culture over an appropriate range into cuvettes, falcon tubes, or klett tubes (it’s your preference). You MUST use Klett tubes in the klett and you MUST use cuvettes in the spectrophotometer so figure out your preferred method. You can of course pour between one and the other.
  • Measure the OD600, Klett, and cell count using the hemacytometer. Protocols

References

Gietz, R.D. and R.A. Woods. (2002) TRANSFORMATION OF YEAST BY THE Liac/SS CARRIER DNA/PEG METHOD. Methods in Enzymology 350: 87-96.


FCS2 for Cycling-PDF

Overview

This is the best (so far) protocol we have found for inducing metabolic cycling in the FCS2 chamber. The low-fluorescence agar pad is used to keep the cells trapped against the coverslip during growth to allow long-term observation.

Materials

Low Fluorescence Media (Recipe) of three different types:

  • Full-nutrient (for growing up your culture)
  • Starvation media (we used LFM with glucose removed)
  • Cycling media (we used LFM with 0.001% glucose)

FCS2 chamber system, including:

  • Peristaltic pump
  • Three sections of tubing
  • Three coverslips
  • Metal chamber base
  • Plastic chamber top
  • Microaqueduct slide
  • Two .75mm-thick oval gaskets
  • Circular top gasket
  • Media and effluent containers

Additional materials:

  • 1mL aliquot Low-fluorescence agar
  • Aliquot of concanavalin A
  • Syringes (16G1 needles)

Stock Solutions

Low-Fluorescence Media Use the LFM Recipe as a base, removing nutrients you wish to limit.

Low-Fluorescence Agar Similarly, we used the glucose-free version of the LFA, of which Anjali made numerous aliquots.

Concanavalin A We use the standard ConA (protocol), (not the ion-free).

Protocol

Culturing the cells

  1. Set back overnight culture and allow to grow back to about OD 0.5 in your growth LFM.
  2. When cells have reached appropriate OD, spin down and re-suspend in the starvation LFM. Incubate for at least 4 hours.

Chamber set-up

  1. Heat LFA at ~95°C.
  2. When liquified, apply 40μL to center of first coverslip, place oval gasket around agar, and place second coverslip on-top, pressing slightly to spread the agar.
  3. Apply ~20μL of ConA to the third coverslip and let incubate for ~5 minutes.
  4. Aspirate off the ConA and add 20μL of diluted starved cells. Incubate for ~5 minutes.
  5. By this time, the LFA should be solidified — remove the top coverslip and gasket, and carefully slide pad to edge of glass plate to be ready to move it.
  6. When cells are ready, rinse using a syringe and ~3mL of the starvation media to dislodge any non-stuck cells. Then aspirate.
  7. Slide the agar pad onto the adhered cells.
  8. Place the coverslip, now with cells and pad, in the chamber, which should be already loaded with media.

Notes

Please feel free to post comments, questions, or improvements to this protocol. Happy to have your input!

–Stephanie S. Steltzer 16:15, 22 July 2015 (EDT) Using Bioptechs software rundown: Be sure to have pumps set at 10 and 100 and switch to EXT. After the system is completely set up, open Windows XP Mode under Windows Virtual PC to run the emulator. Open the application Bioptechs PTC. At the top of the screen under devices, be sure to attach the unidentifiable device that is the USB connected interface box. Do not forget to calibrate the pumps (see calibration manual). tip: If using the software for the first time on a new computer, download Windows Virtual PC and Windows XP Mode. Make sure the computer you are using has the driver DT9812; if not, you may need to update the drivers on the computer. Follow instructions in manual from there, installing the software and data translation device from the disk.

–Bennett A. McIntosh 14:27, 5 August 2013 (EDT) I found it useful to keep the incubating ConA/cells somewhere other than out in the open — an old pipette tip box, for example.

–Bennett A. McIntosh 14:27, 5 August 2013 (EDT) It is often easier to move the agar pad after rinsing carefully with DI water.

–Bennett A. McIntosh 14:44, 5 August 2013 (EDTa) I load the media into the chamber system by pushing it in with a 3mL syringe and a 16G1 tip, since this works much more quickly than waiting for the pump to work.


  1. List troubleshooting tips here.
  2. You can also link to FAQs/tips provided by other sources such as the manufacturer or other websites.
  3. Anecdotal observations that might be of use to others can also be posted here.

Please sign your name to your note by adding ”’*~~~~”’: to the beginning of your tip.

References

B.P. Tu et al. (2005) Logic of the Yeast Metabolic Ccycle: Temporal Compartmentalization of Cellular Processes. Science 310:1152=1158.


Beta-galactosidase Screen-PDF

Introduction

These protocols are used to screen bacterial plates for beta-galactosidase activity using X-Gal (aka blue-white screening).

Each of these protocols has its advantages and disadvantages so be sure to check which one works best for you.

Materials

  • X-gal Stock solution = 100mg/ml in dimethyl formamide (DMF)
  • Agar
  • Media of your choice
  • Sterile water

Methods

Making X-gal plates

  • This method is used if: you won’t be keeping the plates for more than a week, and the media has a neutral pH.
  • Colonies may take up to 36 hours to develop on these plates, but all positive colonies will be evenly colored.
  1. Make the media according to your normal plate recipe and autoclave.
  2. Let the media cool in a 60°C water bath.
  3. Add X-gal stock solution at a ratio of 2μL per mL media (also add any antibiotic).
  4. Swirl gently and pour immediately.
  5. Once solid keep out of light.

Spread onto plates

  • This method is used if: you want to turn an existing plate into an X-gal plate, and the media has a neutral pH.
  • Colonies should develop color overnight, but due to uneven distribution of X-gal, all positive colonies may not be evenly colored.
  1. Take a pre-poured plate and make sure it is dry (i.e. no condensation on the media) and solid.
  2. Dilute the X-gal stock 1 to 1 with sterile water.
  3. Pipette 50μL of this dilution onto the plate (If your plate has condensation on it skip the dilution and pipette 25μL of X-gal stock.
  4. Evenly distribute the solution onto the plate using a spreader.
  5. Let plate dry for 30mins at 37°C.

Agar Overlay

  • This method is used if: your media has a non-neutral pH, you forgot to do one of the other two protocols, or some undergrad in your lab mislabeled the plates.
  • Color should appear on fully developed colonies in 2-8 hours.
  1. Microwave 10ml of water with 0.15g agar for each plate to be screened (e.g. for 10 plates it’s 100ml water and 1.5g agar).
  2. Let the molten agar cool in a 60°C water bath.
  3. Add 2μL X-gal stock for each mL of molten agar (e.g. 200μL for 10 plates).
  4. Pour 10 ml over each plate to be assayed.
  5. Let solidify
  6. Incubate plates in a dark place