Friday, April 4, 2025
Home Blog Page 7

NuPAGE electrophoresis/Hybrid staining-PDF

Overview

A fast protocol for visualizing bands on a polyacrylamide gel via coomassie-like staining.

Materials

  • Deionized water
  • Invitrogen SimplyBlue SafeStain
  • Microwave
  • Plastic tray
    • Use the lid of a 1000μL pipette tip box.
  • Orbital shaker
  • Kimwipes

Procedure

  1. Add 100mL deionized water to the staining tray.
  2. Microwave staining tray loosely covered for 30 secs on high.
  3. Shake the staining tray for 1 min on an orbital shaker at room temperature.
  4. Discard water.
  5. Repeat steps 1-4 two more times.
  6. Add 20mL SimplyBlue SafeStain (enough to just cover the gel).
  7. Microwave staining tray loosely covered for 20 secs on high.
  8. Shake the staining tray for 5 mins on an orbital shaker at room temperature.
    • You should now be able to see most of the bands on the gel.
  9. Place the staining tray with gel inside a ziploc bag to limit evaporation.
  10. Incubate overnight on an orbital shaker at room temperature.
    • Overnight incubation will yield better sensitivity due to darker staining.
  11. Discard SimplyBlue SafeStain.
  12. Add 100mL deionized water.
  13. Add 2 kimwipes.
  14. Shake the staining tray for 2-3 hours on an orbital shaker at room temperature.
  15. Take a gel picture.
  16. Add 20mL 20% NaCl for at least 5 mins.
    • Only do this step if you aren’t planning on drying the gel! Otherwise, when the gel dries, you will see a white salt precipitate.
  17. Gel can be stored in a salt solution for several weeks.

NuPAGE electrophoresis/Gel drying-PDF

Overview

A procedure for drying and preserving a polyacrylamide gel.

Materials

  • Gel drying solution
    • 20% ethanol
    • 10% glycerol
  • Gel drying frames from Diversified Biotech
  • Cellophane sheets from Diversified Biotech

Procedure

  1. Equilibrate gel in gel drying solution for at least 30 mins.
    • Reduces gel swelling and results in a more flexible dried gel.
  2. Place two cellophane sheets in water for 1-2 mins.
    • Cellophane may appear cloudy but will clear upon drying.
  3. Lay one sheet of cellophane on solid back plate, beveled edge down. Avoid air bubbles.
  4. Place gel on cellophane. Avoid air bubbles.
    • Air bubbles can cause cracking.
  5. Pipet 1-2 mLs of gel drying solution on top of gel.
  6. Layer a second wet sheet of cellophane on top of gel. Match edges with edges of back plate. Roll cellophane from bottom of gel towards the wells helps avoid air bubbles.
  7. Place open frame over stack, bevelled edge up. Match edges of back plate. Frame should cover all edges of cellophane.
  8. Attach plastic clips to all four sides.
  9. Leave assembly to dry horizontally for at least 2 days.
  10. Remove clips and pry apart assembly.
  11. Peel dried gel/cellophane sandwich from back plate.
  12. Trim off excess cellophane immediately to avoid curling.

Western Blot Optimization-PDF

Tubulin loading control Western blot is an important control experiment to know your reagents and protocol are in line and that equal protein amounts are loaded in each lane
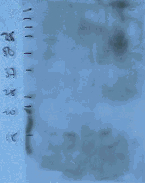
No signal on a prolonged exposure could be an issue with either the primary antibody OR protein expression level
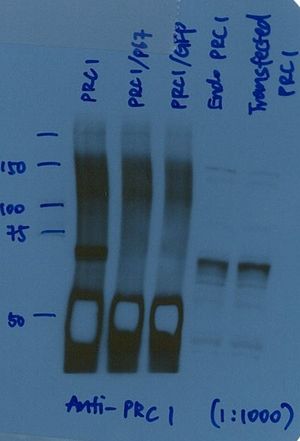
Excessive signal from heavy chain IP/WB @50 kD produces ‘reverse banding’

Time and labor at the bench is extremely valuable. Below is a guide to interpret western blotting experiences in a purposeful way so that each experiment will make a difference. Watch out for futile cycling in work flow and focus energy in a meaningful way.

There is an increasing number of available commercial antibodies from several vendors. Depending the vendor, the level of quality control is highly variable and this leaves a responsibility to optimize protocols in an efficient manner. Because every antibody is different, each one requires a different blocking/incubation buffer in order to optimize the signal:noise ratio.

There are common themes in the types of incubation buffers that tend to work well for blocking and incubation.

Commercial antibodies have a wide range of specificity and sensitivity for the protein of interest. Efficient blocking of the primary and secondary antibodies can take place in a variety of different blocking agents that contain soluble proteins and non-ionic detergent. When developing a new antibody by western blot, it is important to test different blocking/incubation buffers for the best possible signal:noise ratio in the assay. No single blocking agent is ideal for every primary antibody, since each antibody-antigen pair has unique binding characteristics.

Molecular weight vs. actual protein migration

Western blotting is a technique that separates proteins based on size. In general, the smaller the protein, the faster it migrates through the gel. However, migration is also affected by other factors, so the actual band size observed may differ from that predicted. Common factors include:

1. Post-translational modification – e.g. phosphorylation, glycosylation etc, which increases the size of the protein

2. Post-translation cleavage – e.g. many proteins are synthesized as pro-proteins and then cleaved to give the active form, e.g. pro-caspases

3. Splice variants – alternative splicing may create different sized proteins produced from the same gene

4. Relative charge – the composition of amino acids (charged vs non-charged)

5. Multimers – e.g. dimerization of a protein. This is usually prevented in reducing conditions, although strong interactions can result in the appearance of higher bands

Always run a + control and Secondary control

  • Running a + control is helpful in all situations where the banding profile for a given gene may have variation between cell/tissue types. Running the + control will determine if your system protein levels are in question vs. antibody titer/quality.
  • Running a secondary control in parallel will ensure that any artifact bands are clearly understood be.

The importance of the blocking/antibody incubation buffer

PVDF or nitrocellulose membrane has the ability to bind protein of all sorts. Since both the antibodies and the transferred lysate/extract are proteins, steps must be taken to optimze interactions between the membrane and the antibody used for detection of the target protein.

Blocking of non-specific binding is achieved by placing the membrane in a dilute solution of protein containing a low percentage of detergent such as Tween-20. The protein in the dilute solution attaches to the membrane in all places where the target proteins have not attached from the gel transfer to the membrane.

When the primary antibody is added, there is no room on the membrane for it to attach other than on the binding sites of the specific target protein. This reduces “noise” in the final product of the Western blot, leading to clearer results.

Band appearance/aesthetics
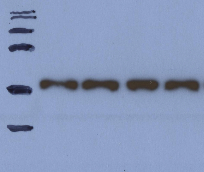
Dumbbell shaped bands are an indication of a hot run

Smile effect of the bands/Dumbbell shaped bands

1. Migration was too fast.

2. Migration was too hot (changing the pH and altering the migration). Slow down the migration or run the gel in the cold room or on ice.

Uneven band size in lanes probed for the same protein

Gel has set too quickly while casting and the acrylamide percentage is not even along the lanes. Review the recipe of the gel and the addition of TEMED to the gels, add a little 0.1% SDS in water to the top of the migrating gel while it sets to stop it from drying.

Molecular weight disparity
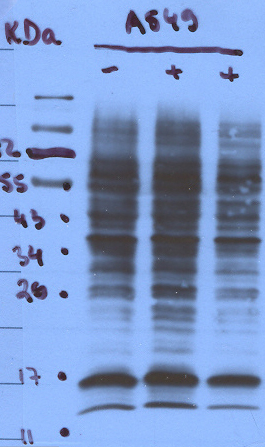
Laddering effects in a western blot may suggest that primary specificity is low and/or the antibody is overly sensitive

Always review protein molecular weight details in the primary literature through PubMed for the most informed perspective on your result. Below are possibilities to explain the infinite nuances of protein behavior in SDS-PAGE.

Post-translation modification

  • phosphorylation: Tyrosine, Serine, Threonine phosphoryl additions are common.
  • glycosylation: Carbohydrate additions due to ER/Golgi processing can increase the weight of the protein.
  • cleavage: pro-proteins undergo cleavage to render the active form.

mRNA splice variation

  • Alternative splicing of exons can create different sized proteins from the same gene. Depending on cell type, differentiation state, & tissue type, the transcript splicing can and will influence structure and function for certain genes.

Intrinsic structure

  • Relative charge: The composition of amino acids (charged vs non-charged).
  • Multimers: Modular proteins or proteins than can form multimeric complex can influence the observable weight. This is usually prevented in reducing conditions through the use of DTT, 2-Mercaptoethanol, or TCEP. However, strong interactions can result in the appearance of higher bands.

Black spots on film
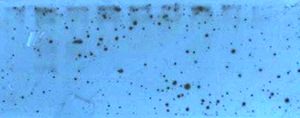
Spotted film below the 140kDa Collagen Type I (COL1A1) precursor band

  • Primary and/or secondary antibody aggregation in solution will cause the film exposure to appear speckled; either primary or secondary antibody. Antibodies may be sticking to the blocking agent.

Microfuge precipitate

  • First approach would be to microfuge the primary and secondary at 14,000xG for 15 minutes at 4C.
  • 0.2 micron filter sterilize the antibodies into a fresh sterile tube and relabel the tube.
  • 0.45 uM filter the blocking agent.


  • Proposing to do 14,000xG for 15 minutes at 4C then 0.2um filter supernatant back into the vial.

Remove air bubbles

  • use a pasteur pipette as a roller. roll the membrane and gel in the submersed transfer buffer before transfer to remove bubbles. keep membrane and materials wet.
  • keep film clean before adding to the developer

Concentration of antigen
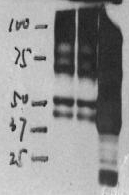
Over abundance of antigen and/or too much primary antibody

The resolution of SDS-PAGE is limited to 50-100 bands. If the relative concentration of the antigen of interest is too low (less than 0.2% of total protein), it may be difficult to detect (for instance, synaptobrevin/VAMP comigrates with histones in cell homogenates which interfere with its detection). Signal enhancement may then lead to the appearance of artificial bands. Enrichment of the antigen by fractionation or by immunoprecipitation should be considered.

On the other hand, too much abundance of antigen or too much primary antibody may yield an overly robust signal.

Excess signal; multiple bands/too much banding
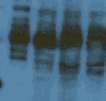
Extraneous banding may represent glycosylation or phosphorylation of the major band

Theoretical prediction is a primary antibody toward a single gene product should produce a single band. While this is common and in some cases to be expected, there are legitimate exceptions to the rule and other factors may be responsible. For example:

Factors that can produce multiple bands of variable molecular weight

  • transcript variation
  • multiple start/stop sights
  • signal-dependent protein processing/shuttling (ie secretion)
  • cell type/differentiation state specific variation
  • endoplasmic reticulum and golgi-dependent alternative cofactor additions

Smearing effect for the band of interest

  • post-translational modifications including glycosylation, nitrosylation, phosphorylation, methylation, acetylation, ubiquitination,
  • ubiquitin-dependent protein degradation

Re-applying ECL reagent

The HRP (horseradish peroxidase) is an enzyme that oxidizes the ECL/luminol (contains HRP substrate + enhancing chemicals (modified phenols)). This oxidation reaction with chemiluminescent substrates produces light. The HRP enzyme can remain active as long as it is kept 4C in 1X TBS buffer, no azide. The moment you expose your blot with the HRP-conjugated antibody to the ECL, the substrate begins to be used up but it doesn’t destroy the HRP enzyme.

If banding signal is excessive:

  • Place membrane in 1XTBS overnight at 4C. The following day, simply re run the ECL step.
  • Blots can be kept in 1X TBS for a 2-3 days 4C. If the signal is too weak, reprobe with the secondary antibody or protein A-HRP, then add ECL reagent.

Excess signal; dark exposure
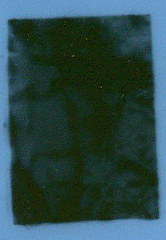
Adjust blocking, 1ary, 2ary diluent all to 5% milk TTBS, and perform 10 shake rinses after the 2ary incubation to resolve overexposure of film
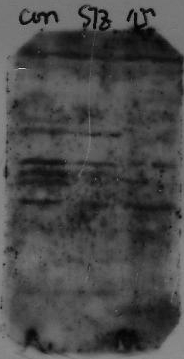
Adjust blocking, 1ary, 2ary diluent to 5% milk TTBS, titration of the primary, further washing after 2ary incubation, and adjusting exposure time can improve the signal:noise

How do I decrease the background on my blot?

The leading cause of excess background is cross-reactivity between blocking agent and primary or secondary antibody: this will result in an overall membrane staining. The best blocking/incubation buffer for your immunoassay is the one that gives you the most clean bands with minimal background noise.

Concentration of antibody may be too high or incubation time too long. Also, several short washing steps are better than one long one.

Additional considerations;

The primary antibody you purchased may be too sensitive for specific detection of the target protein. Contact the vendor and explain your results. Value your time and notify the vendor of your observations. Common feedback may include;

1. Further dilute out your HRP or AP conjugated secondary antibody.

2. Instead of primary antibody incubation overnight, try 2 hours at room temp.

3. Instead of 2 hours at room temp, try 1 hour are room remp or 1 hour at 37C.

4. Perform more wash steps between incubation steps. Try 5 shake rinses followed by 4 x5min washes in 1X TTBS. Several short washing steps are better than one long one.

5. Load less protein onto the gel;

whole cell lysate or tissue extract: 20-50 micrograms subcellular fractions (ie nuclear or cytosol extracts): 10-30 micrograms purified proteins (ie recombinant or eukaryotic expression): 5-50 nanograms

  • Blocking of non-specific binding might be absent or insufficient. Increase the blocking incubation period and consider changing blocking agent. *The primary antibody concentration may be too high. Titrate the antibody to the optimal concentration, incubate for longer but in more dilute antibody (a slow but targeted binding is best).
  • Incubation temperature may be too high. Incubate blot at 4°C.
  • The secondary antibody may be binding non-specifically or reacting with the blocking reagent. Run a secondary control without primary antibody.
  • Cross-reaction between blocking agent and primary or secondary. Add a mild detergent such as Tween20 to the incubation and washing buffer.
  • Antibody detects the casein present in the milk. Use BSA as a blocking reagent instead of milk.
  • Washing of unbound antibodies may be insufficient. Increase the number of washes.
  • Your choice of membrane may give high background. Nitrocellulose membrane is considered to give less background than PVDF.
  • The membrane has dried out. Care should be taken to prevent the membrane from drying out during incubation.

Ghost bands (reverse/white banding)

Ghost bands

Insufficient blocking

Ghost banding is the negative image of the proteins that have been transferred to the membrane.

Visualize in your mind; A 15 lane gel that has been run out and coommassie stained. Every lane will have a laddering appearance. Now imagine this same laddering band pattern being transferred to a PVDF or nitrocellulose membrane. The transfer of the proteins from the gel onto the surface of the membrane creates a protein fingerprint on the membrane. Blocking the membrane is an attempt to cover all other unbound sights.

Ghost banding occurs when there is residual background noise around where the protein fingerprint is present. This event suggests;

1. There is no detectable level of the target protein in the samples

2. The primary antibody is not recognizing the target protein

Excessive signal generated

Reduce the primary/secondary antibody dilution and lower the protein loading amount; Dilute HRP-conjugate at least 10-fold. High levels of specific antibody and an overabundance of protein can cause intense localized signals (typically a single band). Rapid and complete quenching of the substrate will produce no signal. Since there is no light production after the completion of the reaction, white bands are the result when exposed to film.

No signal

Actin or GAPDH control Western blot is an important control experiment to know your reagents and protocol are in line

  • Run an antibody control: parallel Actin or GAPDH positive control western blot that corresponds to the same host species as your experimental primary antibody will conclusively indicate if the issue relates to your protocol on some level OR an issue with the primary antibody/protein expression level. This also validates that your secondary antibody is functional.
  • Run a positive control: Running a sample that is known to express your protein of interest will conclusively indicate if the issue relates to the primary antibody.
  • Antigen is not recognized by primary antibody & this can occur especially with monoclonal antibodies that were raised against a native protein. In some cases, a non-reducing gel system may need to be used. Otherwise contact the vendor technial service.

1. Reagent omitted or improperly prepared. A simple fix yet this becomes more and more rare with experience. Review the protocol.

2. Protein did not transfer from gel to membrane. Try a Ponceau S stain of the membrane to see if there are bands on the membrane.

3. Specificity of HRP secondary antibody not appropriate for primary antibody.

4. Correct orientation of membrane not maintained throughout procedure.

5. Presence of azide in buffer, inhibiting peroxidase activity. Horseradish peroxidase labeled antibodies should not be used in conjunction with sodium azide. A change in the blocking agent or incubation solution will solve this problem.

6. Detergent is too harsh: SDS, Nonidet P-40, and Triton X-100 disrupt binding between proteins. 0.01-0.05% Tween-20 is the most commonly used and recommended detergent for washing and incubation solutions.

Proteolytic breakdown of the antigen

If additional smear/ladder type banding is of lower apparent molecular mass than the full-length protein, then proteases may be active. The addition of fresh protease inhibitors such as PMSF, pepstatin or leupeptin can resolve this. Proteases can mediate degradation when samples are stored for prolonged time or samples are fractionated from starting cell or tissue preps.

Weak signal/poorly defined signal
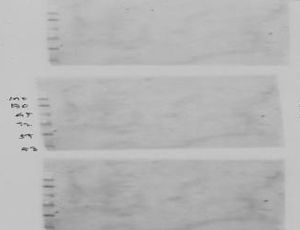
Mulitple blank blots for different antibodies suggests there is a need to load positive controls in order to address sample loading amount and sample quality

First and foremost, the primary antibody may have low affinity for target protein. Antibody affinity may also change after denaturation of a cell/tissue sample with SDS.

1. Low antibody concentration. Increase the primary dilution.

2. Incubation time needs to be extended.

3. Insufficient protein loaded onto gel. Load more protein.

5. Exposure of film too brief. Try multiple exposures extending from 1 minute all the way to overnight.

6. Bald Spots: bubbles between gel and membrane: bubbles create points of high resistance that lead to low transfer efficiency, be sure to remove bubbles completely when putting together the transfer sandwich.

7. Incomplete Transfer.

One of several technical errors can be the source of incomplete transfer

  • Proteins not completely eluted out of gel: this often occurs with high molecular weight proteins, especially when using a transfer buffer containing methanol. One way to overcome this phenomenon is by using nitrocellulose, which does not require methanol in the transfer buffer. Adding SDS to the transfer buffer as well as using higher field strengths also improves protein elution.
  • Proteins have transferred through membrane: this may occur when working with proteins of very low molecular weight. Optimizing/shortening transfer times and using a double layer of membrane usually enables retention of small proteins.
  • Inappropriate transfer buffer used: the most stable and commonly used buffers are Tris-Glycine based and contain methanol.
  • Impurities in the transfer buffer: this will lead to a pattern on the membrane that mirrors the holes in the transfer cassette. Fresh buffer should be prepared prior to each transfer process.

Protocols/p11 resin preparation-PDF

Overview

Preparation of Whatmann P11 Phosphocellulose resin for cation exchange chromatography.

Phosphocellulose remains a useful and cheap cation exchange resin and is particularly good for the final stages of purification of DNA-binding proteins. The preparation of the resin for optimum performance is somewhat tedious but carefull attention to detail will yield a higher performance column with lower back pressure.

Materials

  • Whatmann P11 Phosphocelluose resin
  • Purified water
  • 0.2 M NaOH
  • 0.2 M HCl
  • Storage buffer (Tris-HCl pH 7.6 is a common choice)

Procedure

  1. Weigh out approximately as many grams of resin as millilitres of the column will be required into a large container with at least 20-fold larger volume
  2. Suspend the resin in at least 20 volumes of water and allow it to settle for at least 30 minutes
    1. Pour off supernatant, resuspend, and repeat at least 8-10 times.
      • This may appear pointless but it is crucial for getting rid of fine particles that will increase back pressure and reduce column performance.
  3. Suspend the resin in 0.2 M NaOH, and allow it to settle for at least 30 minutes.
    1. Pour off supernatant and repeat until the pH of the supernatant is higher than 10
  4. Suspend resin in water, allow to settle, pour off supernatant, and repeat until pH is seven or lower
  5. Suspend resin in 0.2 M HCl, allow to settle, pour off supernatant, and repeat until pH is three or lower
  6. Suspend resin in storage buffer, allow to settle, pour of supernatant, and repeat until pH is that of buffer
    • Try to leave the resin at least once overnight in the buffer at some point in this step
  7. Suspend resin and pour carefully into the column housing
  8. If resin is to be stored, consider adding 0.2% sodium azide
  9. Try to replace the buffer regularly as ammonia can be released from amine-containing buffers

Antibody Elution Buffers-PDF

Elution Buffers

Elution buffers for noncovalent purification.

  • 100mM Glycine, pH2.5 (acidic pH)
  • 1M Triethanolamine; TEA (basic pH)
  • 4M MgCl2 (high salt)
  • 1M NaCl/PBS (high salt)

High salt concentration or extreme pH disrupt hydrostatic (antibody-protein) binding. Optimal elution parameters should be determined experimentally.

Antibody Solution Carrier Protein Removal

Removing BSA, gelatin, or any other stabilizer protein from antibody stock solutions is a necessary precursor to performing primary amine-based chemical labeling and conjugation procedures (ie Biotin, Fluorescent dye).

  • Pierceâ„¢ Antibody Clean-up Kit #44600

Reference

Ultimate Immunoprecipitation Guide-PDF

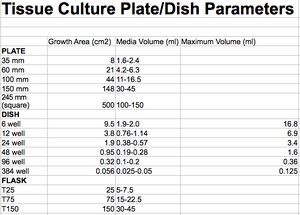
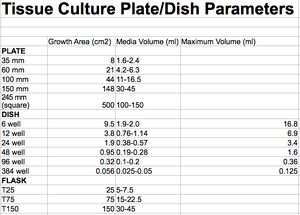
Cell Culture volumetric parameters
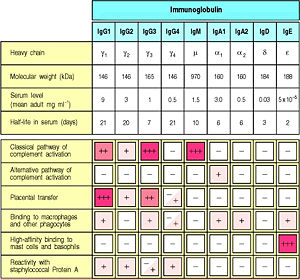
Serum levels of human Ig isotypes
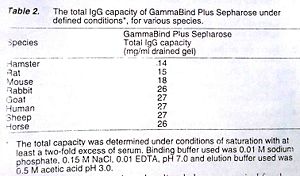
Protein G Binding Capacity
Protein A Binding Capacity

When performing an IP experiment, consider preliminary western blots for the relevant antibodies.

RIPA (Radio ImmunoPreciptation Assay) buffer is a traditional name for an array of recipes. Below are details for optimizing immunoprecipitation experiments. Lysis buffer components (ie detergent composition, salt concentration) influence efficiency. Membrane bound protein, lipid raft, protein scaffold, and protein charge influence yield.

Cell Culture Yields

On the napkin

  • Total cellular protein is lineage dependent (suspension<adherent). 5e6-10e6 cells yield ~1000 ug protein.
  • 2e6 cells ~100ug(suspension) 200ug(adherent) total (RIPA) extracted
  • 4e6 cells ~200ug(suspension) 400ug(adherent) total (RIPA) extracted
  • ~100-300 µg cytoplasmic protein yield = 1e6 cells.
  • ~1ug protein extract / 10,000-20,000 cells.
  • Certain proteins (ie insoluble, modified) may escape/precipitate in classical lysis and purification procedures (ie low or no detegrent(s). Additional methods that can improve enrichment include sonication, cross-linking, and purification under denaturing conditions.
  • Cell Culture Parameters

T75 Flask

  • 1e6 cells ~30%
  • 5e5 cells ~15%

10cm/100mm dish

  • 80% confluent 10 cm dish (10ml culture media volume) / 1e6 cells can yield ~600-1000 ug total protein.

6 well/ 32-35mm

  • 80% confluency (35mm / 3.5cm) of a 6-well plate contains ~8e5 and <1e6 cells / up to 300 µg cytoplasmic protein.
  • 50% confluency (35mm / 3.5cm) of a 6-well plate contains ~5e5 (500K) slow growing cells.
  • 50% confluency (35mm / 3.5cm) of a 6-well plate @ ~2.5e5 (250K) aggressive cells (Hela).
  • (35mm / 3.5cm) of a 6-well plate culture volume @ 2-3ml.

96 well

  • Working volume per well: 50 – 335 μl
  • Optimal subconfluent cell density per well: 8.0e3 (8,000) cells per well.
  • 50,000 adherent cells ~70% confluency per well.
  • 20,000 adherent cells ~40% confluency per well.

Solvents

  • DMSO, EtOH
  • <10%DMSO for in vitro drug assay
  • DMSO Our analysis clearly demonstrated that DMSO cannot be considered biologically inert but induces large alterations in microRNAs (miRNA) and epigenetic landscape, especially in the maturing cardiac model.
  • Optimization replicability (the same analyst re-performs the same experiment multiple times) and reproducibility (different analysts perform the same experiment using different experimental conditions) for cell-based drug screens
  • methanol, ethanol and DMSO Ethanol and methanol are good choices for solvents since they have low toxicity on HepG2, MDA-MB-231, MCF-7 and VNBRCA1 cell lines. However, in the case of agents only dissolvable in DMSO, low concentrations of DMSO from 0.6%-0.015% should be considered.

Common RIPA components

Non-ionic (Zwitterionic) detergents

  • Non-ionic detergents are uncharged, and containing a hydrophilic headgroup. Examples Tween, Triton, Brij. Zwitterionic (containing equal positive/negative-charge functional groups) detergents are net zero charge.

1% Nonidet P-40 or Igepal CA-630 : Non-ionic detergent to extract proteins, form lipid micelles

1% Triton X-100 : Non-ionic detergent to extract proteins, form lipid micelles – to use in place of Nonidet/Igepal

Ionic detergents

  • Ionic detergents contain a head group which is either positively (cationic) or negatively (anionic) charged. Cationic detergents have a positively charged head group / quaternary ammonium group.

0.5% sodium deoxycholate (sodium salt of deoxycholic acid, anionic, bile-acid detergent) : Ionic detergent to extract membrane protein and isolate lipids. Naturally occurring Intestinal bile product deoxycholic acid mediates emulsification and absorption of fats.

0.1% SDS : Ionic detergent to extract membrane protein and isolate lipids. Anionic sodium dodecyl sulfate (SDS) carries a negatively charged sulfate group on a linear C12 hydrocarbon chain.

Physiologic salts and buffering agents

PBS : Salt prevents non-specific protein aggregation

Tris-HCl : Buffering agent prevents protein denaturation

NaCl : Buffering agent prevents protein denaturation

Phosphatase Inhibitors

Phosphorylation/dephosphorylation of proteins influences hydrostatic relationships. Proteins undergo covalent attachment of a phosphoryl group (phosphorylation) at serine, threonine, or tyrosine residues. Phosphate groups are removable via protein phosphatases. During the extraction of phosphorylated proteins from cell and tissue, there are advantages to preserving the phosphorylation states of total protein.

  • (-)-p-Bromotetramisole oxalate
  • Cantharidin
  • Calyculin A
  • Discodermia calyx
  • Imidazole
  • Sodium Fluoride: NaF (Sodium Fluoride) : Serine/Threonine phosphatase Inhibitor; hydrostatic interference of active sights of phosphatases
  • Sodium Molybdate
  • Na3VO4 (Sodium Orthovanadate) : Tyrosine phosphatase Inhibitor; hydrostatic interference of active sights of phosphatases
  • Sodium Tartrate Dihydrate


Chemical Protease Inhibitors

PMSF : Stock Solution 100 mM (100x stock) or 200 mM in Isopropanol; use @ 1 mM. Store PMSF solution up to 6 months @ 4C. phenylmethylsulfonyl fluoride (PMSF) is a serine protease inhibitor binds specifically to the active site serine residue in serine hydrolases.

Protease Inhibitor Cocktails

Tableted formulations containing water-soluble protease inhibitors are user-friendly and effective substitutes in lysis buffers. When using divalent/trivalent columns for enrichment of phosphoproteins, be sure to avoid EDTA/EGTA containing cocktails.

Examples:

  • S8820: Sigma SIGMAFASTâ„¢ Protease Inhibitor Tablets
  • 78429: PIERCE Halt Protease Inhibitor Cocktail (100X)
  • 04693116001: Completeâ„¢ Roche Protease Inhibitor Cocktail Tablets
  • sc-29131: Santa Cruz Biotechnology Inc.,Protease Inhibitor Cocktail Tablet, EDTA-free

Protease Inhibitor components

  • Aprotinin
  • Bestatin
  • Calpain Inhibitor I & II
  • Chymostatin
  • E-64
  • Leupeptin
  • Alfa-2 Macroglobulin
  • Perfabloc SC
  • Pepstatin
  • PMSF
  • TLCK-HCl
  • Trypsin Inhibitor (chicken egg white, soybean)

Conjugation and Affinity Prep Kits

Protein A/G/L Agarose

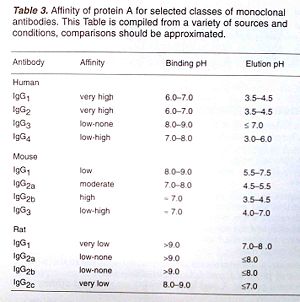
Binding Affinity Guide
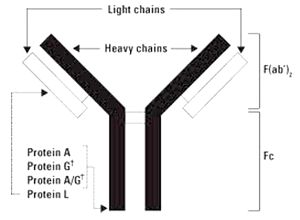
Protein A, G, L binding to IgG

Protein A/G Agaraose

Protein A & Protein G bind to most mammalian immunoglobulins primarily through their Fc regions. Protein L is a kappa light chain specific Ig-binding protein.

Protein A/G/L are common to covalently couple by cyanogen bromide to highly cross-linked 4% agarose beads. This type of matrix is stable in most aqueous buffers.

Specifications

  • Typical Ligand density: ~3 ug Protein/ul of bead
  • Binding capacity: ~15-20 ug Ig/ul bead
  • Bead structure: 4-6% cross-linked agarose
  • Bead diameter: 40-170 um
  • Temperature stability: 4-40 C

Protein A

Native protein A is a single chain (predicted 42 kDa, SDS-PAGE 46 kDa), glycoslyation-free, cell wall component produced in strains of Staphylococcus aureus. Protein A binds specifically to the Fc region of immunoglobulin molecules, including IgG. Protein A has four high-affinity (Ka = 108/mole) binding sites toward Fc region of IgG of several species (two sites can bind at a time). Protein A is heat-stable and retains conformation even after exposure to denaturing reagents such as 4 M urea, 4 M thiocyanate and 6 M guanidine hydrochloride.

Protein G

Native protein G is a bacterial cell wall protein from group G Streptococci that contains two immunoglobulin binding sites, an albumin binding site, and cell surface binding sites. Native Protein G. The recombinant form of Protein G (predicted 17-21 kDa; SDS-PAGE 31-34 kDa) contains only the two immunoglobulin binding sites to reduce nonspecific binding when purifying immunoglobulins.

Protein L

Native protein L is an kappa light chain specific Ig-binding protein that originates from the bacteria Peptostreptococcus magnus. Protein L binds Igs through interactions with the light chains. Because no part of the heavy chain is involved in the binding interaction, Protein L binds a wider range of Ig classes than Protein A or G. Protein L binds to representatives of all classes of Ig, including IgG, IgM, IgA, IgE and IgD. Single chain variable fragments (ScFv) and Fab fragments also bind to Protein L.

In humans and mice, kappa (k) light chains predominate. The remaining immunoglobulins have lambda (l) light chains. Protein L is effective in binding only certain subtypes of kappa light chains. For example, Protein L binds human VkI, VkIII and VkIV subtypes but does not bind the VkII subtype. Binding of mouse immunoglobulins is restricted to those having VkI light chains.

Protein L matrix is suitable for purification of kappa light chain-containing monoclonal antibodies from ascites or culture. Protein L is useful for purification of VLk-containing monoclonal antibodies from culture supernatant because it does not bind bovine immunoglobulins, which can be present in media. Protein L does not interfere with the antigen-binding site of the antibody.

Chicken IgY

Protein L does not react with chicken IgY light chains; PMID 15857176

Protein Quantifcation

BCA Bicinchoninic acid assay

Lowry Assay

RIPA Buffer Recipes

Commercial Lysis Buffer

Add inhibitors fresh at time of use from stock solutions

  • sc-24948, 50 mL – Components supplied in four vials:
  • VIAL 1: 50 mL 1X lysis buffer (pH 7.4 ±0.1) (1x PBS (sc-24946), 1% Nonidet P-40 (sc-280818), 0.5% sodium deoxycholate, 0.1% SDS)
  • VIAL 2: 500 μL (200mM) PMSF in DMSO
  • VIAL 3: 500 μL protease inhibitor cocktail in DMSO
  • VIAL 4: 500 μL (100mM) sodium orthovanadate in water

Lysis Buffer 1:

Lysis buffer for signaling intermediates and soluble/cytosolic factors.

Aprotinin activity is measured by KIU (KIU = Kallikrein Inhibitory Unit) Since the vial contains other components which makes the total dry. I recommend the following procedure to be used with this product: The normal working concentration range for aprotinin is either 0.5ug-2ug/ml (protein weight/volume) or 10 KIU-100 KIU/ml (units/volume). 1ug aprotinin/ml of RIPA buffer works well.

Lysis Buffer 2:

SDS free lysis buffer to consider with Co-IP; IP EGFR effectively.

  • 150 mM NaCl
  • 50 mM Tris-HCl pH 7.4
  • 1% Nonidet P-40
  • 0.25% Sodium Deoxycholate
  • 1 mM EGTA
  • 1mM PMSF
  • Protease inhibitor cocktail
  • 1 mM Na3VO4
  • 1mM NaF

Lysis Buffer 3:

Brij 35 non-ionic detergent, for dissociating membrane complexes; gentler than SDS; for phospho-proteins.

  • 10 mM KPO4 (phosphate buffer)
  • 1 mM EDTA (chelate)
  • 5 mM EGTA (chelate)
  • 10 mM MgCl2 (chelate)
  • 50 mM †-glycerophosphate (inhibits serine-threonine phosphotase activity)
  • 0.5% NP-40 (stabilizer of proteins/enzymes)
  • 0.1% Brij 35 (non-ionic detergent)
  • 0.1% deoxycholic acid (non-ionic, non-denaturing detergent)
  • 1 mM sodium orthovanadate (inhibits tyrosine phosphotase activity)
  • Protease inhibitor cocktail
  1. Roux PP, Richards SA, and Blenis J. Phosphorylation of p90 ribosomal S6 kinase (RSK) regulates extracellular signal-regulated kinase docking and RSK activity. Mol Cell Biol. 2003 Jul;23(14):4796-804. DOI:10.1128/MCB.23.14.4796-4804.2003 | PubMed ID:12832467 | HubMed [Paper1]

Lysis Buffer 4:

RIP-seq

  • 100 mM KCl
  • 5 mM MgCl2
  • 10 mM HEPES-NaOH pH 7.0
  • 1 mM DTT
  • 200 U/ml RNaseln
  • 1x PIC
  • 0.5% NP-40

PMID: 35973723

Lysis Buffer 5:

For IP

  • 50 mM Tris (pH 7.5)
  • 1 mM EDTA, 150 mM NaCl
  • 1% (v/v) Triton X-100
  • 1:100 (1X) Protease Inhibitor
  • 1 mM sodium orthovanadate (inhibits tyrosine phosphotase activity)
  • 1 mM NaF
  • 5 mM MgCl2
  • Benzonase (1U/million cells)

PMID: 35061527

Immunoprecipitation/Co-IP enhancement strategies

Covalent Cross-Linker

Cross linkers represent a shotgun strategy that captures interaction complexes by chemical crosslinking of intracellular proteins prior to cell lysis and immunoprecipitation.

  • DSP (dithiobis(succinimidyl propionate) CAS Number 57757-57-0): Membrane-permeable, Bifunctional protein cross-linker that contains amine-reactive N-hydroxysuccinimide (NHS) esters. NHS esters react with primary amines at pH 7-9 to form covalent amide bonds. NHS-ester crosslinking reagents target primary amines of lysine (K) residues and N-terminus. Lysine residues are generally abundant and accessible on the hydrophilic phase of proteins, and cross-link with high efficiency.
  • Use fresh tissue culture-grade DMSO when using a crosslinker on living cells as unsealed/opened DMSO absorbs atmospheric water, and will pre-react with the cross-linker

Detergent % Optimization

Titration of detergent composition with respect to sample type (ie cell lineage, species, tissue type) improves enrichment of lipophilic components, and improves total soluble fraction yield.

  • 0.1%-1% Nonidet P-40 or Igepal CA-630 : Non-ionic detergent to extract proteins, form lipid micelles
  • 0.1%-1% Triton X-100 : Non-ionic detergent to extract proteins, form lipid micelles – to use in place of Nonidet/Igepal
  • 0.1%-1.5% sodium deoxycholate : Ionic detergent to extract membrane protein and isolate lipids
  • 0.05%-0.1% SDS : Ionic detergent to extract membrane protein and isolate lipids

Adherent cell sample preparation

Below is a procedure for adherent cells (ie A431, A549, Hela, NIH3T3)

  • Remove culture medium and rinse a subconfluent, 100 mm cell culture plate (80% confluent plate yields ~600-1000 ug protein total) with PBS at room temperature. The following steps should be performed on ice or at 4° C using fresh, ice cold buffers.

Optional: For monolayer cells, do a trypsin treatment to lift cells off the flasks prior to adding the RIPA buffer, instead of scraping the cells for a more gentle approach. If you are running a time course experiment, this is not feasible since the cells must be arrested and lysed immediately.

  • Add 0.8 ml of ice cold fresh RIPA buffer to the 100 mm cell culture plates OR 0.5 ml per 5 x 10e6 cells/60 mm dish.
  • Gently rock plates for 15 minutes at 4° C or let the plates set on ice. This step will allow the lysis buffer to act on the cells and will increase the total yield of soluble protein. Scrape the adherent cells with a cell scraper and then transfer the scraped lysate into a sterile microcentrifuge tube. Place the tube on ice.

Optional: wash the plate once with 0.2 ml of RIPA buffer and combine with first lysate. When running multiple plates this can be tedious and not necessary if enough attention is given to the initial harvest.

Optional: Add 10 µl of 10 mg/ml PMSF stock to the lysate. If a protease inhibtior cocktail is used fresh with the RIPA buffer, this is not necessary.

  • Sonicate each sample on a 70% duty cycle or less by placing only the very tip of the pin into the vial, then slowly lowering it into the lysate until it foams completely and then stop. Alternatively, pass the lysate through a 21 gauge needle to shear the DNA & incubate 30–60 minutes on ice.
  • Microcentrifuge cell lysates at 12,000xg for 15 minutes at 4°C.
  • The supernatant fluid is the total cell lysate. Transfer the supernatant to a new microfuge tube and discard the pellet. Quantitate the protein amount by Bradford or BCA.

Suspension cell sample preparation

  • Collect approximately 2.0 x 10⁷ cells by low-speed centrifugation (e.g. 200xg) at room temperature for 5 minutes. Carefully remove culture medium.
  • Wash the pellet with PBS at room temperature, and again collect by low-speed centrifugation. Carefully remove supernatant.
  • Add 1.0 ml of ice cold RIPA buffer with freshly added (Protease Inhibitors) and/or (Phosphatase Inhibitors). Gently resuspend cells in RIPA buffer with a pipet and incubate on ice for 30 minutes.
  • Further disrupt and homogenize cells by hydrodynamic shearing (21-gauge needle), dounce homogenization or sonication, taking care not to raise the temperature of the lysate. (Optional: Add 10 µl of 10 mg/ml PMSF stock; sc-3597) Incubate 30 minutes on ice.
  • Transfer to microcentrifuge tube(s) and centrifuge at 12,000xg for 15 minutes at 4° C. The supernatant fluid is the total cell lysate. Transfer the supernatant to a new microfuge tube. This is your whole cell lysate. For increased protein recovery, resuspend the pellet in a small volume of RIPA, centrifuge and combine supernantants.
  • The supernatant fluid is the total cell lysate. Transfer the supernatant to a new microfuge tube and discard the pellet. Quantitate the protein amount by Bradford or BCA.

Tissue extract sample preparation

There are a few approaches to optimizing protein yield from whole tissue extract. For whole animal studies, arresting the covalent modification state of the entire proteome is essential to obtaining accurate data about the treatment or phenotype effect on the tissue being extracted.

1) Immediately liquid nitrogen flash freeze tissue/organ then stored at -80 C

2) Immediately heat denature the organ from the sacrificed animal by microwave in a sealed container

  • Weigh tissue and dice into very small pieces using a clean razor blade. Frozen tissue should be sliced very thinly and thawed in RIPA buffer containing (Protease Inhibitors) and/or (Phosphatase Inhibitors). Use 3 ml of ice cold RIPA buffer per gram of tissue.
  • Further disrupt and homogenize tissue with a dounce homogenizer or a sonicator, maintaining temperature at 4° C throughout all procedures. (Optional: Add 30 µl of 10 mg/ml PMSF (sc-3597) stock per gram of tissue.) Incubate on ice for 30 minutes.
  • Transfer to microcentrifuge tubes, centrifuge at 10,000xg for 10 minutes at 4° C. Remove supernatant and centrifuge again. The supernatant fluid is the total cell lysate. A longer centrifugation may be necessary to obtain a clear lysate.
  • The supernatant fluid is the total cell lysate. Transfer the supernatant to a new microfuge tube and discard the pellet. Quantitate the protein amount by Bradford or BCA.

Immunoprecipitation Procedure

I) Incubate cell lysate (500-1000 ug) with (2-5 µg) primary antibody (optimal antibody concentration should be determined by titration) for 2 hours at 4°C.

II) Add 20 µl of appropriate agarose conjugate suspension (Protein A-Agarose, Protein G-Agarose, Protein A/G-Agarose or Protein L-Agarose).

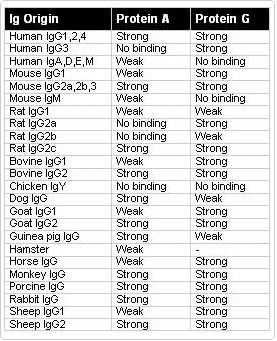
Protein A-Agarose : specific binding to mouse IgG2a, IgG2b and IgA, rabbit polyclonal Abs, human IgG1, IgG2 and IgG4

Protein G-Agarose : specific binding to mouse IgG1, IgG2a, IgG2b, IgG3, rat IgG1, IgG2a, IgG2b and IgG2c, rabbit and goat polyclonal Abs, human IgG1, IgG2, IgG3 and IgG4

Protein L-Agarose : specific binding to mouse, rat and human IgG, mouse and human IgM, IgE and IgA proteins and scFv and Fab fragments

What is Protein G PLUS? Protein G PLUS is a genetically engineered form of streptococcal Protein G that has an increased capacity and has had the albumin binding site removed to reduce background.

III) Cap tubes and incubate at 4 C on a rocker platform or rotating device for 2 hour to overnight.

IV) Collect pellet by centrifugation at 2,500 rpm (approximately 1,000xg) for 5-10 seconds. A touch spin will work. With enough samples, gravity will pellet the beads as well.

V) Carefully aspirate and discard supernatant. The trick here is to slowly aspirate with the needle touching just the top of the liquid and slowly draw down so that the needle is pulling at the surface tension of the supernatant. This will ensure no loss of beads.

VI) Wash pellet 3 times with either RIPA buffer (more stringent) or PBS (less stringent), each time repeating centrifugation step above.

VII) After final wash, aspirate and resuspend pellet in 40 µl of 2x electrophoresis sample buffer. Or elute proteins with an appropriate antibody elution buffer.

VIII) Boil samples for 2 minutes. Load sample.

Related Recipes

Electrophoresis sample buffer (2x): Mix 1.0 ml glycerol, 0.5 ml 2-mercaptoethanol, 3.0 ml 10% SDS, 1.25 ml 1.0 M Tris-HCl, pH 6.7, and 1–2 mg bromophenol blue. Store frozen in small aliquots. Alternatively, make buffer without 2 -mercaptoethanol and store at room temperature. Add 2-mercatoethanol just before using.

Sample buffer formulation:

  • 7 ml Tris·Cl/SDS, pH 6.8
  • 3.0 ml glycerol (30% final)
  • 1 g SDS (10% final)
  • 0.93 g DTT (0.6 M final)
  • 1.2 mg bromphenol blue (0.012% final)
  • Add H2O to 10 ml
  • Store in 0.5-ml aliquots at -70°C

Latex Agglutination Assay

The latex agglutination assay is a laboratory method to check for presence of antibodies or antigens in bodily fluids;saliva, urine, cerebrospinal fluid, or blood. The test depends on what type of sample is needed.

Samples are sent to a lab, where it is mixed with latex beads coated with the specific antibody or antigen. If a affinity reactive substance is present, the latex beads will clump together (agglutinate).

For example, a child has strep throat, a throat swab is taken. The sample is mixed with latex beads that are coated with antibodies against the bacteria. The bacteria in the sample will react with the antibodies on the latex particles causing clumping (agglutination).

Latex agglutination results take about 15 minutes to an hour.

Latex Agglutination Assay

Reference

Membrane Stripping and Reprobing-PDF

Tris/2-Me/SDS

The key to a successful stripping and reprobing is to rinse the membrane until there is no beta-mercaptoethanol odor present. This will require several initial shake rinses into a proper waste storage container, followed by rinsing under milli-q water for a few minutes at a sink, then a few more rinses in TBS or PBS. Check for the odor and when it is gone, the membrane is ready.

Recipe

  • 62.5 mM Tris-HCl, pH 6.7,
  • 100 mM beta-mercaptoethanol
  • 2% SDS

Procedure

I) Submerge the membrane in stripping buffer: Incubate at 50°C for 30 minutes with occasional shaking. If more stringent conditions are needed, this incubate at 70°C.

IIa) Rinse the membrane under running water tap for 1-2 hours.

IIb) Wash the membrane twice for 10 minutes each, at room temperature, in 1x TBS, 0.05% Tween-20. Use a large volume (10-20 ml) of buffer for each wash.

III) Block the membrane for 1 hour at room temperature, or overnight at 4°C, in 1x TBS, 5% milk, 0.05% Tween-20.

Acidic Glycine

Recipe 1

0.5 L (sterile filter solution and keep at 4°C)

  • 0.2 M Glycine, pH 2.5
  • 0.05% Tween 20

Procedure

I) Rinse blot off with 0.05% Tween 20 in PBS & put blot into a sealable bag cut to slightly bigger size than blot.

II) Add 5 to 10 ml stripping buffer & remove as much air as possible and seal bag.

III) Immerse into 80°C water bath and incubate for 20 min.

IV) Rinse blot several times with 0.05% Tween 20 in PBS & Block for 2 hr-overnight.

Recipe 2

To make 1 Liter

  • 15 g glycine
  • 1 g SDS
  • 10 ml Tween 20
  • Volume up to 800ml dH2O
  • pH to 2.2
  • Volume to 1 L dH2O (<200ml)

Procedure

  • 10cm square tray @ 15ml of stripping buffer.
  • (1st incubation) Incubate at room temperature 5-10 minutes. Discard buffer.
  • (2nd incubation) @ 15ml of fresh stripping buffer. Incubate at room temperature 5-10 minutes. Discard buffer.
  • Wash 2×10 minutes PBS
  • Wash 2×5 minutes TBST
  • Block. Proceed to 1ary incubation

Guanidine hydrochloride (GnHCl)

“We have developed a guanidine hydrochloride-based (GnHCl) stripping solution (6M GnHCl, 0.2% Nonidet P-40 (NP-40), 0.1M β-mercaptoethanol, 20mM Tris-HCl, pH7.5) that can rapidly dissociate antibodies from immunoblots at room temperature without removing significant amounts of the transferred proteins. PMID: 19303392”

  • 6M GnHCl
  • 0.2% Nonidet P-40 (NP-40)
  • 100mM β-mercaptoethanol
  • 20mM Tris-HCl, pH7.5


Procedure

  • 2×30 min washes at room temperature for the Gly-HCl solution
  • Wash 4 times with shaking (3 min each time) with 0.14M NaCl, 10mM Tris-HCl, pH7.2, (TBS) containing 0.05% NP-40 (TBSN) to remove the stripping solution.

Comments

The western blotting procedures are the same for PVDF or nitrocellulose, however the handling of these membranes are different prior to- and during- transfer of proteins from the SDS-PAGE gel to the membrane.

Nitrocellulose exhibits the highest sensitivity with very low backgrounds in all transfers, especially in protein blotting. Unlike PVDF, nitrocellulose wets out naturally, does not require methanol, and will not turn hydrophobic during the transfer process. Nitrocellulose is very easily blocked and does not need the many blocking steps required with PVDF.
Protocols for Western Blotting with PVDF and Nitrocellulose are the same with a few exceptions. PVDF is hydrophobic and therefore should be prewet in methanol before it is used. Wet the membrane in methanol for 15 seconds. Membrane should uniformly change from opaque to semi-transparent. Carefully place the membrane in ultrapure water and soak for 2 minutes. Then carefully place the membrane in transfer buffer and let equilibrate for at least 5 minutes.

Another change to note is that the SDS tolerances are not equivalent for PVDF and Nitrocellulose. The binding of protein to PVDF is much more sensitive to SDS levels. Too much SDS can inhibit the protein’s ability to bind to the PVDF and can, in fact, help proteins already bound to the membrane to slip off. SDS levels should never exceed 0.05% for PVDF.

Isolate Leukocytes from whole blood-PDF

Isolate leukocytes from whole blood

Complement Pathway

1) For each 5 mL of blood, add 45 mL of room temperature 0.17 M Ammonium Chloride solution to lyse red blood cells. The cells will not correctly lyse if the solution is cold.

2) Incubate for 5 minutes on a rotator. Do not exceed 5 minutes or white blood cells begin to lyse.

3) Centrifuge for 5 minutes at 2000 RPM.

4) Aspirate supernatant, resuspend pellet in ~50 mL cold 1x PBS.

5) Centrifuge for 5 minutes at 2000 RPM.

6) Aspirate supernatant.

Cell lysate preparation

1) Add 1.0 ml of ice cold fresh RIPA buffer to the cell pellet

2) Gently pipet several times and let set for 15 minutes at 4° C on ice. This step will allow the lysis buffer to act on the cells and will increase the total yield of soluble protein.

3) Sonicate each sample on a 70% duty cycle or less by placing only the very tip of the pin into the vial, then slowly lowering it into the lysate until it foams completely and then stop. Alternatively, pass the lysate through a 21 gauge needle to shear the DNA & incubate 30–60 minutes on ice.

4) Microcentrifuge cell lysates at 12,000xg for 15 minutes at 4°C. 5) The supernatant fluid is the total cell lysate. Transfer the supernatant to a new microfuge tube and discard the pellet. Quantitate the protein amount by Bradford or BCA.


Bradford protein assay-PDF

<owwmenu font=”arial, helvetica, sans-serif” bold=”1″

       color="White" bgcolor="gray" hovercolor=#FF9933
       bghovercolor="black" topfontsize="7" fontSize="7" pagewidth="750"
       image="Cth.JPG" lab="Fong">
   Home=
   Lab Members=People
   Research=Research
   Internal=Internal, Protocols=Protocols, Chemical Inventory=Inventory
   Links=Links

</owwmenu>

Overview

This protocol is a relatively simple way to quantify total protein based on the Bradford method, in which Coomassie dye undergoes an absorbance shift from red to blue in the presence of protein. It is a subjective assay, dependent on the amino acid content of the sample, so it is important to use controls and to interpret the results carefully. For example, protein can be quantified in units of mg equivalent bovine serum albumin.

This assay is commonly used to monitor cell growth when culturing on insoluble substrates such as cellulose, so it is useful to correlate this data to dry cell weight, optical density (on cellobiose or another soluble substrate), or cell counts. This protocol is therefore divided into two parts: first, the preparation of cell suspensions to remove interfering cellulose and obtain a solution of cellular protein, and second, the actual assay protocol.

Materials

  • 0.9% m/v NaCl
  • 0.2 M NaOH
  • Protein assay dye 1x (BioRad)
  • Clear round-bottom Nalgene centrifuge tubes
  • 2ml microcentrifuge tubes
  • 96 well plate
  • Heating block
  • Centrifuge capable of spinning 10ml samples at 8000g, located in 407
  • Plate reader

Procedure

Preparation of protein solution from cell suspension

  1. Turn on heating block to 100°C. Remove a 10ml sample from the well-mixed cell suspension, and centrifuge it at 8,000g for 15 minutes. Discard supernatant.
  2. Wash pellets with 0.9% m/v NaCl, spin again, and resuspend in 2ml 0.2 M NaOH..
  3. Incubate for 10min in the heating block at 100°C.
  4. After cooling, centrifuge at 8,000g for 15 min. Collect supernatant for Bradford assay.

Protein Assay (Bradford)

  1. In 96 well plate, carefully pipette 100μL protein assay dye 1x (BioRad) in each well.
  2. Add 20μL sample, mix well by pipette.
  3. Incubate at room temperature ~5 min. Read A595.

Coomassi Ethanol stain-PDF

Mix

  • 40 % Ethanol
  • 7 % Acetic Acid
  • 0.1 % w/v Coomassi Brilliant Blue-R
  • double-distilled water

Usage

  1. Stain at room temperature for 1h or until overnight
  2. De-stain for 30 min with Prbbbb: Coomassi Ethanol Destain